If you’re an online gamer, it’s essential that you know the different aspects of your gaming connection.
After all, the last thing you want is a laggy or delayed gaming experience.
The first aspect of an internet connection that online gamers analyze is usually their download speed. The download speed is an important part of the gaming experience (and internet experience in general), and it usually gets all the attention when talking about internet connections.
With that said, the aspect of your internet connection that’s less frequently evaluated is your upload speed.
So is upload speed needed for online gaming, or can that part of your internet connection be ignored?
An internet connection with upload speed is required for all online gaming sessions. If an online gamer has an internet connection with poor upload speed, the session will lag and cause a poor gaming experience.
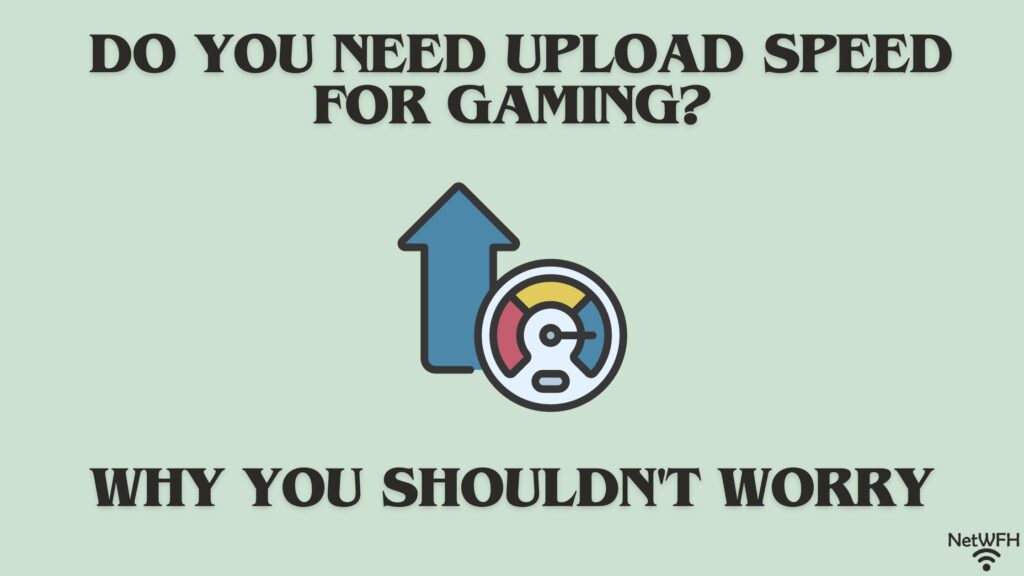
In this post, I’ll explain why upload speed is needed for online gaming. I’ll also discuss why you shouldn’t be worried about the upload speed of your internet connection.
What Is Upload Speed Used for While Gaming?
To start at a high level, it’s essential that you have upload speed when you’re online gaming. To take it one step further, you need upload speed for any functioning internet connection.
The reason for this is due to the nature of internet activity. All internet activity involves data moving in two directions.
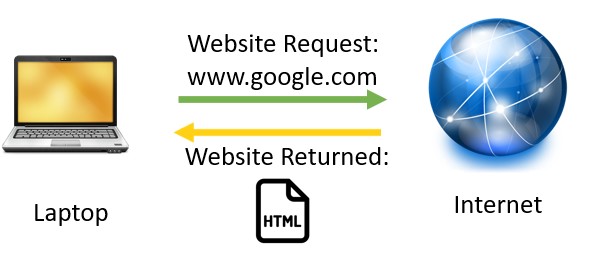
Let’s take a device requesting a web page for example.
When a user types a website URL into the web browser of their device, a request is sent from the device to the internet. Once the requested web page has been retrieved, it’s sent from the internet to the device that requested it.
Requesting a webpage from the internet requires data being sent to the internet, and the requested item being returned to the device
In this interaction, both an upload and download occurs. An upload occurs when the request for a web page is sent from the device to the internet (website request). At the end of the transaction, a download occurs when the web page is returned to the device (website returned).
Regardless of what’s being requested, any request sent to the internet is considered an upload. Online gaming is no exception.
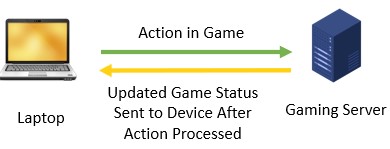
In online gaming, there’s a constant flow of uploads happening. Depending upon the game being played, each mouse movement or keystroke will result in an action in the game. In order for these actions to be registered to the other players that’re in the gaming session, that input needs to be sent to the server that’s hosting the game.
Without breaking a sweat, I’m sure you can think of many actions during a gaming session that will result in an upload to the internet. To name a few, this list includes actions such as:
Any input in the game itself (e.g. moving a character, performing an action in the game, etc.)
Communicating with other players over a microphone
Messaging with other players
Joining or leaving a particular session
All of these actions will require that your internet connection has a certain amount of upload speed. The question is, how much upload speed do you need?
How Much Upload Speed Do You Need for Online Gaming?
Ok, so we’ve established that online gaming involves a lot of upload actions. As a result, you might think that a lot of upload speed is needed to support your gaming sessions.
The good news here is that’s not actually the case.
In fact, the majority of online games say that less than 5 megabits per second (Mbps) of upload speed is required for satisfactory gaming performance. The reason why such a low upload speed is required for online gaming is due to the fact that most of the actions I detailed in the previous section don’t require a lot of bandwidth.
The inputs or actions sent to a gaming server during a gaming session don’t involve large amounts of data. Although these actions are happening constantly, they’re all low-data actions that don’t add up to a large amount of total data being uploaded at a given time.
A key distinction to understand here is that when you’re gaming online, you’re not live streaming your screen to the gaming server. What’s actually happening is you’re sending your inputs to the game that’s hosted on the gaming server on the internet. This gaming server is then sending you the result of that action, where it’s displayed on your screen.
Input from a gamer is sent to the gaming server, and the gaming server provides an updated game status after registering the action
If you were live streaming your gaming session to the public, however, you’d need much more upload speed (at least 10 additional Mbps of upload speed).
How Do I Know if I Have Enough Upload Speed for Online Gaming?
If you’re worried about not having enough upload speed for your online gaming sessions, you shouldn’t be.
The fact is, most internet plans provide more than 5 Mbps of upload speed. Most of the internet plans I’ve seen provide upload speeds of at least 10 Mbps. This should be more than enough to support a good online gaming experience.
If you’d like to find out the maximum upload speed of your internet plan, you may have to do some digging. That’s because the upload speed of a given internet plan isn’t usually widely broadcast. In my case, I can’t even see how much upload speed my internet plan provides by looking at my monthly bill. It only shows the maximum download speed of my plan:
My monthly internet bill only details the maximum download speed of my plan
If your goal is to find out the maximum upload speed of your internet plan, you may have to call you internet provider. Based upon the internet plan you have, they can tell you what your maximum upload speed is.
If your goal is to simply ensure you have more than 5 Mbps of upload speed, you have another option. You can just run a speed test of your internet connection. Just enter “speed test” into your browser search bar, and you’ll be provided with plenty of speed test options to choose from.
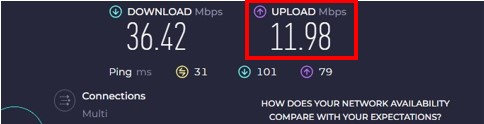
When running a speed test of my internet connection, I saw that I was getting double the upload speed I needed for a good online gaming experience.
A speed test of my internet connection revealed that I was getting close to 12 Mbps of upload speed
The bottom line is, in most cases you shouldn’t have anything to worry about when it comes to upload speed. This is especially true if you have a cable or fiber internet plan. If you have a DSL internet plan, you’ll want to run a speed test to ensure you’re getting at least 5 Mbps of upload speed. DSL internet plans use phone lines to access the internet, and they generally provide slower upload speeds than cable or fiber internet plans.
Wrap Up
When it comes to online gaming, the upload speed of your internet plan shouldn’t be an issue. If you’re experiencing lag or a delayed response while gaming, you should run a speed test of your internet connection first just to make sure your upload speed isn’t limiting your experience. If you’re getting enough upload speed, you should probably evaluate both your download speed and the capabilities of your system/device. Those are the more likely culprits of a poor online gaming experience.
If you have any questions about this information, please leave a comment below.
If this information was helpful to you, here are some other posts that are similar that you should check out:
WiFi and internet are two terms that often get used interchangeably.
The problem with this is that, although they’re related, they actually mean two totally separate things. This often leads to questions about which of the two you need for a wireless internet connection.
So the question is, do you need an internet connection if you’re connected to WiFi?
WiFi and an internet connection are both required to access the internet wirelessly. WiFi simply refers to the networking technology that allows devices to communicate wirelessly. WiFi cannot provide internet access unless an internet plan is also in place.
In this article, I’ll detail the differences between WiFi and an internet connection. I’ll also talk about what it means for your network if you have one and not the other.
Let’s dive in.
Do WiFi and Internet Refer to the Same Thing?
Internet and WiFi are totally independent of each other.
It’s possible to have WiFi without internet.
It’s also possible to have internet without WiFi (although this is less common today).
In situations where internet and WiFi are combined, it allows for wireless internet connectivity. This is the desired state in most networks where there’s confusion about WiFi and internet connections.
Let’s take a closer look at each of these individual components to understand the difference between them.
What Does WiFi Provide?
In order to understand what WiFi provides, it’s important to define exactly what WiFi is.
WiFi stands for Wireless Fidelity. It’s a networking technology that allows electronic devices to communicate with each other wirelessly. This is accomplished through wireless networks that are broadcast by internet routers.
The key here is the association between routers and WiFi.
Any time we’re talking about WiFi, we’re talking about it in the context of a wireless network that’s emitted from a router.
Devices that’re on the same WiFi network are able to communicate with each other over that network. This is what allows you to wirelessly print from your laptop to your wireless printer.
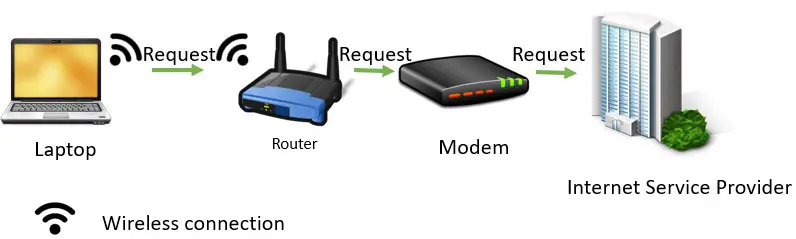
WiFi is also the technology that allows your devices to have wireless connections to the internet.
When devices have a wireless internet connection, they communicate with an internet router over WiFi to transfer data to and from the internet. The router receives requests sent to it over the WiFi network and handles the rest of the communication with the broader internet.
Here’s a visual of the path an internet request takes over a wireless internet connection:
The path of an internet request over a wireless internet connection
The catch here is that a WiFi network can operate independently of an internet connection.
This means that even if there isn’t a connection to the internet, a WiFi network is still broadcast from a router.
This is what allows you to use a router even if you don’t have an internet connection. A router can be used to enable communication between your devices, but your devices just won’t be able to wirelessly access the internet.
The bottom line is that WiFi allows your devices to wirelessly communicate with each other. If you want your devices to be able to wirelessly connect to the internet, you’ll also need an internet connection.
What Does an Internet Connection Provide?
Ok, so if WiFi allows devices to communicate with each other wirelessly, what’s the internet connection do?
To put it simply, an internet connection is the bridge that allows your devices to access the public internet.
Rather than only being able to talk to devices on the same network using WiFi, with an internet connection they’re able to talk to all the devices on the internet.
An active internet connection plays the same role whether WiFi is available or not.
It connects devices to the larger internet.
With that said, an internet connection isn’t as simple as signing up for an internet plan with your local Internet Service Provider (ISP). There are a few different things that need to be in place to get a working internet connection.
The easiest way to think about an active internet connection is to think of it like a library card. If you want access to the books and resources in the library, you need to have a library card.
The same goes for the internet. If you want your devices to be able to access the internet, they need to have an active internet connection.
The Difference Between Internet and WiFi
Now that we’ve broken down both WiFi and internet connections, hopefully you can see the difference between the two.
The best way to think about these two components is that WiFi defines how devices communicate with each other (wirelessly), while internet connections determine what your devices are able to talk to (the public internet).
Combining these two things together provides your devices with the best of both worlds.
What Does WiFi Mean if You Don’t Have an Internet Connection?
So what happens if you have WiFi, but you don’t have an internet connection.
In a scenario like this, it means you have an internet router but no active internet connection. Your router would be broadcasting a WiFi network, but your devices wouldn’t be able to talk to the internet.
This situation would severely limit your home network.
With that said, you wouldn’t be totally handicapped.
If you have WiFi but no internet connection, you’d still be able to:
Print wirelessly
Share files and media on your home network
Play music on wireless speakers (as long as the music is locally saved on your devices)
View the feed of home security cameras (as long as they’re on the same network)
Despite being able to do these things, I have a feeling you’d still be disappointed. This is a tiny fraction of what you can do compared to what you could do with both WiFi and an active internet connection.
But what if you had an internet connection and no WiFi?
Would you still be as disappointed?
What Does It Mean if You Have Internet but No WiFi Connection?
If your home network had an active internet connection but no WiFi, it would be like going back in time.
In a scenario like this, your devices would be able to connect to the internet, but they wouldn’t be able to connect to the internet wirelessly.
If you’ve been on earth long enough (like me), this should make you think about the early days of the internet.
When the internet first came into existence, WiFi didn’t exist.
As a result, any device you connected to the internet had to be physically connected to the internet with a cable.
At the time, people didn’t think anything of it. In today’s world, however, this would be really odd.
That’s because any router made since the early 2000s most likely has WiFi capability.
In this sense, it’s very unlikely that you’ll have internet but no WiFi connection in your home network.
If you did, most of your devices wouldn’t be able to connect to the internet anyway because they only have the ability to connect to the internet over WiFi (phones, some laptops, etc.).
So although it would be quite limiting if this was the situation, it’s extremely unlikely that this is the case in your home network.
Wrap Up
When it comes to providing your devices with a wireless connection to the internet, they need both WiFi and an internet connection.
If you have any questions about this, please leave a comment below. I’d also love to hear from you if for some reason you have a home network with an internet connection and no WiFi.
If you found this information helpful, here are some additional posts I’ve written that you might find useful:
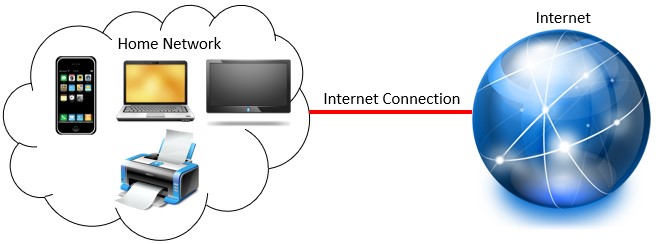
In a world where more home devices than ever before are being connected to the internet, ethernet switches are becoming all the more useful.
The problem is, many people don’t even know what ethernet switches are.
Ethernet switches are physical devices that enable the connection of multiple devices to one ethernet cable. They effectively turn one ethernet cable into multiple wired connections. Ethernet switches are used in situations where additional ethernet ports are needed.
This is especially useful if you have multiple devices that you want to connect to the internet through a wired connection. There are several benefits to using wired internet connections instead of wireless ones, so it’s worth considering if a switch would enhance your network.
This post will provide you with all the information you need to decide if a switch is a good fit for your environment.
What Is an Ethernet Switch?
Before we talk about what a switch can do, let’s discuss what a switch looks like.
A switch is a physical device (i.e. hardware) that is commonly found in home or office networks.
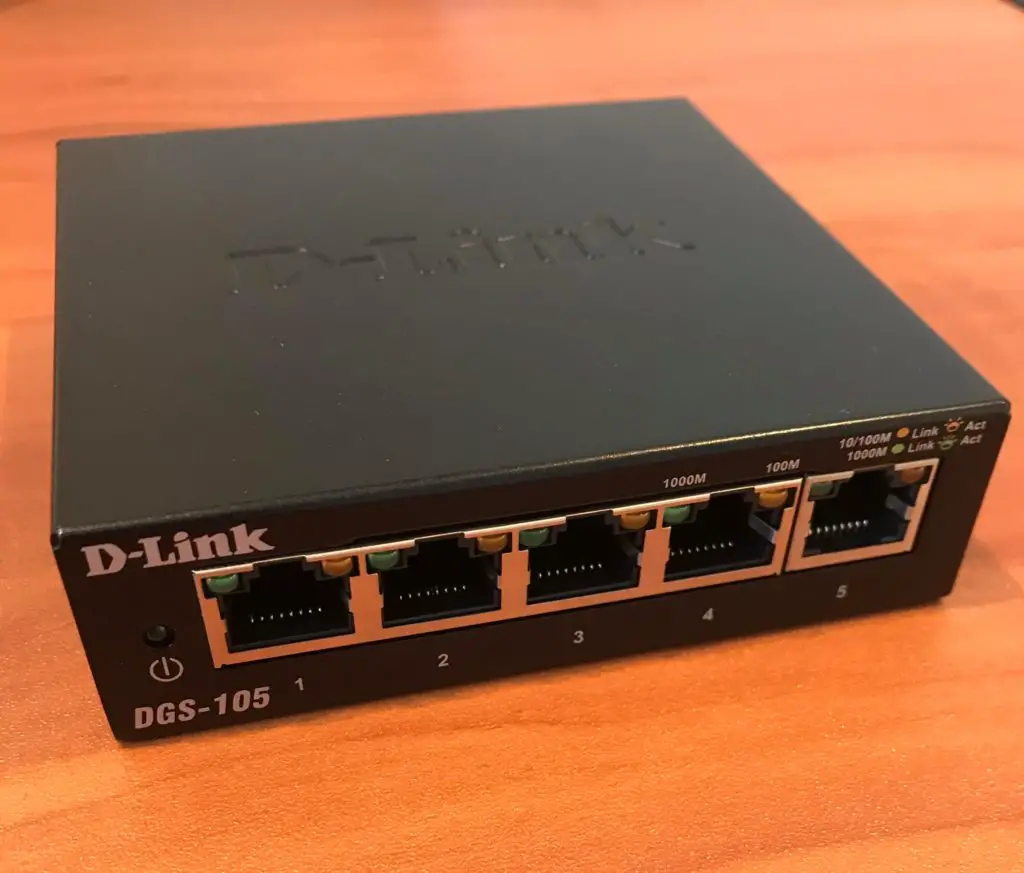
Here’s an example of what an ethernet switch looks like:
Switches have multiple ethernet ports. The switch in the picture above has five ethernet ports (numbered 1-5).
There are two types of ports on a switch: one of the ports will be the uplink port and the rest will be standard ethernet ports.
Let’s look at the difference between these two types of ports.
What Are the Different Ports on an Ethernet Switch?
Uplink Port
The uplink port is theethernet port that connects the switch to the rest of the network. If the devices plugged into the switch need an internet connection, the ethernet cable connected to the uplink port must at some point connect to a router at the other end (either directly or through other switches). Without a connection to a router, the devices won’t be able to communicate with the internet.
If you have a large network with many wired devices or devices that are not located close to each other, you can also use the uplink port to connect the switch to another switch in the network. This allows you to expand your network if you decide to get more wired devices or you have clusters of devices that are far away from each other.
On the other hand, if your devices just need to be connected to each other and not the internet, you don’t have to connect one of the ports on the switch to a router. In doing this your devices will be able to communicate with each other and no one else. It will be a closed network with no internet connectivity.
In other words, you don’t have to use the uplink port if the devices connected to it just need to communicate with each other.
Standard Ethernet Port
Standard ethernet ports are used to connect your home network devices to the switch. As long as your device has an ethernet port, it’ll be able to connect to the switch and become part of the local area network.
Some devices that are often plugged into switches are:
Printers
Desktops/laptops
Network storage devices
Which Port on an Ethernet Switch Is the Uplink Port?
Depending upon the switch you buy, it’ll be easy to determine the uplink port.
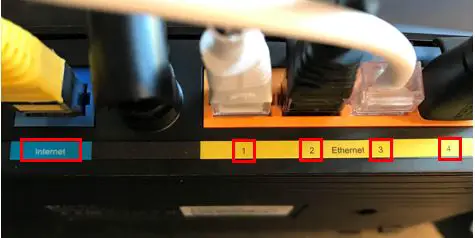
Many switches will have a label indicating which port is the uplink port. A good example of this is your router.
If you take a look at the back of your router, you’ll notice that there are multiple ethernet ports on it. That’s because routers also serve as switches. This allows you to connect several devices to the internet with a wired connection.
In the above router, there are five ethernet port connections. There is one port labeled “Internet” and the other four ports are labeled “Ethernet”.
Can you guess which port is the uplink port?
That’s right, the port labeled “Internet” on a router is the uplink port.
The other four ports in this case are the standard ethernet ports that you can plug your internet devices into.
In the case of the switch pictured above, there’s no port that’s clearly identified as the uplink port.
So which port is the uplink port?
This switch is an example of an unmanaged switch. In this unmanaged switch, you can use any of the ports as the uplink switch. In other words, you could connect a router or another switch into any port on the switch and have it serve as the uplink port. This is possible because newer switches have ports that can automatically sense which one is being used as the uplink port.
We’ll discuss managed switches in more detail in the next section.
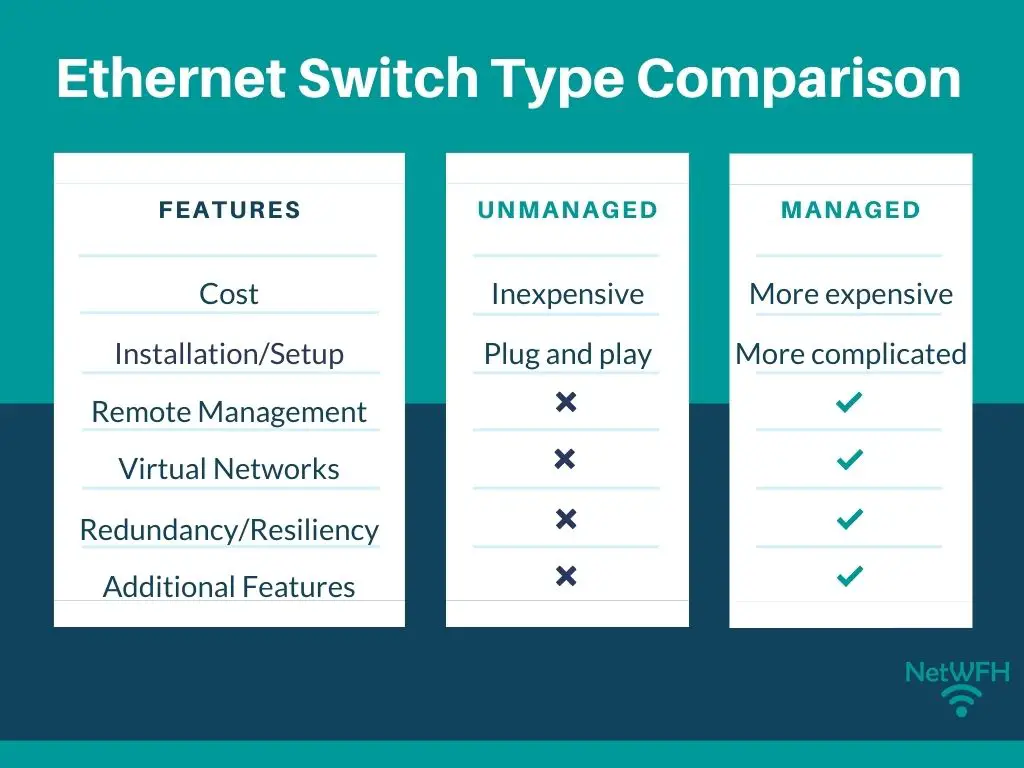
Managed vs. Unmanaged Switches
Switches are divided into two main types: managed and unmanaged. These categories indicate the basic functionality of the switch and their capabilities. Most of the switches you’ll come across in home networks are unmanaged switches. In larger office environments you’re more likely to find managed switches.
Let’s dive into both to see what their major differences are.
Unmanaged Switches
Unmanaged switches are used in many home networks because they:
Are inexpensive
Are easy to install
Don’t require any management/configuration
Are very reliable
These devices require no upfront configuration. Once you take it out of the box you just need to plug in the power cord and it’s ready to go. They are truly plug-and-play devices that even the most non-technical people can install.
Unmanaged switches provide the same experience to each port on the switch and are considered very reliable. With an unmanaged switch you can quickly expand the number of wired devices in your network with very little hassle.
All these factors are reasons why unmanaged switches are preferred in home networks. If you’re thinking about getting a switch for your network, you’ll probably want to go with an unmanaged switch.
Managed Switches
While unmanaged switches are very simple devices, managed switches can be the opposite.
Managed switches are used in many office environments because of how customizable they are. Managed switches:
Are expensive (when compared to unmanaged switches)
Offer robust capabilities like quality of service (QoS), virtual network creation, and others
Are remotely configurable
Allow for network monitoring
Are resilient to network downtime events
Managed switches are highly-technical devices that require a specific skillset to set up and install. In many companies, internal network engineers or third-party vendors will be responsible for the configuration and monitoring of these devices.
I know what you’re thinking: if they’re so difficult to install and maintain, why would you want to use managed network switches?
The reason for this is although they’re very complex, they allow you to do so much more than an unmanaged switch. When you have a lot of traffic on your network, managed switches allow you to optimize this traffic better than unmanaged switches can.
Let’s look at some of the features that managed switches provide.
Quality of Service (QoS)
Quality of Service refers to the ability to prioritize traffic on your network. If you own a company with limited bandwidth, you’ll probably have some network traffic that’s more important than the rest. This includes real-time communication traffic like:
Video conferencing (e.g. Zoom and Skype)
Voice over IP (VoIP)
Streaming video through a browser
With QoS, you can prioritize these activities on your network. Not only can you prioritize network traffic by application, but you can prioritize certain devices or traffic from specific users as well. QoS will ensure your video calls run smoothly at all times, while other activity like transferring files or internet browsing will have a lower priority if the network is congested.
This is a level of configuration that unmanaged switches don’t provide.
As a side note, most newer routers come with QoS capabilities. You won’t have to buy a managed switch to get this benefit on your home network.
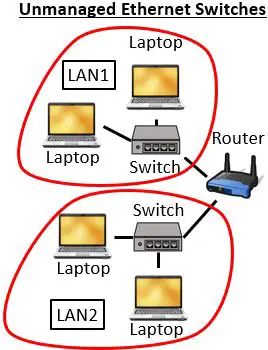
Virtual Local Area Networks (VLANs)
If you have devices on your network that you want to isolate from each other, you can use a VLAN to accomplish this. Rather than separate these devices on different switches, managed switches allow you to isolate devices on the same switch. This is a much faster (and simpler) way to separate your network.
For example, if the human resources department has a system that contained the banking information of all its employees, you can use a VLAN to make sure the system isn’t accessible by any other departments other than the human resources department.
To provide this example visually, if the company used unmanaged switches their network would look like this:
However, using a managed switch the company’s network would look like this:
Hopefully you can see how a network with many segments would get very complicated if unmanaged switches were used.
VLANs are a great benefit to larger offices with many employees because they:
Are simpler than setting up physical LANs
Are easy to manage
Improve security of the network
Give more control over network traffic
In terms of your home network, you can create VLANs without having to buy a managed switch. As I mentioned earlier, most routers come with switch capabilities and allow you to create VLANs.
Remote Configuration
Another benefit of managed switches is the ability to configure them remotely.
You can make changes to managed switches remotely as long as you’re connected to the network the switch is on. In other words, you can change QoS or VLAN settings on the switch without having physical access to it.
Once again, this is very helpful for companies in large buildings with many floors and multiple server rooms. Rather than traveling to the switch to change its configuration, you can do it all from a distance. Better still, if you have a change you’d like to make to multiple switches, you can make changes to groups of switches at a time.
These benefits allow network engineers to respond to network issues very quickly.
Remote Monitoring
Managed switches provide a level of network monitoring that unmanaged switches do not.
With a managed switch, you can gain insights into:
The devices that are connected to the switch
What a top-level view of your network looks like
Statistics about the flow of traffic on your network
Root causes of network issues
Remote monitoring makes it easier for network engineers to manage large, complex networks.
Being able to see what the network looks like and the flow of traffic through it is a huge benefit when troubleshooting network issues. Network engineers can quickly drill down to the root cause of network bottlenecks with managed switches.
On top of that, they can resolve any issues they find from a remote location. This makes the lives of the network users and engineers much easier.
Having a view into the systems connected to the network is useful as well. It makes it much faster and easier to identify if someone is on the network that shouldn’t be. This improves the security of the network.
This level of insight can be overkill on home networks because they’re usually simple networks that don’t contain many wired devices.
Downtime Resilience
Managed switches provide network redundancy that’s not offered by unmanaged switches.
They use several protocol like rapid spanning tree protocol (RSTP) to prevent network downtime events from occurring. Essentially RSTP identifies an efficient path for network traffic to follow. If this path of network traffic is disrupted, it would normally halt traffic and result in network downtime. However, when these events occur RSTP can reroute traffic around the network to avoid the area that experienced the failure.
Pretty cool huh?
This is a big advantage in complex networks with multiple paths or connections between different devices.
Another advantage of RSTP is that it prevents looping. Looping is a situation that occurs if both ends of an ethernet cable are plugged into the same switch. In short, this causes the network to become flooded with traffic until the issue is corrected. Although this is prevented in managed switches, looping can happen on unmanaged switches. For your own sanity, please don’t plug two ends of an ethernet cable into the same switch.
Due to the fact that home networks are pretty simple, there are not usually multiple paths that network traffic can take. In this sense, a managed switch wouldn’t provide the same benefit for a home network as it would for a large, corporate one.
The ability to prevent looping is nice to have, but unless your head is screwed on the wrong way you shouldn’t be plugging both ends of an ethernet cable into an unmanaged switch. This is more likely to happen in large datacenters where there are many devices and wires all over the place. You shouldn’t buy a managed switch for your home network just to prevent looping.
Port Security
On managed switches, you have the ability to turn off individual ethernet ports. This is yet another security benefit of managed switches. By turning off any ports on the switch that aren’t in use, you know that unwanted people are not plugging devices into your network.
Corporate networks are usually so large that it would be difficult to detect a hacker who snuck into the building and plugged a malicious device into a port on one of the switches. By turning on ethernet ports only when they will be used, this can be prevented.
For example, let’s say I was using two ethernet ports on a switch.
Rather than leave the remaining three ports open, I could disable them. That would mean if anyone plugged an ethernet cable into ports 3, 4, or 5 of the above switch it wouldn’t work. I would first need to turn on the port before it could be used to connect to the network.
On home networks port security is usually not a concern, because not many people are interested in sneaking into your house to plug devices into your switch. In addition, you’ll most likely only have one or two switches on your network. It’s very easy to monitor a few switches by physically checking them once in a while.
When to Use a Network Switch
Now that you know all about managed and unmanaged ethernet switches, let’s discuss when you would want to use a switch in a home network.
First off, you’d consider doing this if you have devices that would benefit from a wired connection (e.g. gaming devices or computers). As a reminder, wired connections provide some advantages over WiFi when it comes to internet connections.
Let’s take a look at a few use cases.
Switch Use Case 1
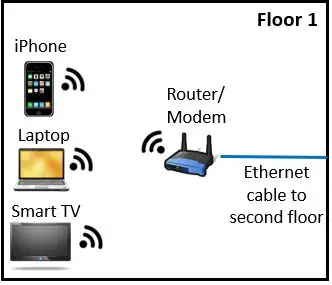
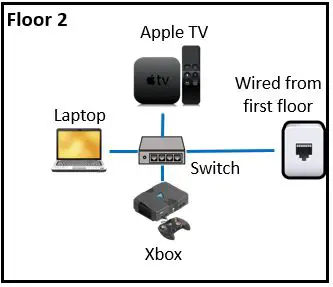
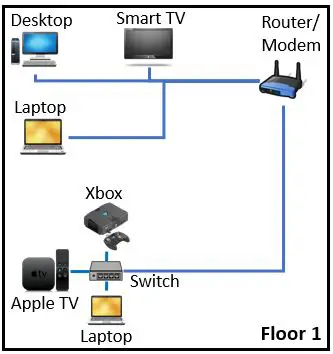
Let’s say you live in a home with multiple floors. On the first floor is your living room where you have your router. Your living room is where most of your wireless devices are located. On the second floor you have an entertainment room with multiple devices you’d like to provide with a wired network connection.
Without a switch you’d have to connect multiple ethernet cables from the first floor to the second floor. However with a switch, you could wire one ethernet cable from the first floor and have it run to a switch on the second floor.
Your first floor would look like this:
And your second floor would look like this:
In this case, a switch makes a lot of sense. You can provide all your devices on the second floor with a wired connection. All you would have to do is wire one ethernet cable from the first floor.
Switch Use Case 2
For this next use case, let’s say you have a large one floor house. Your router is located in your living room. In the surrounding area, you have many devices that you want to give a wired connection. If your switch only has four ethernet ports available, what do you do?
You can wire three of the devices directly to your router, and you can use the fourth ethernet cable to connect to a switch. That switch then allows additional devices to have a wired connection.
This scenario would look something like this:
By using a switch to multiply the number of available ethernet connections, you can provide a wired connection to as many devices as you want.
What Type of Switch Do I Need for My Home Network?
In most cases, you should get an unmanaged switch for your home network. I imagine your reasons for getting a switch in the first place are so you can provide more devices with wired connections to your network. This is what unmanaged switches are designed to do.
As mentioned above, the added capabilities that managed switches support are likely overkill for what you need.
With that said, you can now find smaller, managed switches at a similar price to unmanaged switches (like this one). As a result, you should weigh the benefits that managed switches provide and decide if they would benefit your network. Keep in mind that many routers provide the ability to:
Set up VLANs
Configure quality of service (QoS)
Provide limited network monitoring
If you have any questions or are undecided about what type of switch to buy, feel free to reach out to me in the comments section or the Contact Me page.
What Should I Look for When Buying an Ethernet Switch?
Once you’ve decided that your home network would benefit from an ethernet switch, there are a few things you should consider.
The Number of Ports on the Switch
You’ll want to determine the number of devices you’ll want to have a wired connection.
Ethernet switches come with different numbers of ports. Common configurations include five, eight, ten, and sixteen ports.
It’s important to remember that one of the ports will be needed as the uplink port to connect to your router, or another switch if you have a large network. So essentially a five switch port will provide four devices with wired connections.
The most commonly used switches have five ports, but if you have a lot of devices that need wired connections you will want to buy a switch with more ports (like this eight port switch). Also keep the future in mind here. If you’re going to be adding devices in the future that require a wired connection, air on the side of caution and get a switch with some extra ports.
If You Want a Managed or Unmanaged Switch
You will want to have a good idea of the features you want your switch to provide. Some common questions you will want to ask yourself are:
Do you want your switch to offer port security?
Do you want to be able to remotely configure your switch?
How much visibility do you want into your network traffic?
Are there devices on your network (e.g. security cameras) that would benefit from network redundancy?
Your answers to these questions will help you decide if you want a managed switch or not. If you want to have more control over your switches, you should go with a managed switch. Keep in mind that these will be more difficult to configure than unmanaged switches.
If you’re a non-technical person who just wants to provide a few devices with network connectivity, you can’t go wrong with an unmanaged switch.
The Speed Supported by the Ethernet Ports on the Switch
Most new switches today will offer ethernet ports that support 10/100/1000 Megabits per second (Mbps). This means that the switch will support speeds up to 1000 Mbps. If this is the case, you don’t have to worry about your switch limiting the speed of your network.
On the slip side, if the switch has ethernet ports that support 10/100 Mbps the ethernet ports will only support speeds up to 100 Mbps. The trouble with this is that many people have internet plans that offer more than 100 Mbps. If this is the case you’ll want to make sure your switch supports 10/100/1000 ethernet ports.
In a case where you have a 600 Mbps internet plan and your switch only supports 100 Mbps, the devices connected to your switch will get a maximum of 100 Mbps. If you’re paying the extra money for a fast ethernet plan over 100 Mbps, do yourself a favor and make sure your switch supports speeds up to 1000 Mbps.
As a side note, just because your switch supports 1000 Mbps does not mean your network will function at 1000 Mbps. You’ll want your ethernet cables to support the internet plan you are paying for as well. Check out our previous post on ethernet cables to learn more: Can an Ethernet Cable Slow Your Internet Speed?
The Price of the Ethernet Switch
You’ll be able to find five port unmanaged or managed switches for around $25-$30. If you’re looking for an unmanaged switch, I would recommend this one. Here’s a good five port managed switch if that’s what you want. If you need more than five ports on your switch, expect to pay a little more.
With that being said, the price for some managed switches can be much higher (more than $1,000). These higher-priced switches are made for large, complex corporate networks. They’ll be overkill for your home network.
Wrap Up
There you have it.
You should now be able to make an educated decision regarding:
If a switch would help optimize your home network
What type of switch is the best fit for your home network (managed or unmanaged)
The network speed you want your switch to support
The number of ports you need on your switch
Approximately how much you should be spending for your ethernet switch
Are you using a switch in your home network? If so, I would love to hear about your experience or any questions your might have. Drop a comment below to share your story.
If you found this article interesting, here are some relevant posts you might enjoy:
Did you know that changing your domain name server (DNS) will improve your internet speed and make your internet searches more private and secure?
Until recently, I overlooked the DNS that my internet devices use. I imagine you might be in a similar boat.
Although your device’s DNS is a setting that is “invisible” to you, it can increase your internet speed and make your searches both more secure and more private.
By the end of this post you will understand:
The benefits of changing your DNS on your internet devices
What the most popular public DNS are
How to determine what DNS is best for you
How to change your DNS settings to improve your internet security, privacy, and internet browsing speed
DNS background information
If domain name servers are new to you, I recommend you check out our previous post:How does a DNS query work?
Reading our post about DNS queries will provide you with all you need to know about DNS and the steps involved in the domain name resolution process.
Recursive DNS recap
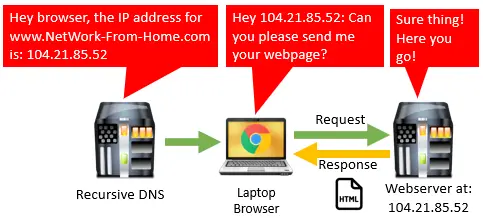
To refresh your memory, your recursive DNS is the domain name server that acts on your behalf to get the IP addresses of the internet sites you want to access.
Whenever you enter a fully qualified domain name (FQDN) for a website into your browser’s search bar, your recursive DNS will take that request and find the location for it on the web.
Once the site location is found, your recursive DNS provides it to your browser, and your browser reaches out to that location with a request for the website you searched for. In response, the server at the identified IP address sends your browser the website you want.
Now that you have the background information you need, let’s dive in and talk about your situation as it pertains to DNS.
What DNS am I using now?
By default, most internet devices will have the recursive DNS set to be automatically assigned. What this means is that your recursive DNS is most likely provided by your Internet Service Provider, or ISP (e.g. AT&T, Verizon, etc.).
If this is the case, there is no reason to fret. I’m sure your internet performs just fine using the DNS that your ISP has automatically assigned.
With that said, you can do better.
Actually, you should do better.
There are much better public DNS that you can use, and it is a free and easy change to make.
How can I improve my DNS?
The benefits of using a public DNS that is different from your automatically assigned DNS come down to three categories: performance, security, and privacy.
DNS performance
By changing your DNS to something other than what your ISP provides, you can actually improve your internet search speed.
The problem with a DNS that is provided by your ISP is that they are often slow and can be outdated. Combine that with the fact that there may be thousands of people using the same DNS at one time (other subscribers of the same ISP in your area) and you can see how they may get bogged down and congested.
Another item to pay attention to is that an ISP DNS is assigned to you regardless of your geographic location.
Huh? Why is your location important?
Importance of DNS location
When you make an internet request, it is sent to your recursive DNS over high speed wires. I’m sure it is not surprising to hear that the closer this recursive DNS is to you, the faster your internet search will be. By performing a test of public DNS options, you can most likely find one that is located closer to you (and less congested).
So yes, changing your DNS will likely improve your internet speed.
DNS security
Another benefit of using a DNS other than the one that your ISP provides is that you can choose one that is more secure.
There are several companies that provide DNS offerings focused on their user’s security.
How can your DNS security be enhanced?
For one, DNS can help protect you from malicious websites that contain viruses and other harmful content. If a website is known to be harmful and you try to access that page, you will be taken to a different page with a warning saying the site you tried to access is not safe. This process is called DNS filtering.
Your DNS safety can also be enhanced by a public DNS through a development called DNS over HTTPS (DoH).
What is DoH?
First and foremost, I am not talking about Homer Simpson here.
DNS over HTTPS is a protocol that is used to encrypt your DNS searches. It is used for communication between your computer’s browser and your DNS.
This basically means that your browser and DNS are the only two things that can read your DNS requests, regardless of who else may be listening in. To anyone else trying to see what websites you are going to, they will see scrambled characters that are useless to them.
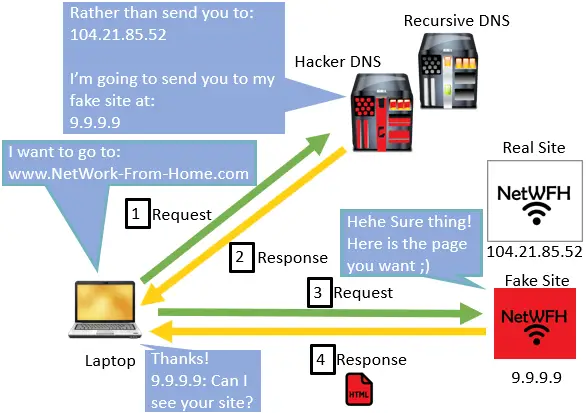
How does DoH affect my internet security?
DoH makes your DNS searches more secure by preventing hackers from changing them.
This is best explained in an example.
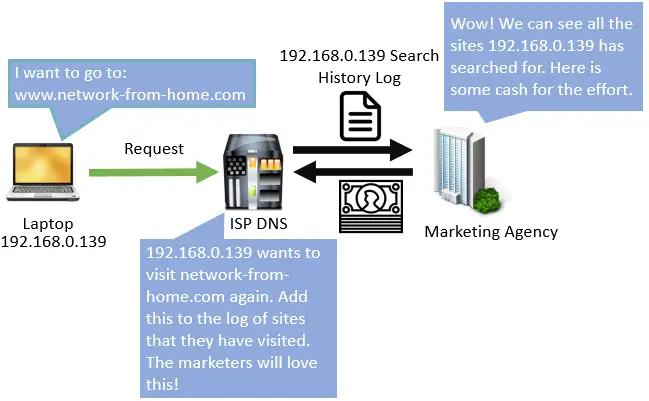
Say you wanted to access network-from-home.com. Your laptop would send a request to your recursive DNS asking for the IP address of network-from-home.com.
Seems normal enough right?
What if a hacker was able to intercept your DNS request and rather than send you the IP address for network-from-home.com, he or she sends your browser to the location of a fake site?
What if this fake site looked identical to the one you wanted but contained a virus that you computer downloaded when you visited it?
Your computer would access the bad site and download the virus. If the hacker is skilled enough, you might not even notice the difference.
Yeah, this is not good.
Here is a visual example of this scenario:
The good news is with DoH enabled on both your browser and DNS, you can prevent the above situation from happening. If the hacker can’t read the information sent between your computer and DNS, they will not be able to intercept and alter your requests.
Although this change will not make a noticeable impact on your internet searches, it should give you peace of mind because they will be more secure.
DNS search privacy
Every time you make a DNS request to search for a website’s location without using DoH, the site you are looking for is not secret. In other words, that part of your search is unencrypted. Even if you are using a secure browsing protocol like HTTPS (instead of HTTP), this information is still sent in plain text.
What does that mean in terms of privacy?
It means that your ISP can see and track every website that you search for. This is also true when you use other WiFi networks in places like airports or coffee shops; whoever is operating that public network can see every site that you access. They may not be able to see the contents of your searches and the information you enter into those sites, but they can see that you accessed them.
Why is this a privacy issue?
Well for one, your ISP can build a profile of all the sites you have accessed. This information is very valuable to advertisers and other third-party companies trying to sell you things. Your ISP will sell your information to these companies and make a profit off of your data.
Would you want other people looking at all the things you searched for on the internet?
Neither would I.
Thankfully DNS over HTTPS (DoH) has you covered in this regard as well. I must caveat this by saying your ISP may still be able to track your internet searches through other methods, but this at least makes it harder on them.
At the very least, any other third-party trying to listen in on your internet searches will be out of luck.
How does DoH make my DNS searches more private?
By encrypting the contents of your DNS requests over an HTTPs connection, DoH hides your requests from your ISP. In addition, DoH cuts down on the information that is sent to other DNS when trying to find the location of a website. By only providing the information that is relevant to each particular DNS, it makes it even more difficult to log the sites you visit.
In summary, DoH makes your internet searches much more private than they have been in the past.
I can’t imagine why you wouldn’t want something like this.
Do all public DNS use DoH?
Unfortunately there is a catch.
Due to the fact that DoH is still relatively new, not every public DNS supports it.
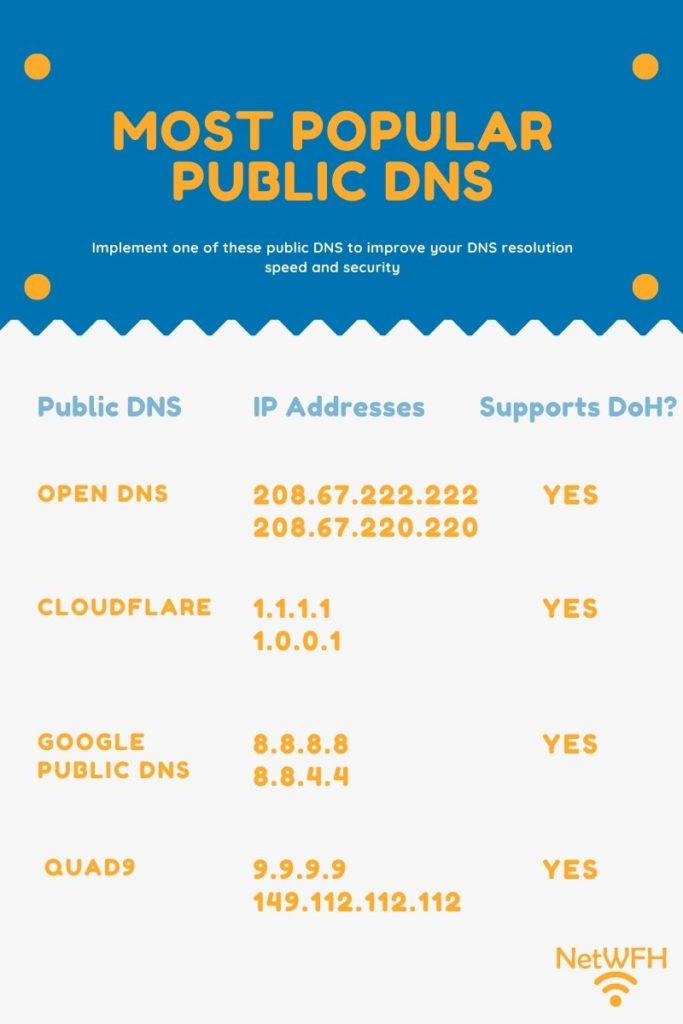
A few of the most popular public DNS that support DoH are as follows:
Google Public DNS
Cloudflare
OpenDNS
Quad9
In addition, DNS over HTTPS will only work if both your web browser and DNS support it. This is due to the fact that DoH uses an encrypted connection between your browser and DNS. If they both don’t support it, you will not be able to create the encrypted connection required.
As of today Google Chrome, Microsoft Edge, and Mozilla Firefox browsers support DoH.
What is the best DNS for me?
The good news is there are tools to make it easy to find which DNS will work best for you.
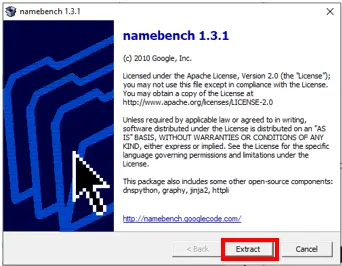
There are several tools out there, but the one I used is called NameBench. NameBench is a tool that can be used on Windows or Mac OS. It automatically tests popular DNS servers for you and gives you performance statistics on each. Based upon the results from the test, you can decide which DNS you want to choose.
You can download NameBench here. If you are using Windows you will want to choose the .exe download at the top of the list. For Mac OS you will want to choose the most recent .dmg file.
Setting up the NameBench DNS test
Once the file downloads, open the .exe (or .dmg if you are on a Mac OS) file and click Extract:
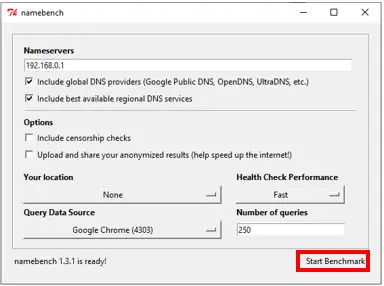
Once the extraction is complete, a new window will open. On this window you do not need to change any settings. You can simply click Start benchmark:
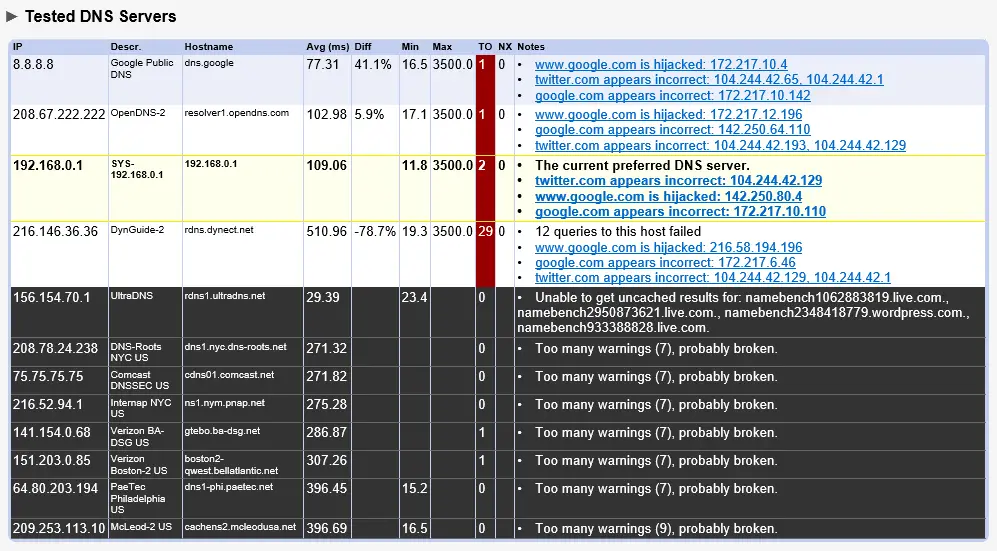
This will start your DNS test. The test will include the performance of your current DNS that is assigned by your ISP. You can tell by the 192.168.0.1 in the Nameservers entry. This means the test will use the DNS that your router tells it to. If your DNS has been automatically assigned, this will be your ISP’s DNS.
The test can take 10 minutes or so because it tests a handful of different DNS for response times. The NameBench window will indicate the status of the test at the bottom of the window.
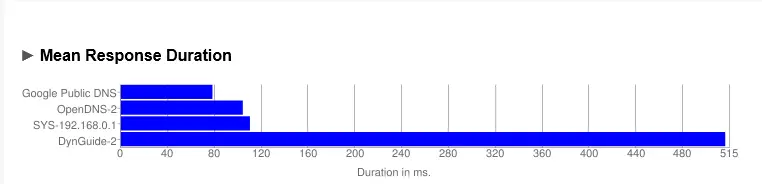
When the test has completed, you will get a summary of the mean response duration from the fastest DNS:
You will also receive a summary of the DNS tested:
What does all this mean?
For one, looking at the mean response duration you can tell that there are faster DNS than the one I am currently using (the ISP’s). Remember that the DNS I am using is listed as 192.168.0.1 which is the DNS assigned by my router. Looking at the DNS summary statistics in the Diff column, it looks like Google Public DNS is 41.1% faster than my current DNS.
That is significantly faster.
These results got me excited. One thing I did notice in the results, however, was that there were other popular public DNS that were not included in this test.
How to test other DNS with NameBench
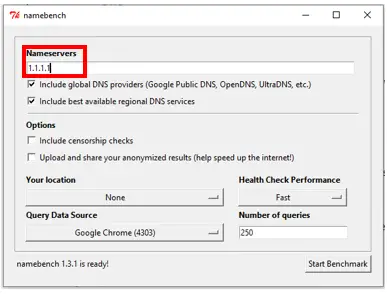
The good news is that NameBench allows you to manually input other DNS to include in the DNS test.
You can do this by entering the IP address of the other DNS you want to test. In this case, I wanted to test Cloudflare’s DNS because they have a good reputation from both a speed and security standpoint.
All I had to do was enter the IP address of Cloudflare’s DNS (1.1.1.1) into the Nameservers entry field in NameBench and run the test.
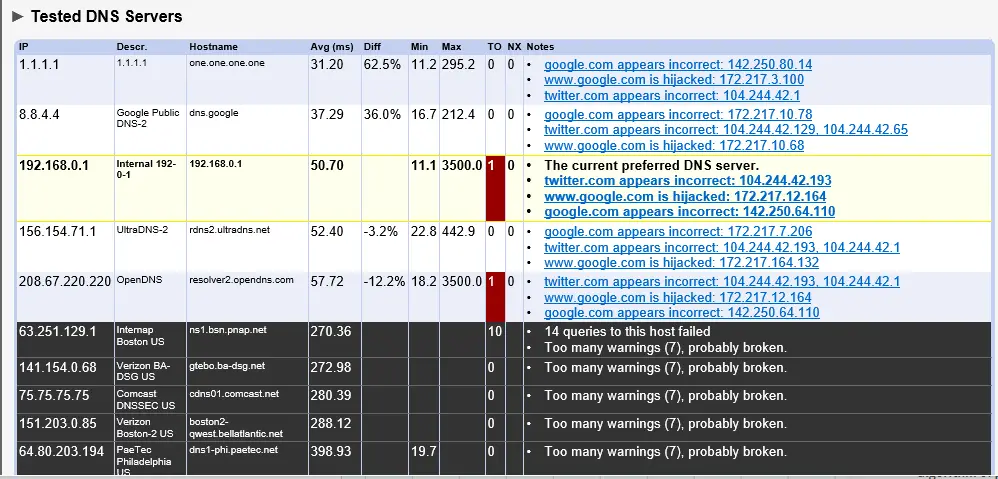
After running the test with Cloudflare’s DNS included, here are the results I got:
Cloudflare’s DNS is 62.5% faster than my current DNS server! At this point I was really starting to like the results of these tests.
Although my DNS test resulted in Cloudflare’s DNS being the fastest, your results might be different.
As a reminder, a factor in the speed of a particular DNS will depend upon how close you are to it. There may be other DNS that are closer to you that will result in faster resolution times.
Other DNS considerations
It can be very easy to select a public DNS that provides the fastest speed, but I urge you to consider the security aspect of your DNS as well.
In my case I was lucky because Cloudflare was the fastest DNS I tested but they are also very focused on security. On their website they promise to clear any logs of your DNS searches within 24 hours. This is another reason for me to go with Cloudflare, because I have their promise that they are not selling my DNS search data. This is a level of comfort I don’t have when I use my ISP’s DNS.
I say all this to recommend that you choose a DNS that supports DoH. That way, you will have a faster DNS that also provides you with more privacy and security.
Here is a list of the most popular public DNS that you should test with NameBench:
How to change DNS settings on your router
Ok at this point you have determined which DNS you want to use.
What next?
On your home network, you will want to change the DNS on your router.
Why change the DNS on your router?
This makes it easier for you. By changing the DNS on your router, all the devices on your home network will use the new DNS. Most of the time these devices will be connecting to the internet on your home network, and some of them will only connect through your home network (think Smart TVs, desktop computers, etc.)
To put it simply, your router will tell all the devices on your network to use the new DNS. You will not have to go onto each individual device and change the DNS settings. You may want to do that on your laptop and mobile devices, but we will get to that later.
Steps for changing your router’s DNS
In order to change the DNS of your router, you will first need to log into it. For many people you can do this by entering 192.168.0.1 into your search browser. You will then be prompted to enter the username and password for your router.
You will often find a sticker on your router detailing the address you can enter into your browser to change your router settings.
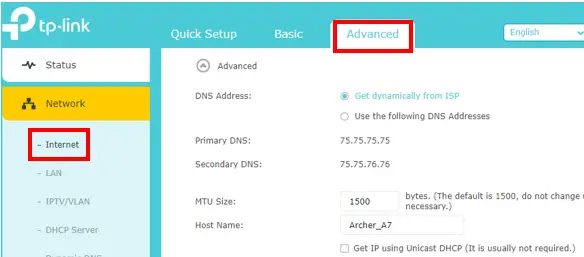
Upon logging into your router, you will need to find the advanced internet settings page.
Here you can see that the Primary and Secondary DNS fields show the currently assigned DNS. I have a TP-Link router so your settings menu may look completely different than mine. That being said, there should be similar options for you.
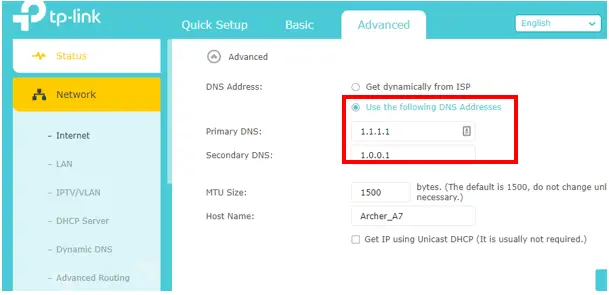
From this window I can select “Use the following DNS addresses”. You can enter the primary and secondary IP addresses of the DNS you want (in my case Cloudflare’s).
After making these changes I suggest you reboot your router.
Nice work, you have improved the internet experience for all your home devices. Every time you are connected to your home network, you will now be using the new DNS you chose.
How to change the DNS settings of your mobile devices
Unfortunately, changing the DNS on your router does not account for all the times you connect to the internet.
Think about the devices you take with you away from your home network.
I’m talking about your cellphone and laptop computer to name a few.
When these devices connect to an internet network other than your home network, they will use the DNS that the router of that network tells them to. In many cases, this will be the ISP’s DNS. Which means you will be open to someone tampering with your DNS searches or selling your search data to marketers.
You can get around this by changing the DNS on the device itself. This will overrule what DNS the router tells your device to use.
If you change the DNS on your device itself, no matter what internet network you are connected to, you will always use the free and public DNS that you like. This ensures your DNS searches are always secure, even when you are away from home.
How to change your laptop’s DNS
I will show you how to change your DNS using Windows 10. If you have a Mac, there are many other sites available showing how to change your DNS.
https://www.youtube.com/watch?v=MtQKR1PvD68
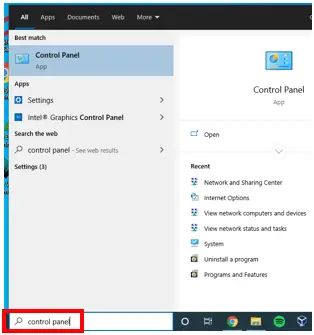
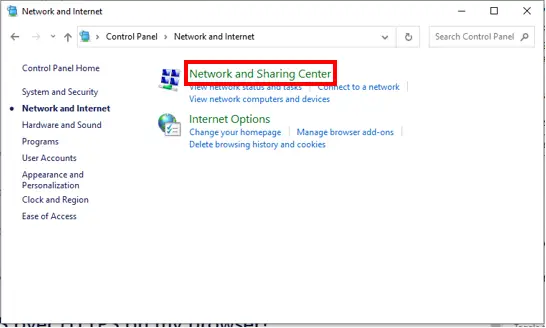
To change the DNS on your Windows 10 device, first you need to open the Control Panel. You can do this by typing Control Panel in the search bar at the bottom of your screen.
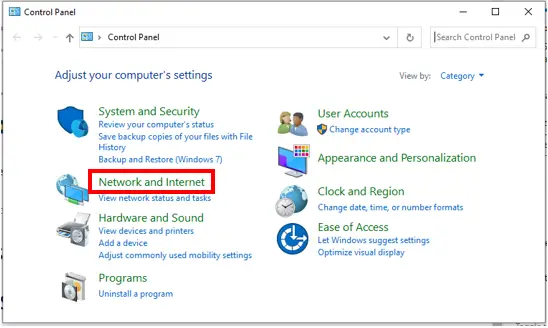
From there you will want to select Network and Internet.
In the next window select Network and Sharing Center
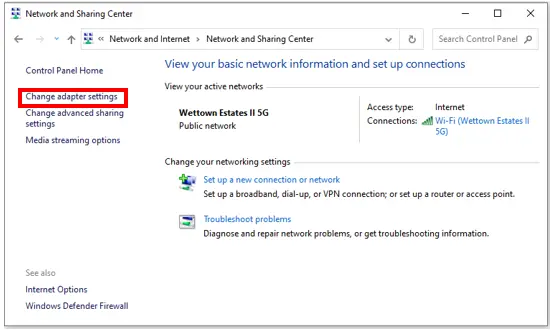
On the next window select Change adapter settings.
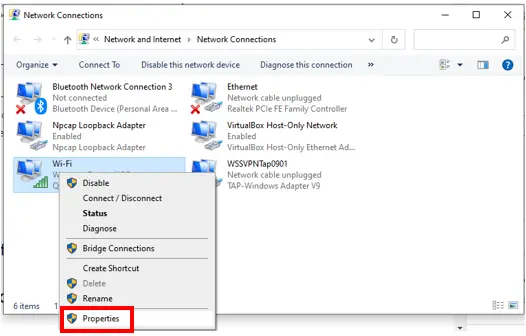
On the next window that opens, right-click the adapter that you are currently using to connect to the internet. For example, if you are connected to the internet over WiFi, right-click Wi-Fi and select Properties.
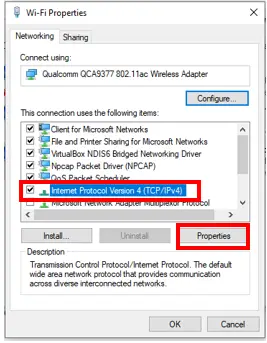
On the window that opens select Internet Protocol Version 4 and click Properties.
Now select Use the following DNS server addresses. In the Preferred DNS server and Alternate DNS server fields, enter the primary and secondary IP addresses of the DNS you would like to use. Then press OK.
At this point, every time you are connected to the internet over WiFi you will use the DNS that you just entered.
With some of your devices like your laptop, you may connect to the internet with a wireless (WiFi) or wired (ethernet) connection depending upon the situation. In this case you will want to switch the DNS for your ethernet adapter as well.
If you want to use the same DNS when you are on an ethernet connection, you will need to repeat the above steps for your Ethernet adapter. Your ethernet adapter can be selected from the network connections window.
Once you have changed the DNS for your ethernet and WiFi adapters, your computer will use these DNS however it is connected.
How to change your phone’s DNS
It is easier and faster to change the DNS on your phone than on your computer. Also, because phones can only connect to the internet over WiFi, you only need to change one adapter setting.
Let’s get started. I will show you the steps to change your DNS on an iPhone, but if you have an Android there are many other sites detailing steps to change your DNS.
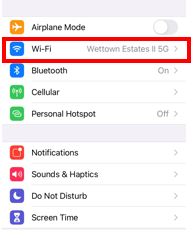
On an iPhone, you first need to go into the Settings menu. In the Settings menu, select Wi-Fi.
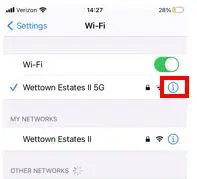
Next tap the information button next to the internet network you are currently connected to.
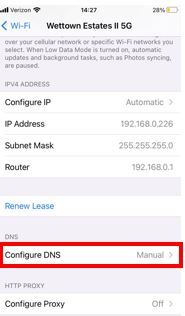
On the next screen select Configure DNS.
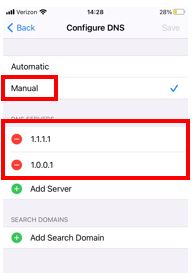
In the next screen, select Manual instead of Automatic. Then enter the primary and secondary IP address of the DNS you want to use. Make sure you delete the IP address of your router. That way, the only IP addresses listed are the primary and secondary DNS of the public DNS you chose.
When you are done your screen will look something like this:
Now, whenever you connect your iPhone to a WiFi network, it will use the DNS you want. You should never have to change this setting again.
In addition, if you have an Android or Apple tablet, the steps to change your DNS will be very similar.
Doesn’t that give you peace of mind? I know it does for me.
How do I enable DoH on my browser?
Now that you have configured your devices to use the DNS you want, there is one last thing to do.
Assuming you chose a public DNS that has DoH enabled (this is in your best interest), you will need to make sure that your browser has DoH enabled as well.
The good news here is as long as you have Google Chrome version 83 or newer, DoH is enabled by default.
In addition if you have Mozilla Firefox (and are a United States resident), DoH has been enabled by default since February of 2020.
The bad news is if you have Safari, you are out of luck. Safari does not enable DoH by default. That means if you have an iPhone with Safari installed, there is not much you can do in terms of DoH. Your options are to write your own app, or enable DoH directly in an app if that feature is offered.
I wouldn’t want to do that either.
Personally, I would just download Firefox or Chrome on your phone and ditch Safari.
What we have learned about DNS
Congratulations! Now you should have all the information you need to start using a public DNS.
You will now be browsing the internet more privately, safely, and faster than before.
Hopefully you have learned:
That changing to a public DNS will increase the privacy, security, and speed of your internet searches
What the most popular public DNS are and if they support DoH
How to test which DNS is best for your unique situation
How to change the DNS on your router, phone, tablet, and computer
I hope this information has inspired you to take the few minutes to change your DNS.
If you go through the exercise of finding which DNS is best for you, I would love to hear about your results.
Let me know how much your DNS resolution speed increased by switching to a public DNS.
As always, feel free to reach out to me if you run into any problems or have any questions.
One of the most underappreciated aspects of the internet today is the domain name server (DNS). We use them many times a day to get to our favorite websites. What most people don’t understand is that when we type a site into our internet browser search bar, we are querying a domain name server for the location of the site we want. So how then, does a DNS query work?
In this post we will cover all you need to know about domain name servers and their purpose on the internet.
My goal is for you to walk away from this post with a complete understanding for how DNS queries work. It wouldn’t hurt if you walked away with some appreciation for domain name servers too.
Alright, let’s take it from the top.
What is a Domain Name Server?
Domain name servers are essentially address books for the internet. They contain the locations of all the websites on the internet.
Every device that uses the internet is assigned an IP address. You will recognize an IP address as a series of four numbers separated by dots (e.g. 192.168.0.1). These four numbers detail the location of each device connected to the internet (it is also called an IPv4 address). Computers identify the computer or device they want to talk to by their IP address.
This is very much like our mail system today. You need to know the address of the person you want to send a letter to. If you don’t, your letter will never arrive at its intended location.
So how do computers know the IP addresses of the devices they want to communicate with?
We have domain name servers to thank for that. If it weren’t for domain name servers, we would have to memorize the IP addresses of all the websites that we go to.
That would get complicated.
Fully Qualified Domain Name
Rather than make everyone memorize the IP addresses of their favorite websites, the internet decided to make it easy by assigning a fully qualified domain name (FQDN) to each IP address. A FQDN is essentially a recognizable name that is linked to each IP address.
For example, the FQDN for the IP address of 172.217.10.238 is “google.com”.
What is easier to memorize? 172.217.10.238 or google.com?
I thought so.
What does DNS have to do with this?
Domain Name Servers are responsible for keeping track of which FQDN matches to each IP address.
It is important to note that one domain name server is not responsible for keeping a record of every single website on the internet. It is a shared responsibility by a network of domain name servers. These DNS work together to get you where you want to go on the internet.
How does a DNS query work?
When you type the FQDN of a website into your browser search bar (e.g. network-from-home.com), your request gets sent to a network of Domain Name Servers. The DNS network takes your request and attempts to look up the location of www.network-from-home.com based upon its IP address.
This process of translating an FQDN into an IP address is called domain name resolution. This is the primary service that domain name servers provide.
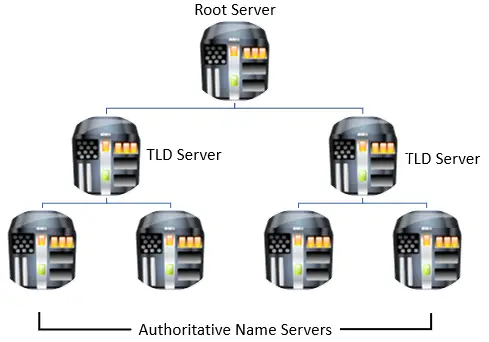
DNS structure
Before we discuss the different components that make up the DNS network, it is worth mentioning the structure of the domain name service.
The domain name service that is implemented on the internet is a hierarchy. As you will see, this hierarchy is a way of separating each domain (or address book of IP addresses) into logical groups. This makes it easier and faster for your DNS to find the IP addresses you are looking for.
At the top of the hierarchy you have what is called a root server. Below the root server you have top level domain (TLD) servers, and beneath TLD servers you have authoritative name servers. The authoritative name servers will hold the IP address information of the FQDN you are looking for. That being said, each of these DNS servers are important because they help you get closer to the IP address you are looking for.
Here is a visual representation of the DNS hierarchy:
It is important to keep in mind that the visual above is a scaled down version of what the DNS network really looks like. In reality, there are thousands of servers that make up this network.
Now that we have explained the DNS hierarchy, let’s learn more about the different players in the DNS query process.
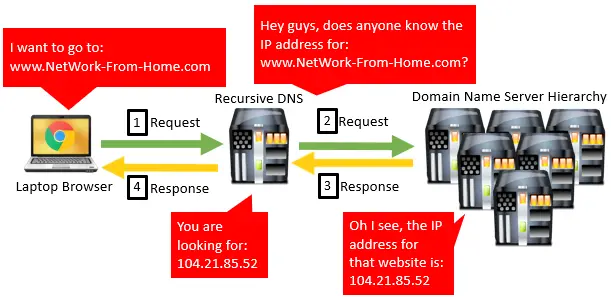
Recursive DNS
The recursive DNS is the domain name server that carries out your IP address search for you. When you type an FQDN into your browser search bar, your recursive DNS is the one your browser contacts first.
Your recursive DNS will then take your request and ask the domain name server hierarchy what the IP address of your site is.
Here is an oversimplified visual of the recursive DNS’ role:
Recursive DNS are usually assigned by your internet service provider (ISP). They are often slow and insecure. What’s more is your search history is not private when using the ISP’s DNS.
The good news is you can choose which recursive DNS you want to use. There are many available that are much faster, more private, and more secure than what you are using now. Most of them are free and it is an easy change to make as well.
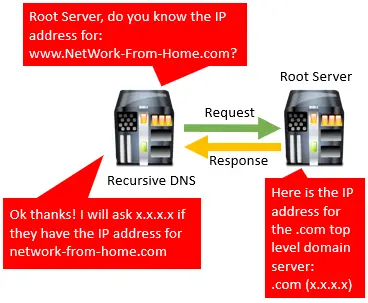
The root server is the first DNS that your recursive DNS will talk to when trying to find the IP address of the site you want to access.
The root server will not know the IP address that the recursive DNS is looking for, but it will point the recursive DNS in the right direction. It does this by sending the recursive DNS the IP address of the top level domain server that pertains to the site you are looking for.
With the IP address of the top level domain server, the recursive DNS can ask the TLD if they know the IP address of the site you want. This continues the trip down the DNS hierarchy.
The interaction between a recursive DNS and root DNS looks something like this:
There are currently 13 DNS root servers and more than 1,500 top level domains that are stored on each root server. All the root servers hold a copy of these same 1,500+ top level domains. This allows the root servers to double check each other and make sure the information they are storing is accurate. Errors in the root server would prevent you from being able to search for sites on certain domains.
What are the top level domains? Read on to find out.
Top level domain server
Top level domain servers help guide your recursive DNS toward the IP address it is looking for. The TLD servers start the process of separating large groups of IP addresses into hierarchies. Based upon which hierarchy the website you are looking for falls into, that is the TLD that your recursive DNS will question.
You will have a better understanding of this once we provide some examples.
Top level domains are separated into two main categories: organizational hierarchies and geographical hierarchies.
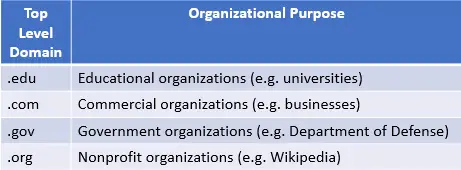
Organizational hierarchies
Organizational hierarchies are divided by the purpose of the domain. This is why you see universities with .edu at the end of their website names. Most university websites will end with .edu and this is an example of an organizational hierarchy.
Other examples of organizational top level domains are:
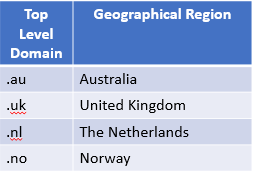
Geographical hierarchy
Geographical hierarchies are divided by the location of the domain. This is why you see other countries with different endings for their websites. An example of this is Australian-based websites ending in “.au”.
Other examples of geographical top level domains are:
As you can see, the top level domain servers only care about the ending of the website you are looking for. This is the first major category that helps point your recursive DNS down the right path.
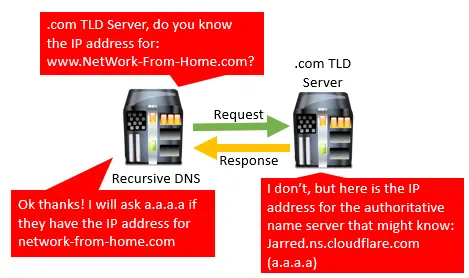
To recap, the root server will send your recursive DNS the IP address of the TLD server that pertains to the site it is looking for (e.g. the .com TLD). Your recursive DNS will then ask the .com TLD if they have the IP address of the site you are looking for.
Once the top level domain server is asked for the IP address of a specific site in its domain, it points the recursive DNS further down the DNS hierarchy to an authoritative nameserver.
Let’s take a look at the authoritative nameserver.
Authoritative nameserver
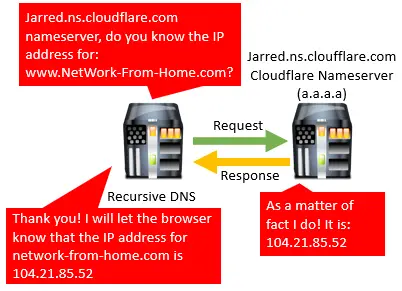
The authoritative nameserver is the lowest level of the DNS hierarchy. This is the server that actually knows the IP address of the site you want to visit.
Authoritative nameservers are responsible for storing the IP addresses of the different locations in a given domain. In this example where we are trying to find the IP address for network-from-home.com, the authoritative nameserver is jarred.ns.cloudflare.com.
The network-from-home.com website is hosted by Cloudflare, which explains why the Cloudflare nameserver knows its IP address.
When the recursive DNS asks the Cloudflare nameserver what the IP address is, it responds with the IP address for network-from-home.com because it has that information stored on it. No further steps are required.
With the IP address of network-from-home.com in hand, the recursive DNS can respond to the browser with this information.
This ends the DNS hierarchy lookup process.
Internet browser
What happens after your recursive DNS delivers the IP address to your browser?
At this point your browser does what you wanted it to in the first place. It contacts the website you want to access by reaching out to its IP address.
Once your request is received from the web server, it sends your browser the webpage you want to look at.
At long last, your browser will show you the webpage you wanted.
DNS name resolution process
I know that was a lot of information to take in all at once.
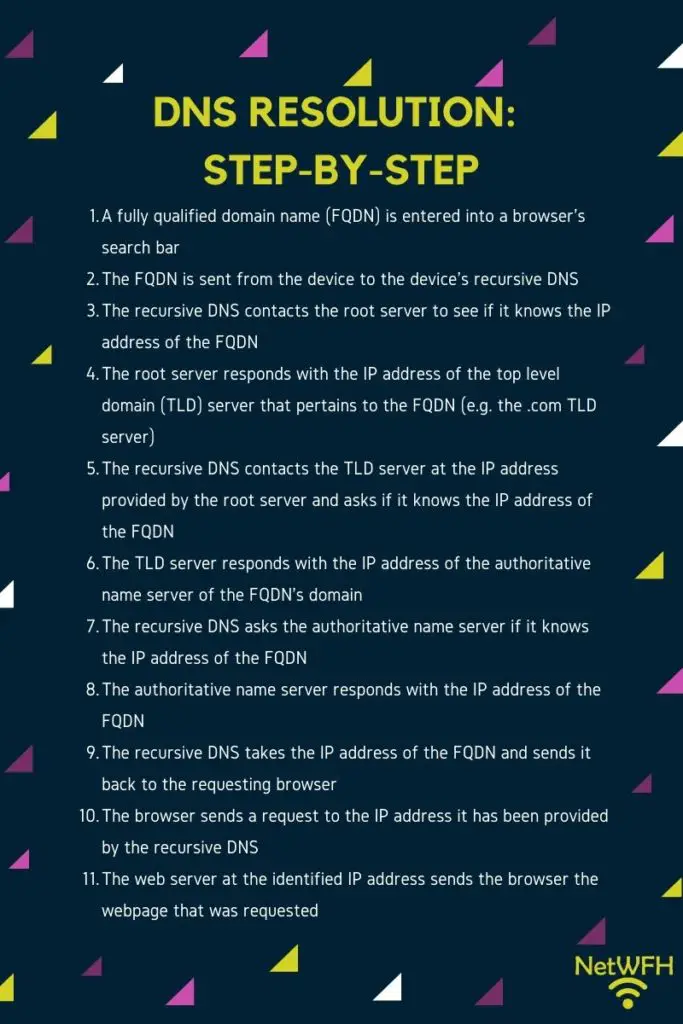
To make things easier, let’s break down the steps of a DNS query in one place so it is easier to follow along:
See, it’s not so bad.
If a visual example is easier for you to follow, here is a high-level view of the process:
When you consider this all happens in less than a second, you realize how amazing domain name resolution is.
DNS are some of the most underappreciated pieces of equipment on the internet, and the internet is very easy to use because of them.
Let’s move on before I nerd out too much about the benefits of DNS.
Does DNS resolution occur every time I search for a site?
Despite the fact that DNS resolution happens very quickly, it will not happen every time you go to a different website.
If every device on the internet had to perform DNS resolution for every website they visited, the DNS hierarchy would quickly become overwhelmed. This would result in slower resolution times. No one would be happy about this.
DNS cache
To prevent this problem and further speed up resolution times, your device’s operating system keeps a copy of all your recent website searches. This is called your DNS cache.
For any website that you have recently accessed, your operating system will remember the IP address for the fully qualified domain name. This prevents your recursive DNS from having to find the IP address for you. This makes it much faster to get to websites that you frequently visit.
On top of that, DNS cache reduces the burden on the DNS hierarchy. With less people querying the DNS hierarchy, the hierarchy can quickly respond when devices need to find an IP address.
Even if your operating system doesn’t have an IP address in its cache, your recursive DNS has a cache of IP addresses as well. Thousands of people use the same recursive DNS, so if someone else recently searched for the same website that you want to get to, the recursive DNS will have the IP address in its cache. When your device asks for the IP address of a website, it will respond with the IP address without having to ask the DNS hierarchy.
Talk about efficiency!
What if I have the IP address of a site? Can I skip the DNS resolution process?
So far in this post we’ve discussed finding an IP address when you know the fully qualified domain name of the site. What if you only have the IP address and not the fully qualified domain name?
Unfortunately there are no shortcuts here. You can’t avoid DNS resolution simply by typing the IP address of the site you are looking for into the browser.
The reason for this is that some IP addresses host many different websites. The web server you are contacting can only tell what site you are trying to reach by the FQDN that is sent to it. This is included in your request for the web page. When you type an IP address into a browser search bar, the FQDN for the IP address will be found by the DNS.
The process of finding the FQDN for an IP address is called reverse DNS.
I know. Not very original is it?
Anyway, the process for reverse DNS is different than the forward DNS process of finding an IP address for a FQDN. Although the steps involved in reverse DNS are out of the scope of this post, there are some good articles online explaining how it works if you want to learn more.
Wrap up
Hopefully you now have a thorough understanding of DNS and how a DNS query works.
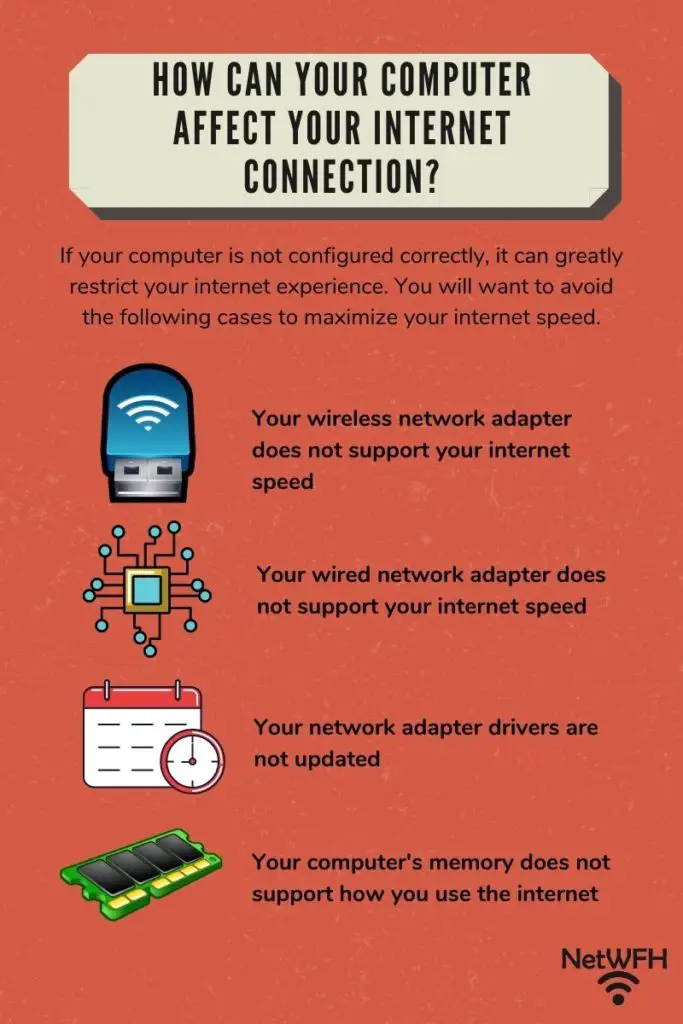
I’ve analyzed how routers, modems, and ethernet cables affect your internet connection, but what about your computer?
Can your computer affect your internet speed as well? This is the next logical question to answer.
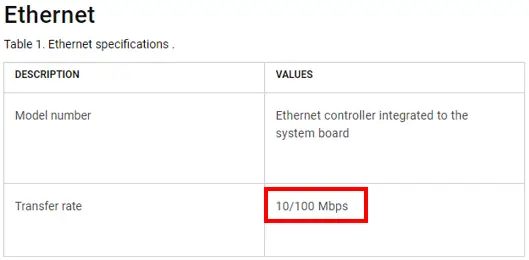
An old computer can be the cause of a slowed internet connection. If the wired and wireless network adapters on the computer can’t support the internet speed provided by the internet plan (or the network adapter drivers are outdated), it will limit the computer’s internet speed.
I know this may sound confusing.
Fear not. In the article below I’ve broken this down to explain exactly what it means.
How Does a Computer Connect to the Internet?
Before we dive into how a computer can affect your internet speed, we should first break down how computers use the internet.
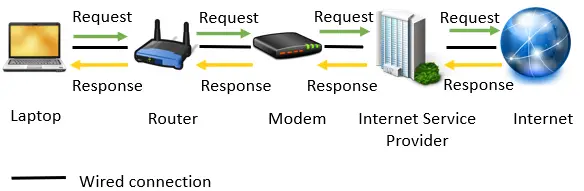
Computers connect to the internet through a wired (ethernet) or wireless (WiFi) connection to a router. They use the bandwidth provided by your internet service provider (ISP), which is delivered to your computer with the help of a modem and router.
When you enter a website into your web browser, a router and modem help your requests get to the ISP. The ISP then retrieves the requested information on the internet and returns it to your computer.
In a wireless internet connection your computer connects to your wireless router through the air using radio waves. The wireless networking technology that is used for this wireless connection is called WiFi (as I’m sure you already know). Once your router receives your request over WiFi, it ensures your request gets sent out to the ISP and the site you requested gets sent back to you.
The path followed by your request in a wireless internet connection looks something like this:
Data flow of a wireless internet connection request
In a wired connection, your computer is directly connected to a router with an ethernet cable. Your internet request is sent from your computer to the router over the ethernet cable, where it’s then forwarded to the ISP for resolution.
A request sent over a wired connection takes the following path:
Data flow of a wired internet connection request
In order to communicate through wired or wireless connections, computers use devices called network adapters.
What exactly are network adapters?
I’m glad you asked.
What Is a Network Adapter?
Network adapters, also known as Network Interface Cards (NICs) are devices that allow your computer to connect to the internet or other computers and devices. Today, many computers have the ability to connect to the internet with both WiFi and wired connections. As a result, they have two network adapters installed in them. One adapter is dedicated to wired connections and the other is dedicated to wireless communications.
Let’s take a look at the two different types of adapters.
What Are Wireless Network Adapters?
Wireless network adapters are used in most internet-connected devices today. They are responsible for taking the digital signals that computers generate and converting them to analog signals. These analog signals are then sent through the air to a router when the device wants to connect to the internet. In order to send analog signals over WiFi, wireless network adapters have small antennas built in them. This is a major difference between wireless and wired network adapters.
Examples of devices with wireless network adapters are:
Smart TVs
Apple TVs
Desktops/laptops
Gaming systems
Printers
Mobile phones
In the majority of cases, wireless network adapters come preinstalled in internet devices when they are purchased. If you have an old computer that doesn’t have a wireless adapter, there are many wireless adapters you can purchase that plug into the USB port of your device (like this one for example).
What Is a Wired Network Adapter?
Wired network adapters are available in many of today’s internet devices as well. Examples of devices that incorporate wired network adapters are:
Apple TVs
Desktops/laptops
Gaming systems
Printers
Wired network adapters are the devices that are responsible for taking the digital signals produced by computers and transmitting them over an ethernet cable. As previously mentioned, wired network adapters don’t come with built-in antennas, as they don’t need to transmit anything wirelessly. They are dedicated to wired communication.
Today, wired network adapters are usually incorporated into the motherboard of the computer.
Can Old Computers Affect the Speed of Your Internet?
Now that we have that background information out of the way, let’s get to an answer for our question.
I provided an explanation of how network adapters work because they play a major part in your internet experience.
The ways your computer can affect your internet connection are as follows:
Your network adapters (wired/wireless) don’t support your internet speed
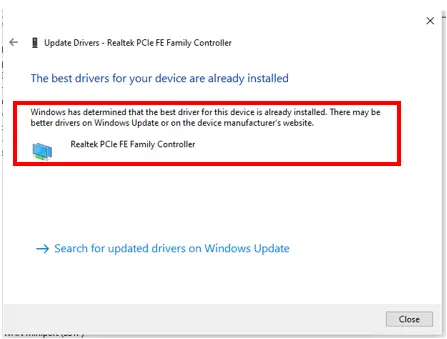
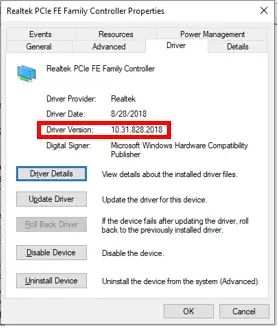
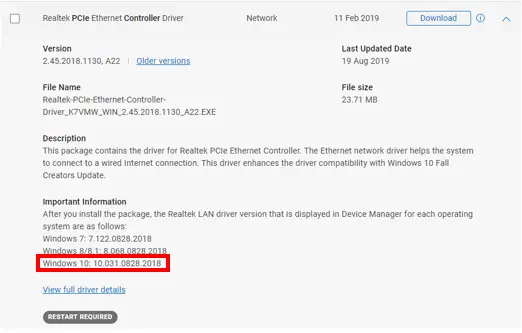
The network adapter drivers on your computer are outdated
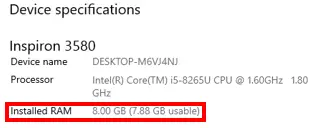
Your computer’s memory doesn’t support how you use the internet
We will be diving into each of these cases and providing steps you can take to avoid them.
Your Internet Connection Can Be Slowed if Your Computer’s Network Adapters Don’t Support Your Internet Plan
If you don’t have a network adapter that supports the speed of your internet plan, it could limit your internet experience.
This is especially a cause of concern on older computers. There have been many advancements in internet technology in recent years, and newer network adapters have been developed to support these advancements. Old computers will have older network adapters installed in them, and they may not be able to keep up with modern internet speeds.
Let’s go through the steps required to see if your network adapters are up to the task.
What Wireless Network Adapter Do I Have?
To find out if your network adapter is the cause of your slow internet, you need to find out what wireless network adapter is installed in your computer.
This may sound daunting, but it’s easier to figure out than you may think.
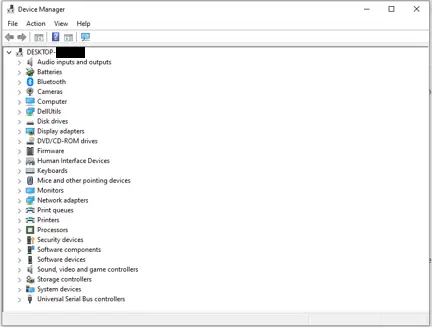
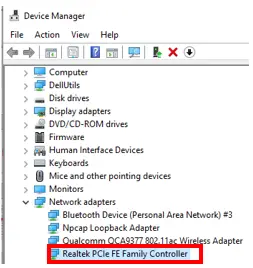
The first step is to find the Device Manager on your computer. If you have Windows, you can simply type “Device Manager” into the search box of your taskbar. The Device Manager window will look something like this:
Windows Device Manager
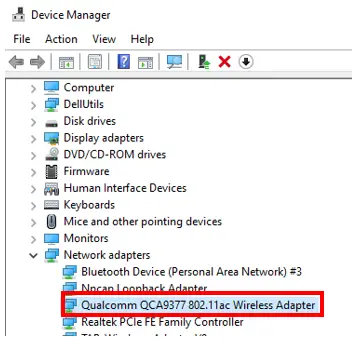
When you click the arrow next to Network adapters, it will display all the network adapters on your computer. Your wireless adapter should be clearly marked.
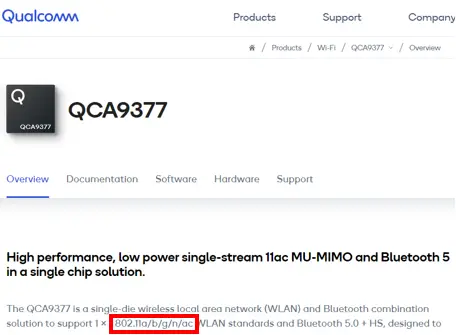
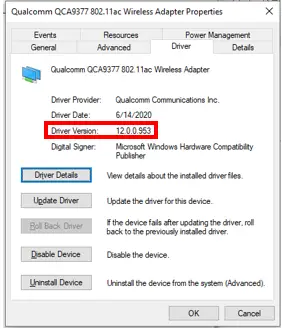
It looks like I have a Qualcomm QCA9377 wireless adapter in my computer.
What does the 802.11ac portion mean?
802.11ac identifies the wireless standard that my wireless adapter supports.
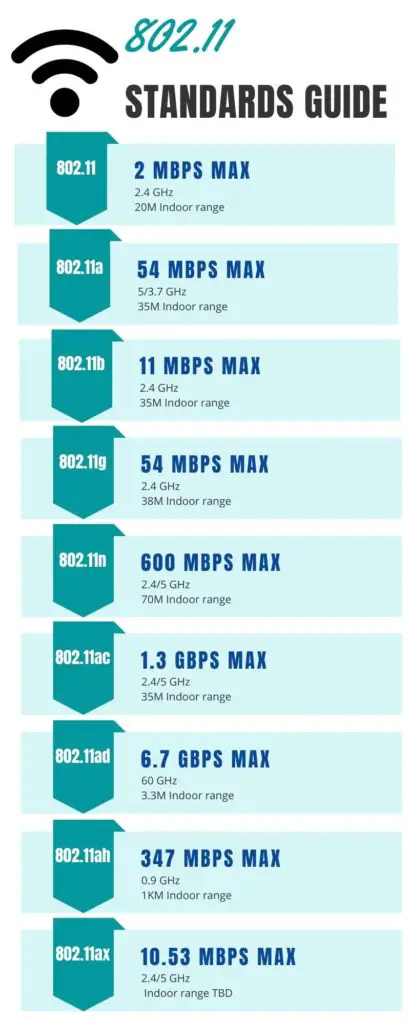
What Are Wireless Standards?
Wireless standards are the different guiding principles that have been created for WiFi as advancements to the technology have been made. Each wireless standard is designed for different internet speeds and ranges. As a reminder, here’s an ultimate guide of the internet speeds that each standard supports:
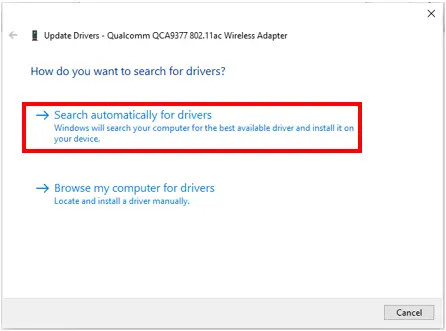
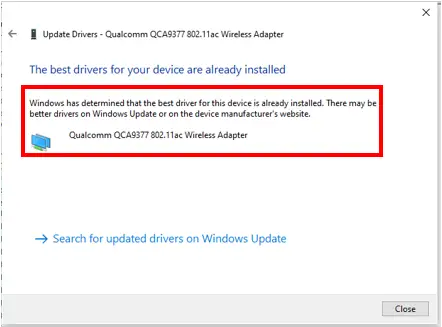
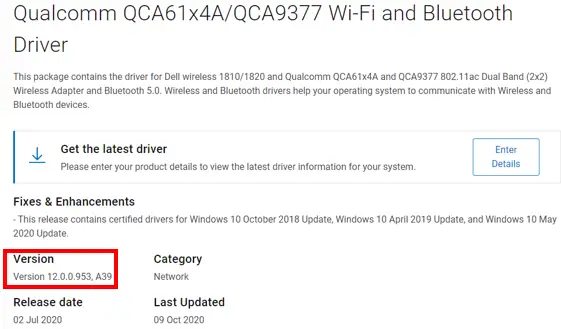
How to Determine What Internet Speed Your Wireless Adapter Supports
Returning to the example of my computer, I know I have a wireless adapter that supports the 802.11ac wireless standard. Based upon the wireless standards guide above, this means that my adapter was built to support speeds up to 1.3 Gbps (1,300 Mbps).
What if the Device Manager Doesn’t Provide the Wireless Standard My Network Adapter Supports?
What should you do if your Device Manager doesn’t list the wireless standard that your adapter supports?
Easy, just look up the specifications of your adapter on the manufacturer’s website.
You can see that on the Qualcomm website they confirm that my adapter supports the 802.11ac standard.
Take note of what speed your wireless network adapter supports. This will be important later on when we’re looking at the big picture of your computer’s internet connections.
We will now determine what kind of wired network adapter you have.
What Wired Network Adapter Do I Have?
As I mentioned earlier, many wired network adapters are built into the motherboard of your computer. As a result, it may be harder to find out what wired network adapter you have.
Thankfully you don’t need to have this information to find out the speed of your wired network adapter.
How to Determine What Internet Speed Your Wired Network Adapter Supports
By going to my computer manufacturer’s website (Dell) and looking up the ethernet specifications of my computer, I was able to confirm the speed of my wired network adapter.
The transfer rate of my ethernet port is 10/100 Mbps, meaning that it can support up to 100 Mbps of internet speed.
Most ethernet ports today will support either 100 Mbps or 1,000 Mbps (1 Gbps). Very old computers may only support 10 Mbps ethernet connections.
Identify What Internet Plan You Have
Now that you know the internet speeds that your wired and wireless network adapters support, you need to look at what internet speed you’re paying for.
As I have explained in other articles, you can do this by calling your ISP or looking at your latest internet bill.
As you can see, my ISP will provide me with up to 600 Mbps as part of my plan.
Do Your Network Adapters Support Your Current Internet Plan?
It’s time to determine if your network adapters support your internet plan. Using my case as an example, I’m paying for an internet plan of 600 Mbps.
My wireless network adapter supports speeds up to 1,300 Mbps.
My wired network adapter supports speeds up to 100 Mbps.
Does this mean my wired internet adapter is limiting my internet speed?
At first glance, you might think that’s the case. However, even though my wired connection is limited to 100 Mbps, that’s more than enough for my needs.
The most internet-intensive task I run on my computer is streaming and watching YouTube videos, which won’t need more than around 30 Mbps for the highest quality videos. 100 Mbps suits me fine and I have no issues when using my wired internet connection.
If I was on a wired connection and I was experiencing slow internet, I could always switch to a wireless connection because my wireless adapter supports much faster speeds.
What to Do if Your Wireless Network Adapters Don’t Support Your Internet Plan
Let’s say I had an older computer with a wireless adapter that supported the 802.11a (54 Mbps), 802.11b (11 Mbps), or 802.11g (54 Mbps) standards. If my internet plan provided much higher internet speeds and I wanted to make sure I wasn’t paying for speeds that I couldn’t use, what could I do?
I will start by saying that even though your computer may not support the maximum speed of your internet plan, it may still fit your needs. If you are getting 54 Mbps on your computer you shouldn’t have any problem streaming or surfing the web.
I get it though. If you are paying for a fast internet plan, you want to make sure your devices are able to use it.
In order to upgrade the wireless internet capabilities of your computer you have a few options. You could:
Buy a new computer
Buy an external WiFi adapter that plugs into your computer’s USB port
Replace the existing wireless adapter on your computer with a newer adapter
If you wanted to keep your current computer, thankfully you can buy a good external WiFi adapter for less than $20. This would probably be the easiest solution. You would just need to plug it into an open USB port of your computer.
If you plan on keeping your old computer for a longer period of time, it might make sense for your to replace its wireless adapter with a new adapter. I wouldn’t advise you do this unless you have some experience working with computers or are willing to pay professionals to do it. You will also want to keep in mind that computer parts don’t last forever and it’s risky to continue using computers that are very old.
What if Your Wired Network Adapters Don’t Support Your Internet Plan?
As mentioned above, wired network adapters usually support 10 Mbps, 100 Mbps, or 1000 Mbps. If your computer supports 10 Mbps over ethernet connections and you want to upgrade it, your most likely options would be to:
Buy a new computer
Buy a USB to ethernet adapter
Use only wireless internet connections
An easy solution would be to buy a USB to ethernet adapter online like this one. These are cheap devices that are easy to use. If you have a really old computer, you just need to make sure your USB ports are fast enough for the internet connection you want. You’ll also want to ensure the adapter supports the current Operating System you’re running on your computer.
The easiest solution would be to resort to wireless connections for the internet if your wireless network adapter supports faster speeds. This may not be feasible for some people who want the low latency of a wired connection, but for many this would be a good alternative.
Your Internet Connection Can Be Affected if the Drivers of Your Network Adapters Are Outdated
Your computer can also be the cause of a slow internet connection if the drivers of your network adapters aren’t updated. If your network adapters support the speed of your internet plan but your internet is still running slowly, you may need to update your drivers.
What Is a Device Driver?
Device drivers are the software that allow the different pieces of hardware on your computer to function. Without drivers, none of your computer components would work.
A few examples of this would be your computer’s:
Microphone
Speakers
Network adapters
USB drives
CD-ROM drive
Just like any application, they need to be updated as technological advancements are made and bugs are fixed.
Updating Your Computer
I should start by saying that if you routinely update your computer when prompted, this will more than likely result in updated drivers for your network adapters. It’s important to update your computer on a regular basis so that your computer components are kept up-to-date and working as they should.
However, if you’ve been slacking with your computer updates, you’ll want to see if there are updates available for your network drivers.
How to Update Your Wireless Adapter Driver
To update your wireless adapter driver, you need to go back to the Device Manager like we did earlier.
Within the Device Manager, bring up the properties of your wireless adapter. Then click on the Driver tab.
Click Update Driver.
On the resulting window, select Search automatically for drivers
If there are any available updates for your network adapter driver, you’ll be able to install them. However, if your computer can’t find any updates for your driver, you’ll get the following notification:
If you get this notification and still want to check for updates, you can search for them online on the manufacturer’s website. In my case this would be Qualcomm’s website.
Before you do this, you will want to verify the version of the driver you have installed. This can be found back in the Driver tab for the network adapter.
It looks like I have version 12.0.0.953 installed for my Qualcomm wireless adapter.
When I went to Qualcomm’s website, I received a notification saying that they don’t provide drivers to end users and that I should check my computer manufacturer’s website.
Next I searched Dell’s website, where I found that the latest driver they had for my wireless adapter was the one I have installed.
At this point I knew the driver for my wireless adapter was up-to-date.
These steps will be similar regardless of the model of wireless adapter you have. Feel free to leave a comment at the bottom of this post if you have any questions or run into any trouble.
How to Update Your Wired Network Adapter Driver
When updating the driver for your wired adapter the process is very similar to the process of updating your wireless adapter.
The hardest part is determining which driver includes your wired network adapter.
In my case, after doing a little research I learned that the Realtek PCIe FE Family Controller was the network adapter that contained the wired adapter.
I followed the same process of automatically checking for driver updates under the Driver tab.
Much like the wireless adapter, I got the same results.
I then went to the Realtek website to double check that no new driver updates existed. Before I did, I verified the driver version that was currently installed on my computer:
On the Realtek website, I was able to confirm that I had the most recent driver update.
Although my network adapter driver was up-to-date, this is the process you would follow to make sure yours are updated as well.
Your Internet Can Be Affected if Your Computer’s Processor Does Not Support How You Use the Internet
The last way in which your computer could slow your internet speed has nothing to do with your network adapters.
Surprisingly enough, it has everything to do with the memory your computer has.
I’m talking specifically about the random access memory (RAM) of your computer.
What Is the Purpose of RAM?
RAM is the memory that’s used by a computer to store things on a short-term basis. Your computer stores anything that’s actively running in RAM so it can quickly access it when you need it.
The amount of RAM you have on your computer closely aligns with your computer’s performance. The more RAM you have, the faster your computer can run.
When buying a laptop, it will most likely come with 4, 8, 16, or 32 gigabytes (GB) of RAM.
How Does RAM Impact Your Internet Speed?
RAM doesn’t have a direct impact on the internet speed your computer is getting, but it can have an impact on how fast your internet seems.
Internet browsers (especially Google Chrome) can take a lot of computer resources to run. This is especially true if you are one of those people that has many tabs open at once. If you have a lot of browser tabs open and not enough RAM to support them, it will make your internet (and entire computer) run really slowly.
As an example, there are multiple articles online stating that if you only have 4 GB of RAM on your computer and you try to open 50 tabs of Google Chrome, your computer will lock up. If this happens it will seem like you have a really slow internet connection. In reality, it’s your computer’s memory that’s causing the problems.
In most cases you will only have issues if you have 4 GB of RAM, but this is something to be aware of if your internet (and computer) seems to be running slowly.
How to See How Much RAM You Have
It’s very easy to check how much RAM you have installed on your computer.
If you have Windows, you just need to type “view processor info” into the search box on your taskbar. The resulting window will show how much RAM is currently installed.
I have 8 GB of RAM so my computer doesn’t slow down if I have multiple tabs open.
If I Have 4 GB of RAM What Can I Do to Prevent a Slow Internet Experience?
If you have 4 GB of RAM and your internet slows down when you have a lot of internet tabs open, your RAM could be the cause.
In this case you can:
Buy a new computer with more RAM
Install more RAM on your computer
Restrict yourself to using a small number of browser tabs
If you’re going to be buying more RAM, you can buy another 4 GB of DDR3 or DDR4 RAM for $15-$50. You’ll just need to make sure that you get RAM that’s compatible with your computer (either DDR3 or DDR4) and you have an open RAM slot for the stick. Most computers come with additional open slots so this is usually not an issue. The additional RAM will also make your computer run faster in general.
If your computer has 4 GB of RAM, you won’t be disappointed if you add 4 more gigabytes to it. I promise.
Verdict
In conclusion, your computer (especially an old one) can cause your internet to run slowly. If you don’t have the proper network adapters, your network adapters are outdated, or you don’t have enough RAM, your internet connection may be restricted.
In providing the above factors that may affect your computer’s internet speed, there are some assumptions that were made that must be called out.
Your Internet Plan, Router, Modem, and Ethernet Cables All Need to Provide the Computer With Adequate Bandwidth
When it comes to a home or office network, there are many factors that affect the internet speed your computer receives.
If you don’t have an internet plan that provides enough bandwidth, your computer will never be able to provide a good internet experience. It won’t matter how old your computer is or the network adapters it has. Having a good internet plan is first and foremost.
All the downstream components from your ISP (your router, modem, and ethernet cables) need to support the internet bandwidth you are getting from your ISP. I have previously provided an in-depth analysis of how this equipment affects your internet performance in the following posts:
Your computer uses the bandwidth it’s provided to connect to the internet. If your computer isn’t provided with the proper bandwidth from your home network, it can’t provide you with the internet experience you want.
Your Computer Can’t Your Computer Cannot Affect the Internet Speed of Your Other Devices on Your Network
Another important factor to keep in mind is that your computer can’t affect the internet for the other devices on your network.
If your computer is slow and doesn’t have the proper network adapters, the only device that will be impacted is your computer. Assuming your other devices are provided with the proper internet speed, they’ll be able to use the internet without any problems.
The only way your computer can slow the internet speed of other devices is if you’re not getting enough speed from your ISP and your devices are fighting over limited bandwidth. In this case the computer isn’t the root cause of the issue. You’ll need to reduce your internet needs or get a better internet plan.
Your Computer Can’t Increase the Internet Speed It Receives
Much like it can’t slow down your other devices, your computer can’t boost its internet speed either. In the earlier example it was determined that my wireless adapter could support speeds up to 1,300 Mbps.
My current internet plan provides speeds up to 600 Mbps.
In this case, my wireless internet speed on my computer will not be 1,300 Mbps. It’ll be the maximum speed provided by my ISP: 600 Mbps.
Although your computer can limit the amount of bandwidth it can use, it can’t do the opposite. This highlights the importance of having a computer that’s designed to meet your internet needs. It can be helpful to “future proof” your computer so that you don’t need to buy a new one if you upgrade your internet plan, but you don’t want to buy something that’s much more than you’d ever need.
With my wireless adapter supporting speeds up to 1,300 Mbps, I’ll be able to upgrade my internet plan in the future without having to worry about my computer not being able to support it.
Wrap Up
I hope you found this article helpful. Feel free to reach out to me via the Contact Me tab with any questions you may have about this topic.
If you like this content and would like to get more of it, subscribe to the monthly newsletter by entering your information in the sidebar of this post.
Are you aware of the different types of internet connections that are available to you? If not, you have come to the right place. I am going to break down all the possible options and explain what you can expect from each one. With this guide, you will be able to determine which options will most likely suit your internet needs.
Depending where you live, some options may not be possible for you. You will need to do some research on your own to determine what is available in your area. That said, this post will give you an idea about which connection is best for you before you even begin your search.
Furthermore, I am confident that most of you will find there are only a few types of internet connections that will get you the bandwidth you want.
Before we take a closer look, here is an introduction to the internet connection types available:
Types of Internet Connections
Dial-up
Dial-up internet uses phone lines to connect to the internet. This was the first method for connecting to the internet and was popular in the 1990s. Now, dial-up internet is largely obsolete and there are better options out there for you. In any case, I have provided more information about dial-up internet in case you are curious…
To connect to the internet, your computer calls into the Internet Service Provider (ISP) (e.g. Verizon, Xfinity, AT&T, etc.). The ISP will then connect you to the internet and allow you to browse.
The trouble with this connection is that if you only have one phone line in your home, you cannot be connected to the internet and have a phone call occur at the same time. If someone picks up the phone to call someone while you are connected to the internet, you will lose your connection.
Dial-up internet is widely available. It is an internet connection option for many people, but it should only be used if there are no other options to choose from. This will most likely be the best option for those living in rural areas who do not want to pay for satellite internet.
Speed
Dial-up internet is extremely slow (by today’s standards), clocking in at a blazing 56 kilobits per second (kbps). It is only used by about 3% of Americans today.
Cost
If you are already paying for a phone line, you can use it to connect to the internet at no additional cost. If you do not have a phone plan in place, you will have to sign up for one (they cost $42/month on average). Also, if you do not already have a telephone jack in your house, you will need to have one installed.
At this price point, it is obvious to see much faster and cheaper options are available (keep reading!)
For a dial-up internet connection, you need:
A dial-up internet modem and router
A landline telephone line to connect to your modem
A phone plan with an Internet Service Provider (no separate internet plan is required)
What can you do with a dial-up internet plan?
Not much. At 56 kbps per second, you will only be able to perform very limited browsing of websites. You can forget about streaming your favorite episode of Gossip Girl with speeds like this.
Also keep in mind that only one person can use the internet at a time for each phone line to your house. Since most houses have only one phone line, you will most likely be restricted to having one person on the internet at a time.
Digital Subscriber Liner (DSL)
Similar to dial-up internet, DSL uses a phone line to connect to the internet. The difference is that DSL allows you to both make phone calls and browse the internet at the same time.
Speed
With DSL you can expect speeds between 5-35 Megabits per second (Mbps). Although it is much faster than dial-up internet, it still provides speeds on the lower end of the spectrum. You will need to check with you ISP to determine the DSL speeds you can expect.
Other benefits of DSL include the fact that it is widely available (similar to dial-up internet), and it is usually cheaper than other options that may be faster (such as cable and fiber).
Cost
DSL will be an option for many people that also have the option of dial-up internet. This is a better option than dial-up if you are willing to pay the additional cost ($42.66/month on average for a DSL plan).
For a DSL internet connection, you need:
A DSL modem and router
A landline telephone line to connect to your modem
An internet plan with an ISP (you don’t need to have a phone plan)
What can you do with a DSL internet plan?
You should have no problem if one person is browsing the internet, checking email, and using social media websites. If multiple people are using the internet at the same time, you may experience slow load times.
In addition, depending upon the specific bandwidth available to you, one person using the internet may be able to stream clearly. If you plan on streaming with other people using the internet at the same time, you should look into some of the other available options (cable or fiber).
Satellite
You are probably most familiar with satellite internet from your experience on airplanes. Satellite internet is one of the two ways that airlines can provide internet access (via WiFi) to their customers.
Satellite internet is also a useful option in remote areas where other landline internet options are not available (e.g. DSL, dial-up, etc.).
It works by using satellites that are orbiting earth to relay the internet messages from your modem/router/device to a location on the ground that can carry out your request.
These satellites can be reached from any location on earth, so satellite internet is an option for everyone. With that said, it is not usually the fastest option and is only used when limited (if any) other options are available.
If you think about it, your internet requests travel from your device to the satellite in space, and then back to the earth’s surface where your request is carried out. A response is then sent back to the satellite, where it is relayed back to your device.
Example of a satellite internet connection
That is a lot of ground to cover for each request you send. This makes any real-time communication like Skype calls really difficult.
Speed
Delivering speed up to 100 Mbps, satellite internet is faster than dial-up and can even be faster than Digital Subscriber Line (DSL) depending upon your location. This option can’t compete with some of the faster land-based options like cable or fiber-optic internet, but it is a good option in terms of speed when these options aren’t available.
Cost
On average, satellite plans cost about $100/month. This is one of the most expensive internet options available, which is another reason why it should only be utilized when suitable landline options aren’t available.
For a satellite internet connection, you need:
A modem and router
A cable internet plan with a satellite internet provider
A stationary satellite device
What can you do with a satellite internet plan?
Your internet experience can be very similar to DSL with a satellite internet plan. You should have no problem surfing the internet or using social media. You will likely have trouble with streaming and any real-time communication with this service, however.
Another factor to keep in mind is that although satellite internet can be very reliable (if you are in an open area), bad weather can negatively affect your connection. The weather is out of your control, so your internet connection is a victim of the conditions surrounding you. This is just another data point to consider if you are looking at a satellite internet plan.
Cellular Internet
Cellular internet uses the same channels as your cell phone to access the internet. Radio waves from your phone are sent to a cell tower, which connects to the internet for you and relays your requests.
Example of a cellular internet connection
You have probably used this type of connection when browsing the internet using your cell phone’s data plan, or if you have used a hotspot before.
This will most likely be a good option for you if you want to use internet devices (e.g. tablets) that do not have cellular plans and you are away from home. It is rarely used as a home internet option unless there are limited options and you have minimal internet needs.
Speed
Using cellular internet, you can get speeds up to 53.3 Mbps. The speed you get depends upon the strength of the cellular signal in your area. You will most likely get around 35 Mbps or less so you need to take this into account.
Cost
If you are going to use your phone as a hotspot, you will be using the data plan of your cellphone. There will be no additional cost unless you overrun your monthly data limit.
If you are going to purchase a hotspot, you will need to buy the physical device. In addition to the hotspot device, you will need to buy a data plan for it. Cellular providers have different data plans based upon your needs (anywhere from $10-$100 monthly), similar to a cellphone. If you are going to go this route, you will need to contact your cellular provider for more information.
For a cellular internet connection, you need:
A hotspot device (unless you will use your cell phone)
A cellular plan with a cellular provider
What can you do with a cellular internet plan?
Depending upon the plan you sign up for, you should be able to perform most basic tasks on the internet. You should be able to have a few people browsing the internet, checking email, and using social media websites at the same time. You may also be able to support streaming for one person. Overall this is a good option for one person who needs internet access at random times while he/she is away from home.
It is widely available in most urban areas of the United States and will be an option for most people.
Speed
With cable internet, you can expect speeds much faster than DSL and dial-up. Speeds for cable internet range from 10-500 Mbps. These speeds are generally more than enough for multiple people to use the internet at the same time.
Cost
A monthly cable subscription is usually more expensive than DSL, but if you can afford it you will have a much more enjoyable experience. On average, cable internet plans cost about $58/month.
One item of note is that ISPs usually offer multiple plans for cable internet, each with different available bandwidths. This gives you the opportunity to select the plan that best fits your needs. It goes without saying, the faster connections are more expensive.
For a cable internet connection, you need:
A modem and router
A cable internet plan with a cable/internet provider (for most providers you don’t need to have a cable television plan as well)
What can you do with a cable internet plan?
Depending upon the plan you sign up for, you should be able to do most things on the internet. You should have no problem with many people browsing the internet, checking email, and using social media websites at the same time. Your cable internet connection should also be able to support multiple people streaming/online gaming at once.
Fiber Optic Internet
Fiber-optic cable internet is the cream of the crop when it comes to internet connections. It offers blazing fast speeds that should meet all your internet needs. To learn more about the benefits of fiber internet, check out this video:
https://www.youtube.com/watch?v=1l8wrmqtcfQ
Fiber optic internet utilizes fiber cables instead of the copper wires used by cable, DSL, and dial-up internet. These fiber cables transfer data with light waves instead of electricity, which is what the other internet connection methods use.
Most ISPs already utilize fiber-optic cables to transfer the data you send over the internet. These cables transfer data over long distances much faster than copper wires can. This is the only way ISPs can provide you with the seamless internet experience you want. Fiber-optic cable internet takes this one step further.
With fiber-optic internet, rather than using fiber-optic cables for just the backbone of the internet, ISPs use fiber-optic cables to deliver the internet to your home as well.
This will only be an option for you if an ISP has installed fiber-optic cables to your area. For many people, this has not been done yet. In some cases however, you will be able to schedule and pay for the installation of fiber to your home.
In terms of availability, about 40% of the United States has access to fiber-optic internet. It is still a fairly new technology and the infrastructure is not yet in place to offer it across the U.S.
Speed
When it comes to speed, there is no better option. Fiber-optic cable internet speeds can range from 250-1,000 Mbps (1,000 Mbps is equal to 1 Gigabit per second).
Another benefit of fiber internet is the fact that upload speeds are usually the same as download speeds. Upload speeds are important when you are either streaming live video from your home to the internet, or you have to consistently upload large files to an external website for work or school.
Cost
Surprisingly, fiber-optic internet is not the most expensive internet option. For the areas where the infrastructure is in place, plans cost about $56/month on average. There are a variety of options and pricing plans for fiber-optic internet based upon the provider and the infrastructure they have in place, so you will want to contact your provider for specific speed/pricing plans.
One thing to keep in mind is that fiber-optic internet prices are expected to fall in the future as it becomes more widely available with the advent of 5G technology. If fiber internet is currently not an option for you (or is too expensive), you have something to look forward to.
For a fiber internet connection, you need:
A fiber-compatible modem and router
A fiber internet plan with an ISP
Fiber installation to your home from ISP (depending upon your location and fiber availability)
What can you do with a fiber internet plan?
The better question is probably: what can’t you do with fiber internet? Fiber internet should provide you with the ability to do anything you want on the internet. Especially with upload speeds that are equal to download speeds, you should be able to livestream without disruption, if that is something you are into. If the price of fiber-optic cable is not an issue and it is available in your area, I promise you will not be disappointed if you go with this option.
Which internet type is best for me?
So which connection type should you choose? Hopefully the information presented above will allow you to narrow your choices. Some of the factors you should consider when picking the best option are as follows:
What providers/plans are available to me?
What do you use the internet for? Browsing? Social media? Streaming? Live communications?
How many people will need to use the internet at once?
What is my budget for my monthly payment?
This site will help you determine which options are available to you. Just enter your zip code and click “Search Providers”
Another important item to note is that you will rarely get the top internet speed that providers advertise. There are a multitude of reasons for this (your modem/router, signal interference, congested lines, etc.). The bottom line is that you should subscribe to a plan that has a safe cushion on top of what you think you will need during peak internet usage. You need to plan for your highest internet demand and make sure your plan can support it if you want a seamless internet experience.
To summarize the expected speed and monthly costs of the different types of internet:
Type of Connection
Speed
Monthly Cost
Dial-Up
45 kbps
$42 (average)
DSL
5-35 Mbps
$42.66 (average)
Satellite
Up to 100 Mbps
$100 (average)
Cellular
53.3 Mbps (average)
$10-$100 (based upon data plan)
Cable
10-500 Mbps
$58 (average)
Fiber-Optic
250-1,000 Mbps
$56 (average)
Speed and Monthly Cost of DIfferent Internet Connection Types
What is the most commonly used internet connection?
Most households in urban areas either opt for cable or fiber internet because they provide the best experience. People are reliant on the internet more than ever before, and they need connections that support their needs.
Nothing is more miserable than watching a YouTube video and having it stop because you don’t have enough bandwidth.
Or being on a Skype call with coworkers and not being able to understand them because of low bandwidth.
Or not being able to game online with your friends because your parents are watching Netflix.
Spend the money for proper bandwidth. It will make your life much easier, I promise.
Wrap up
I hope this guide gets you one step closer to being able to enjoy the internet without restriction.
If you found this information helpful, check out some other posts I’ve written on similar topics: