
Have you ever purchased an ethernet cable that was just a little too long?
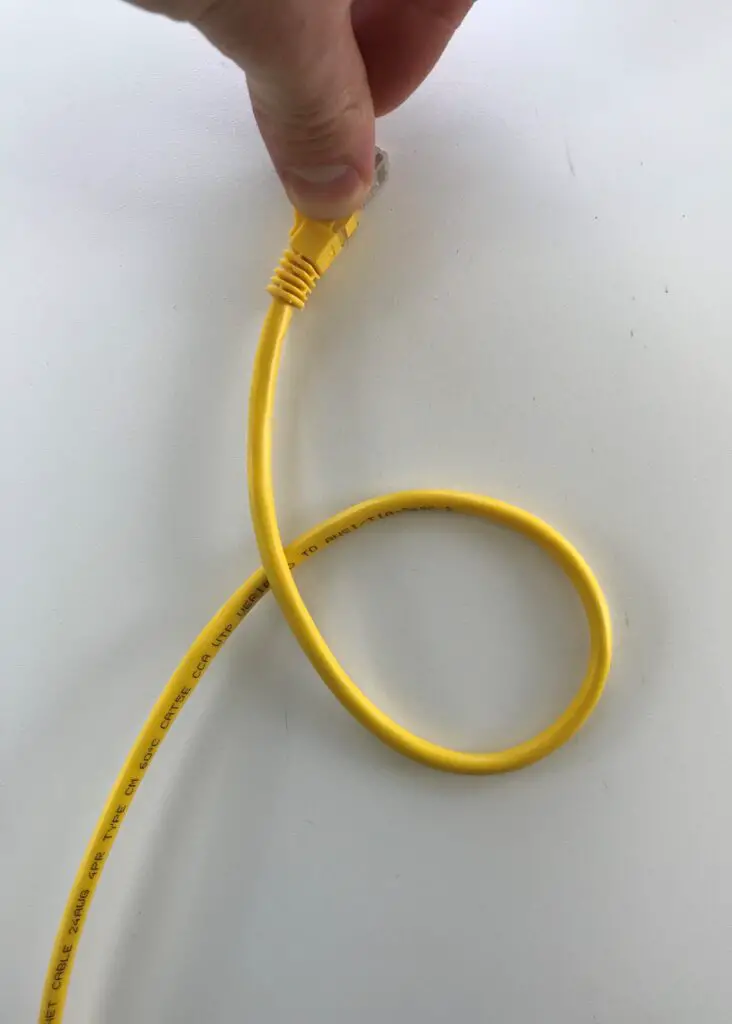
Better yet, have you ever thought about buying a coil of ethernet cable and making your own cables?
If you ever find yourself in this situation, you need to know how to crimp your ethernet cables.
So how do you crimp an ethernet cable?
At a high level, the steps for crimping an ethernet cable are as follows:
- Identify the length of the ethernet cable you need
- Cut the ethernet cable so it is a few inches longer than what you need
- Strip at least 1 inch of the protective sheath off of the end of the cable
- Put an ethernet cable connector boot on the cable (if you have one)
- Untwist the exposed pairs of twisted wires
- Line up the untwisted wires into one of the standard ethernet cable pinout configurations
- Cut the aligned wires so they are all the same length
- Insert the wires into the end of an ethernet cable connector
- Use a crimping tool to crimp the wires inside the ethernet cable connector
- Test the cable to make sure it works properly
There you have it. That’s all you need to do if you want to create your own ethernet cables.
In this post, I’ll provide more detail about the high-level steps above, as well as everything you’ll need to crimp your ethernet cables.
What is crimping?
Before we get into how to crimp ethernet cables, let’s make sure we have an understanding of what crimping is.
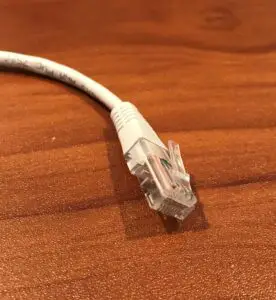
Crimping is the process of terminating the wires inside an ethernet cable with a connector. These connectors are called RJ45 connectors.
Despite their confusing name, I’m sure you’ve seen them before:
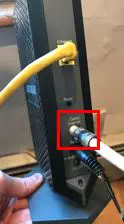
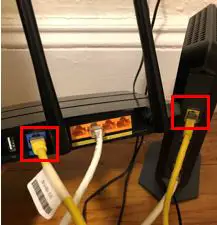
RJ45 connectors allow you to connect your ethernet cable into an ethernet port on one of your devices.
Essentially, crimping is a fancy term for putting an RJ45 connector on an ethernet cable. It may sound easy, but the process actually requires a little attention to detail.
I’ll detail all about that later.
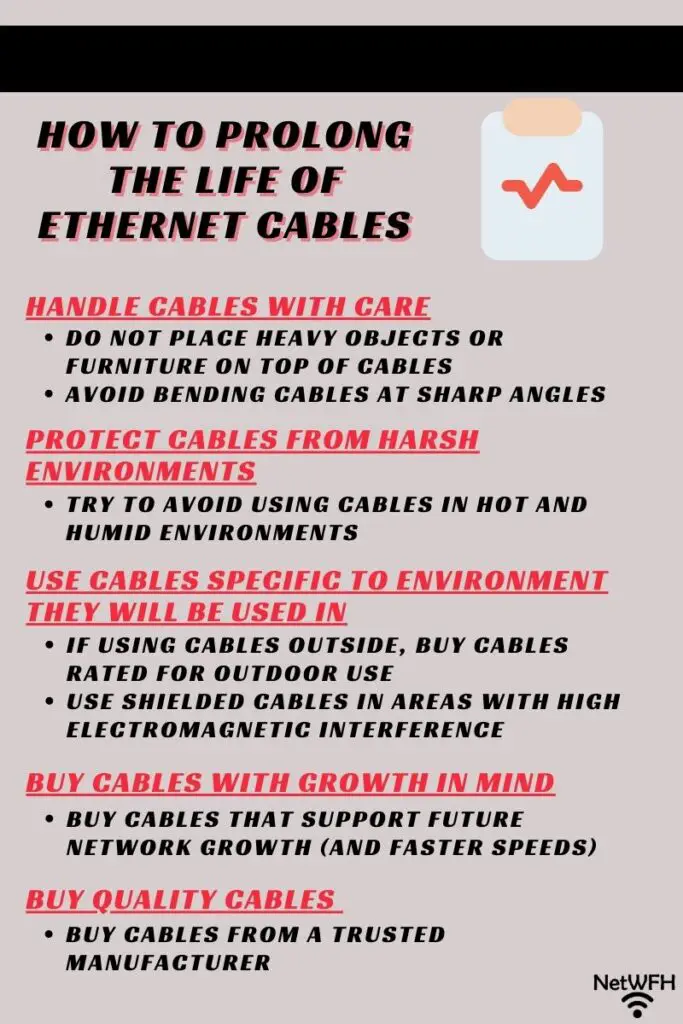
Why you need to crimp ethernet cables
Ok so now we’re on the same page about what crimping means.
Let’s talk about why you’d want to crimp an ethernet cable in the first place.
There are a few reasons why you’d want to crimp your cables. You either:
- Need to shorten one of your ethernet cables
- Want to make your own cables
- Want to replace the connector on a cable
Chances are, at least one of these situations will be applicable to you at some point. In breaking down each of these scenarios, you’ll see that knowing how to crimp ethernet cables can come in pretty handy.
You need to shorten an ethernet cable
This is probably the most common situation for everyday home networks.
We’ve all been there.
You buy an ethernet cable and connect it to the two devices you need to connect. At this point you notice there’s a lot of slack in the cable.
Maybe this is a tripping hazard, or maybe it just makes your home look disorganized.
You have a few options here.
One option is to buy a cable tie to keep the excess cable neatly coiled. The other option is to shorten the cable so there’s less excess between your two devices.
That’s where crimping comes in.
If you crimp the ethernet cable and make it shorter, you won’t have any excess cable. It’ll look much neater as well.
You want to make your own cables
It’s not uncommon for people to make their own ethernet cables. Especially if they’re going to use a lot of them in their home.
Some people even buy long coils of ethernet cable and wire an ethernet jack in each room in their home. This is usually what you’ll find in offices as well.
You really can’t fault them either, because there are benefits to using ethernet cables instead of WiFi to connect devices.
If you need really long ethernet cables, or you just need a lot of them, you can save a lot of money making your own cables. That’s because buying ethernet cable in bulk is much cheaper than buying individual cables.
It also gives you the flexibility of making cables that’re exactly the length you need.
You want to replace a connector of a cable
This is another situation I’m sure you’ve seen before.
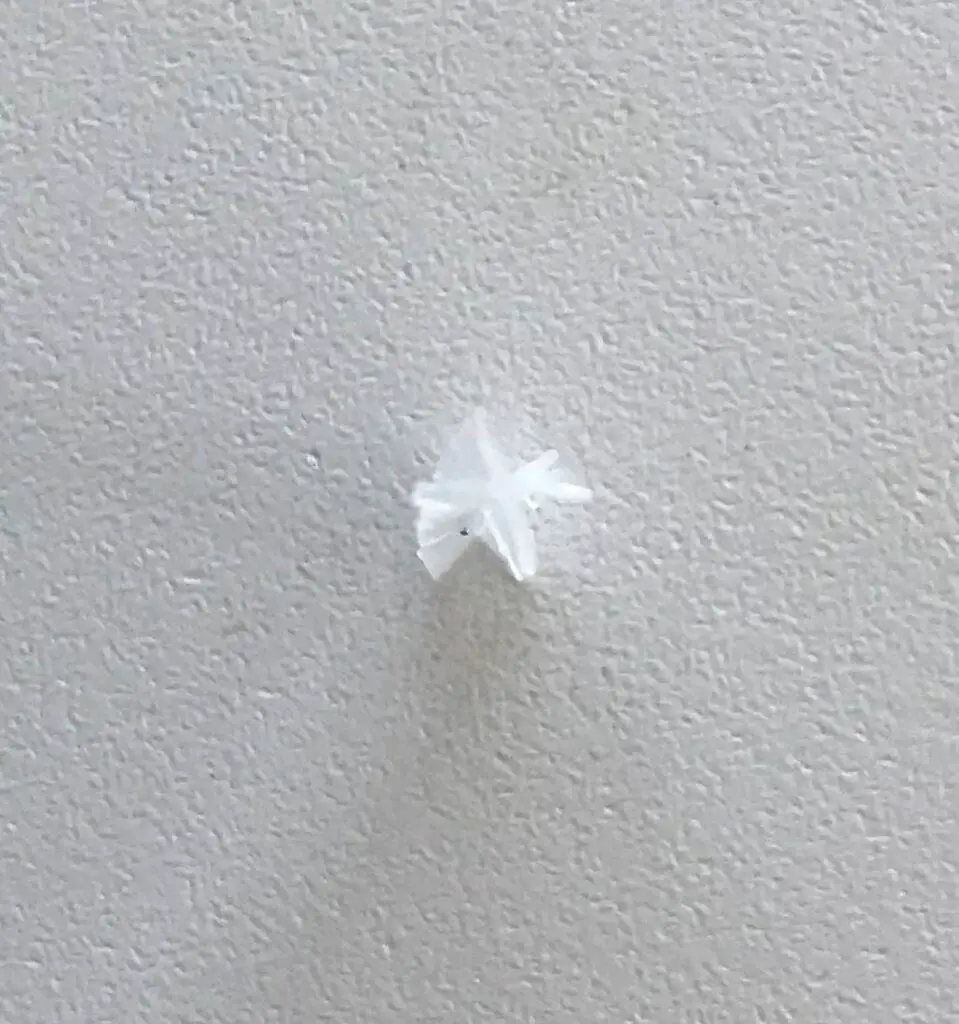
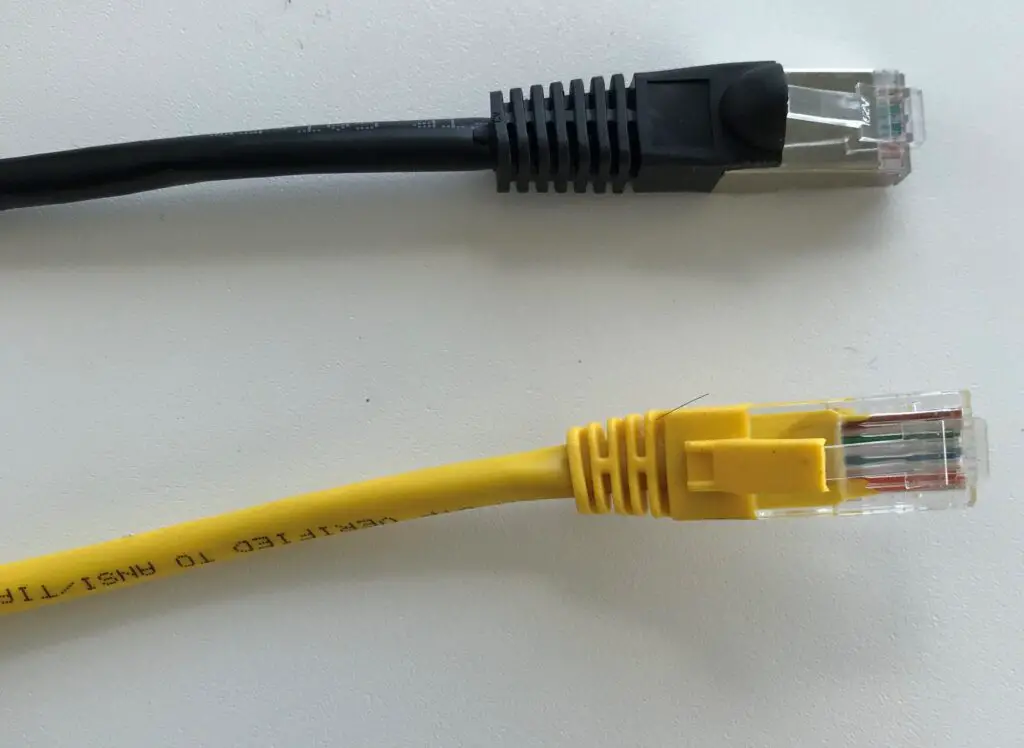
Have you ever had a tab break off of one of the RJ45 connectors on your ethernet cable?
It ranks as one of the most annoying things in the world.
One minute the connector on your cable looks like this:
The next thing you know, it looks like this:
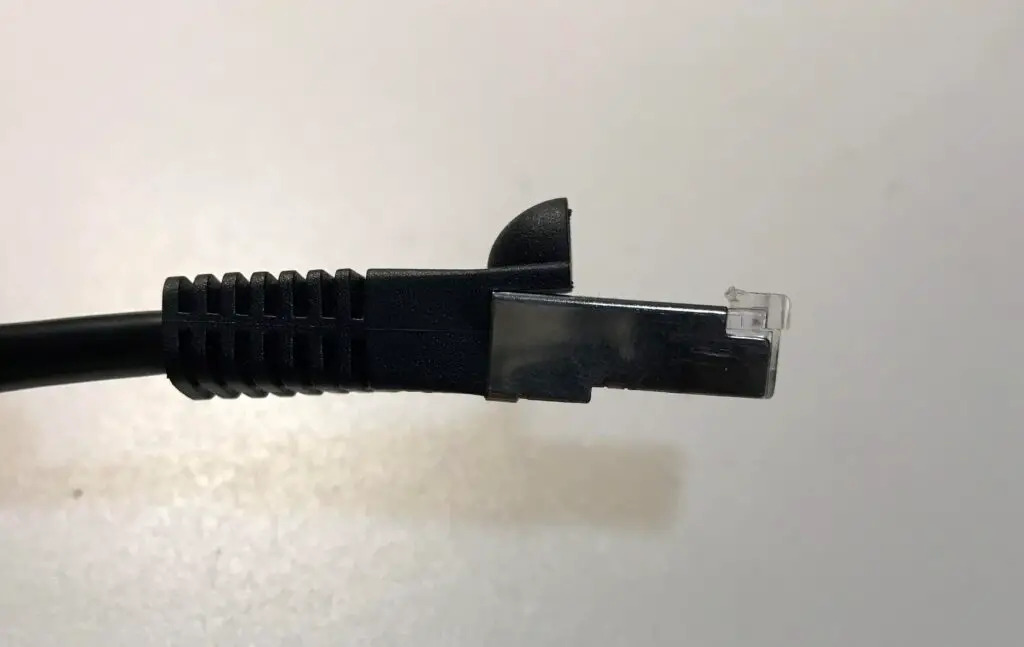
When a tab breaks off a cable connector, it’ll constantly fall out of the device it’s plugged in to. Many people go and buy a brand new cable when this happens.
You won’t have to do that if you know how to crimp your own cables.
By crimping the cable, you can replace the connector with a brand new RJ45 connector. The bonus here is it only takes a few minutes.
Much better than having to go out and buy an entirely new cable. Or worse yet, struggle to get by with an ethernet cable with a broken tab.
What you need to crimp ethernet cables
Ok, let’s say you want to crimp some of your ethernet cables.
Where do you start?
The first thing you should do is make sure you have the right equipment.
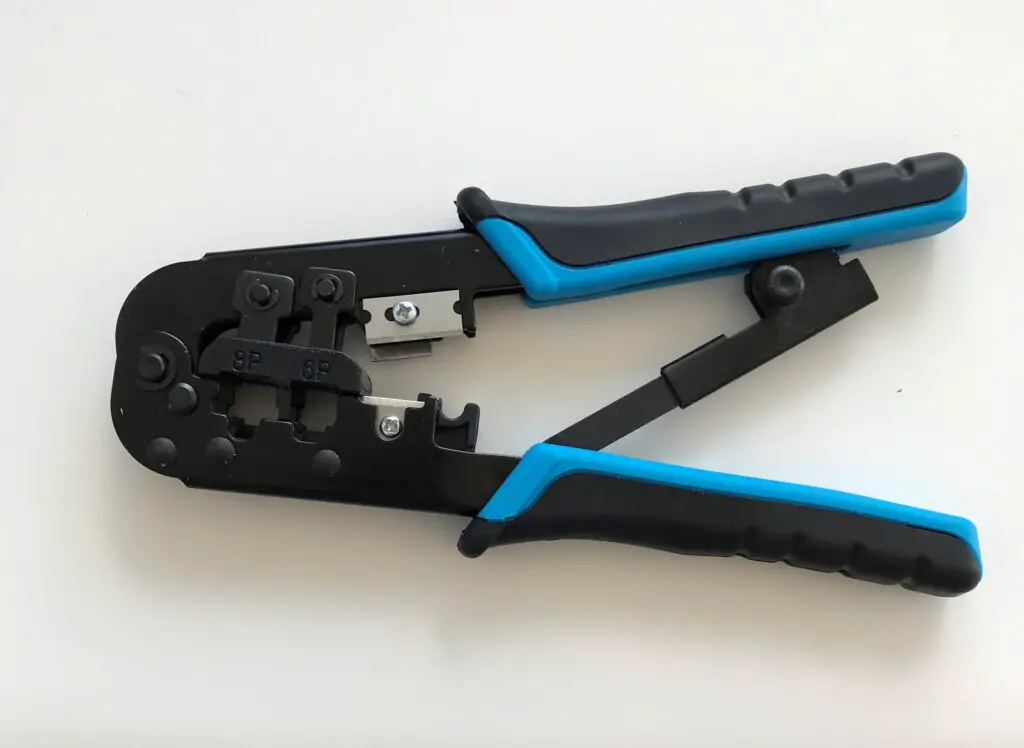
The most important piece of equipment you’ll need is a cable crimping tool, which looks like this:
You can find these online and in many electronics stores. The catch here is that you’ll probably need more than just a crimping tool if you’re going to crimp your own cables.
The good news is that there’s an easy solution for this.
To get everything you need, you can buy a crimping kit. A lot of crimping kits will include:
- A crimping tool
- An ethernet cable stripping tool
- Ethernet cable boots
- RJ45 connectors
- An ethernet cable testing device
Let’s look at each of these items in a little more detail to explain why they’ll be useful when crimping ethernet cables.
Crimping tool
As I mentioned, a crimping tool is essential if you want to quickly and reliably crimp your cables.
Crimping tools are used to attach the wires inside an ethernet cable to an RJ45 connector. They’re very easy to use once you know how to order the wires correctly (which we’ll get to later).
If you have a small number of cables to crimp, it’s possible to use a screwdriver instead of a crimping tool to attach the RJ45 connector to the wires in the cable. I would advise against this, however, because using a screwdriver is much slower and less effective than using a crimping tool.
On top of that, you don’t know how many cables you’ll have to crimp in the future.
Trust me, you’ll be much happier with a crimping tool. Even if you don’t want to buy a complete crimping kit, I suggest you at least pick up a crimping tool.
Ethernet cable stripping tool
An ethernet cable stripping tool is also very handy to have.
Here’s what they look like:
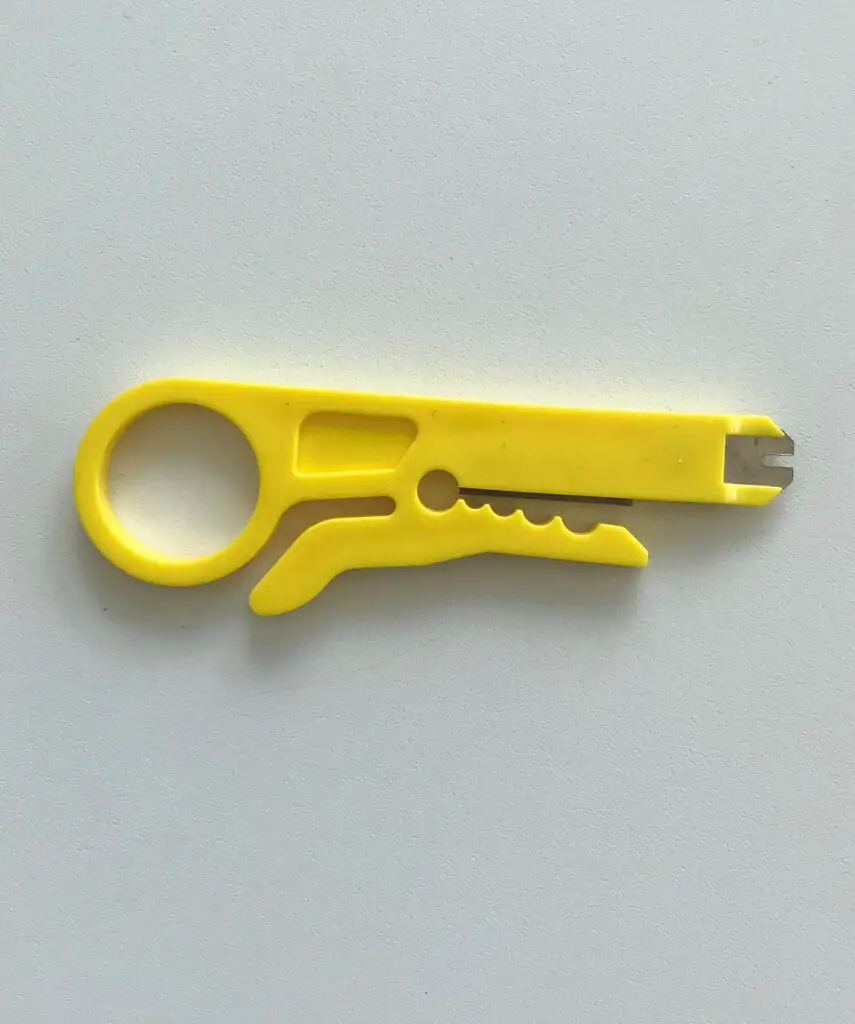
As you may have guessed, ethernet cable stripping tools are used to remove the sheath of an ethernet cable. You can use other tools to cut the sheath off an ethernet cable, but if you’re not careful you can damage the wires inside it.
The last thing you want to do is damage the wires in the cable, because then the cable won’t work properly.
With a stripping tool, you can quickly and easily strip the sheath off of a cable without having to worry about damaging the wires inside it.
You’ll need to do this when crimping your cables, because you need access to the wires in the cable in order to attach them to an RJ45 connector. If you’d like, you can buy these separately from an ethernet cable crimping kit.
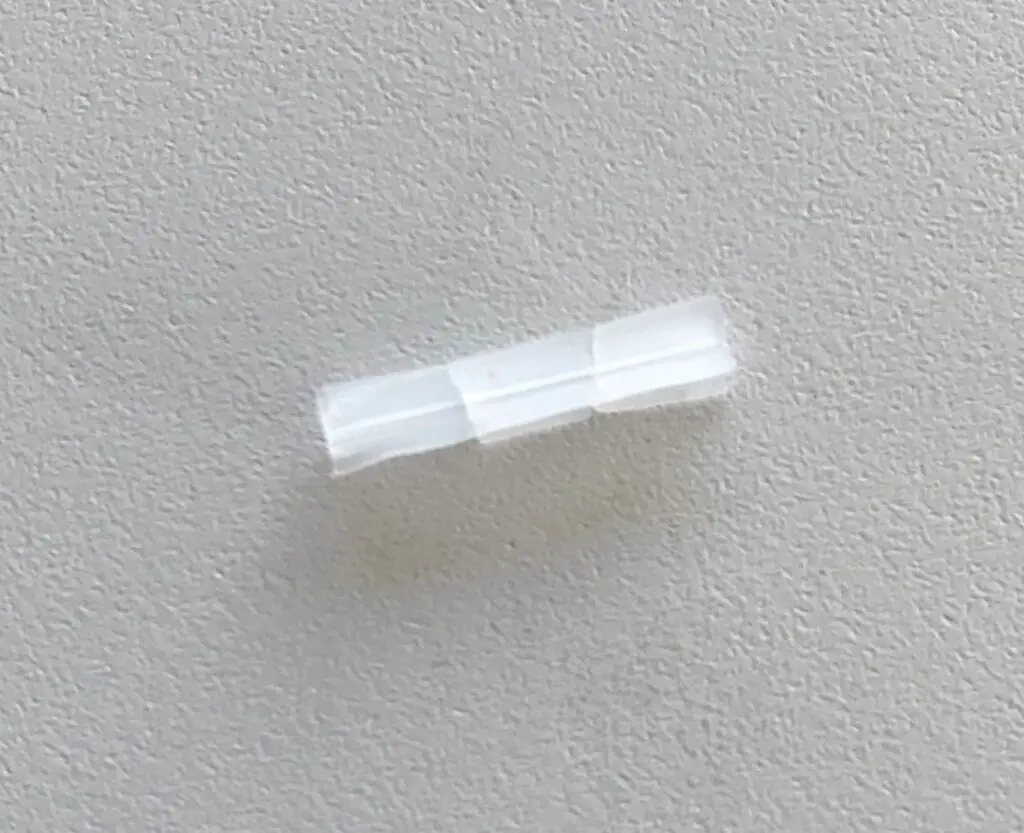
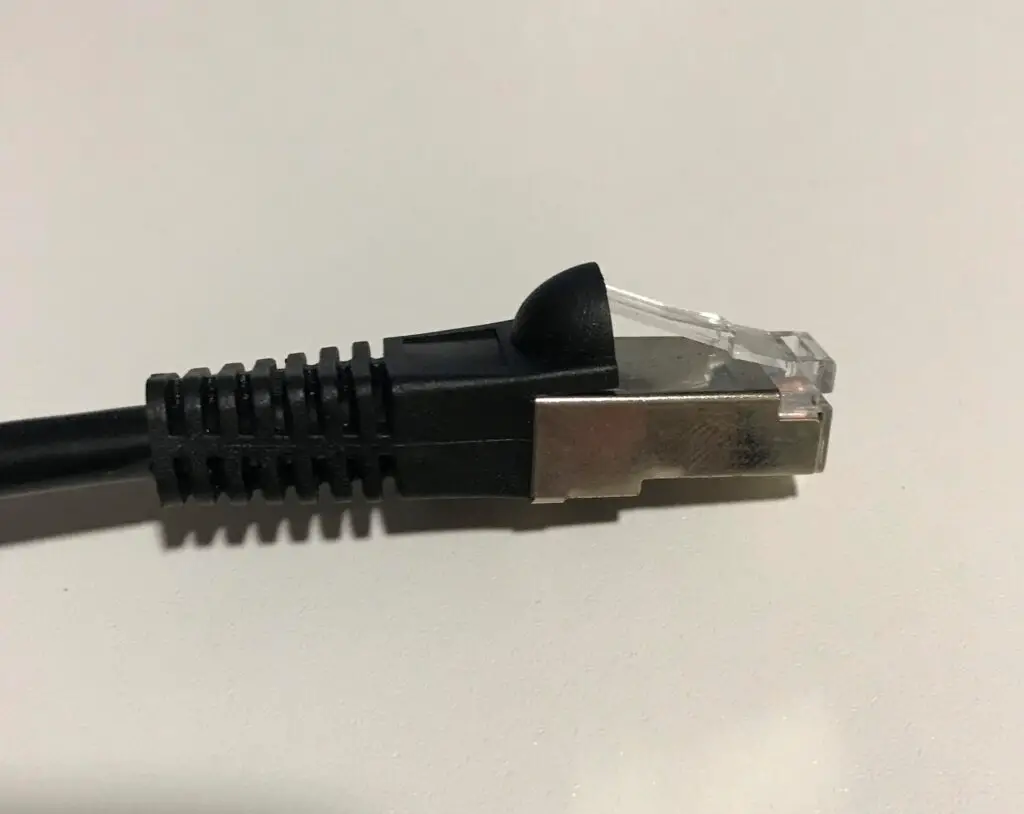
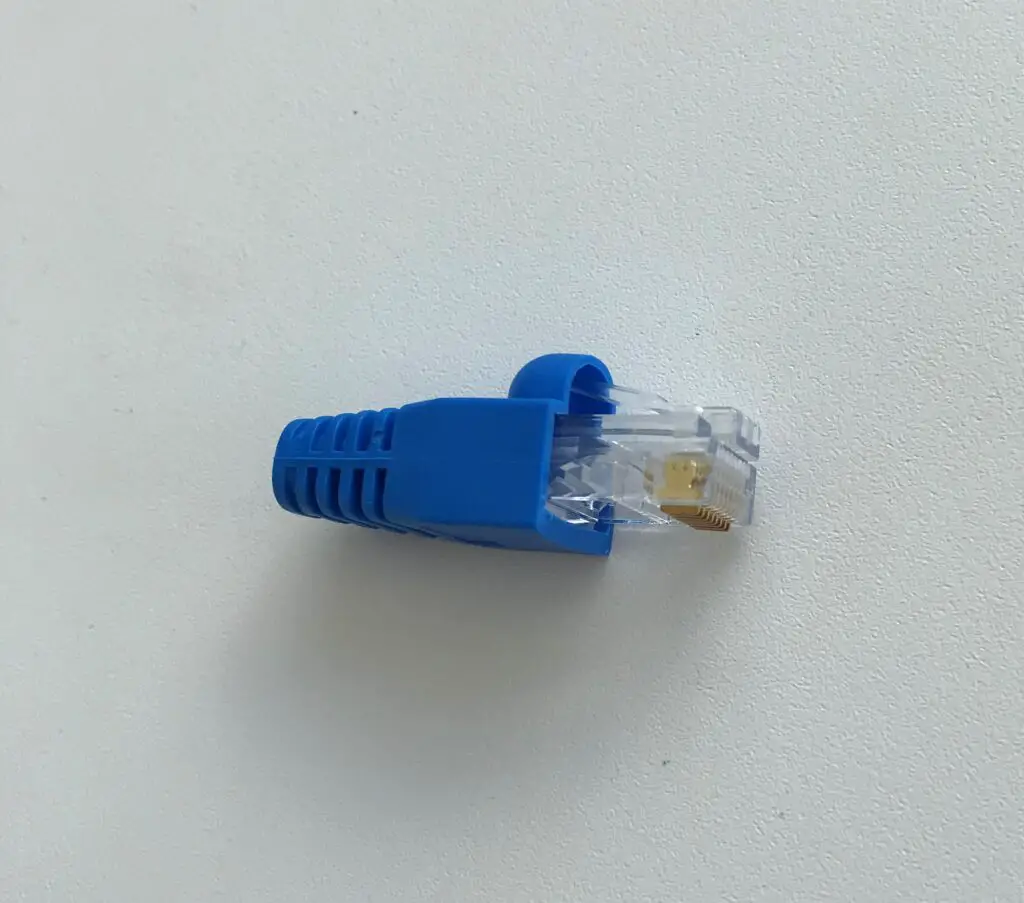
Ethernet cable boots
Although they aren’t mandatory, ethernet cable boots are good insurance for your ethernet cables.
I’m sure you’ve seen these before, as they’re pretty common on ethernet cables.
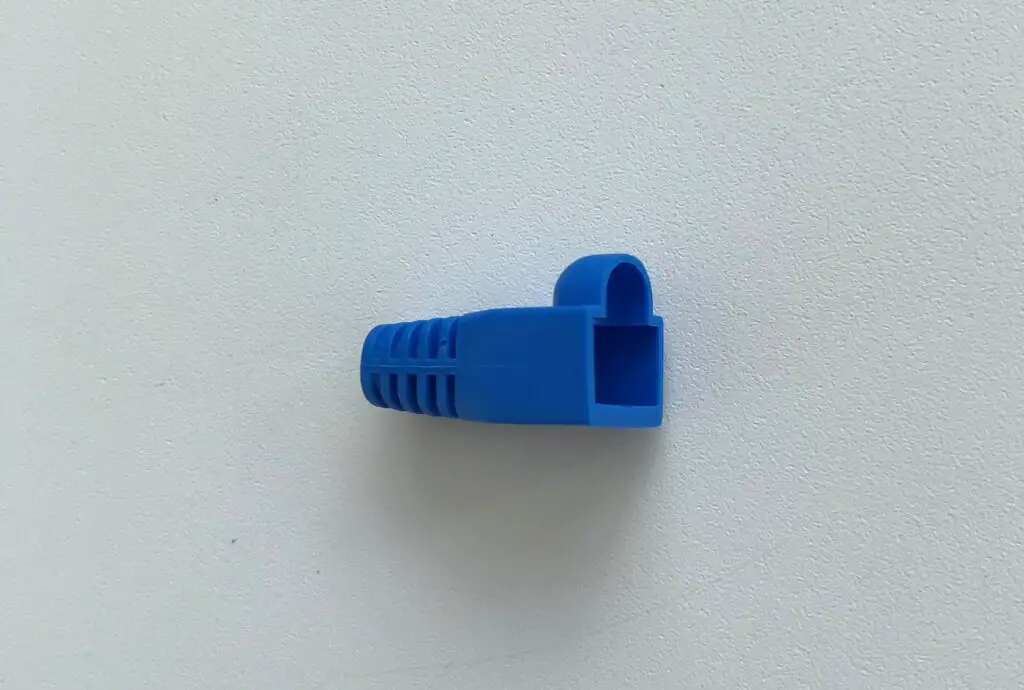
The purpose of ethernet cable boots is to protect the tab on the RJ45 connector.
When an ethernet cable has a boot on it, it prevents the tab of the RJ45 connector from snagging on something. If the tab of an RJ45 connector gets broken off, it’ll be much harder to keep the cable connected to the device it’s plugged in to.
As you can see, the boot provides a protective housing over the tab of the connector.
Again, you don’t need to use these on your ethernet cables if you don’t want to.
With that being said, if the tab on one of your RJ45 connectors breaks off, you’ll wish you had a boot on it. You can buy these separately if you don’t want everything that comes in a crimping kit.
RJ45 connectors
RJ45 connectors are pretty self-explanatory.
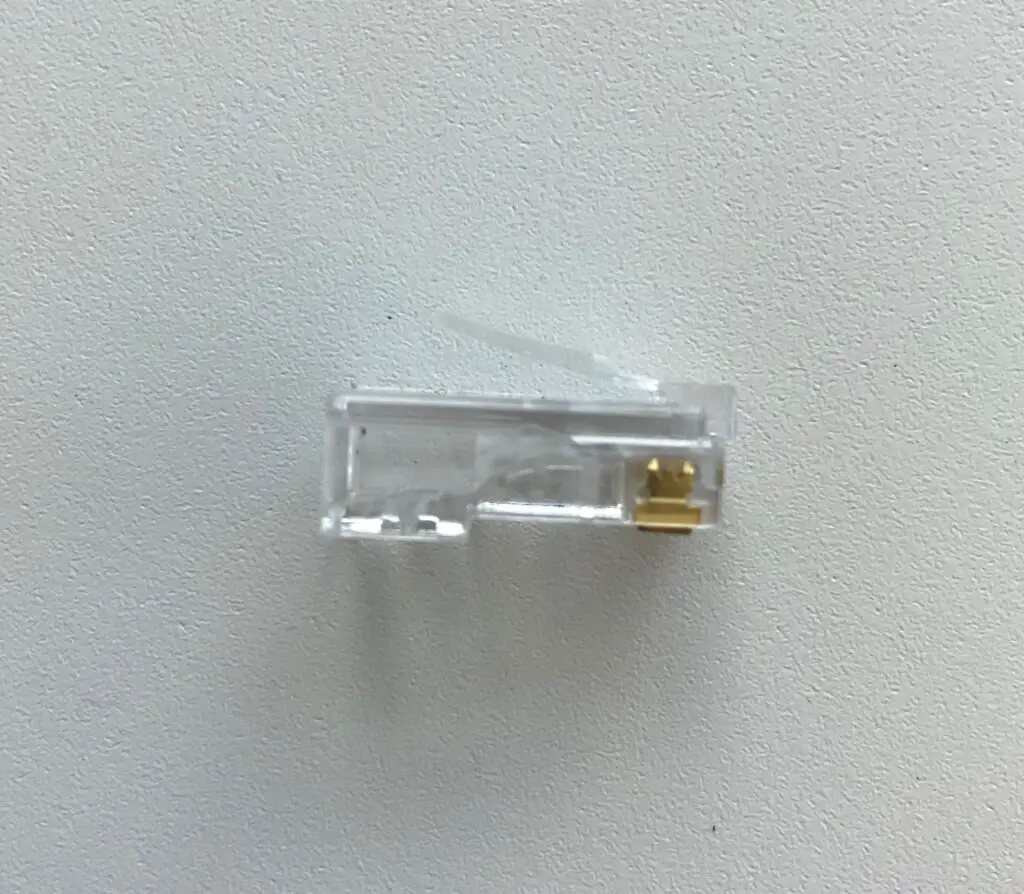
The bottom line is that you can’t have a working ethernet cable without RJ45 connectors on each end.
It’s very helpful to have some spare connectors on hand at all times. You never know when you’ll need to crimp a cable or replace a connector.
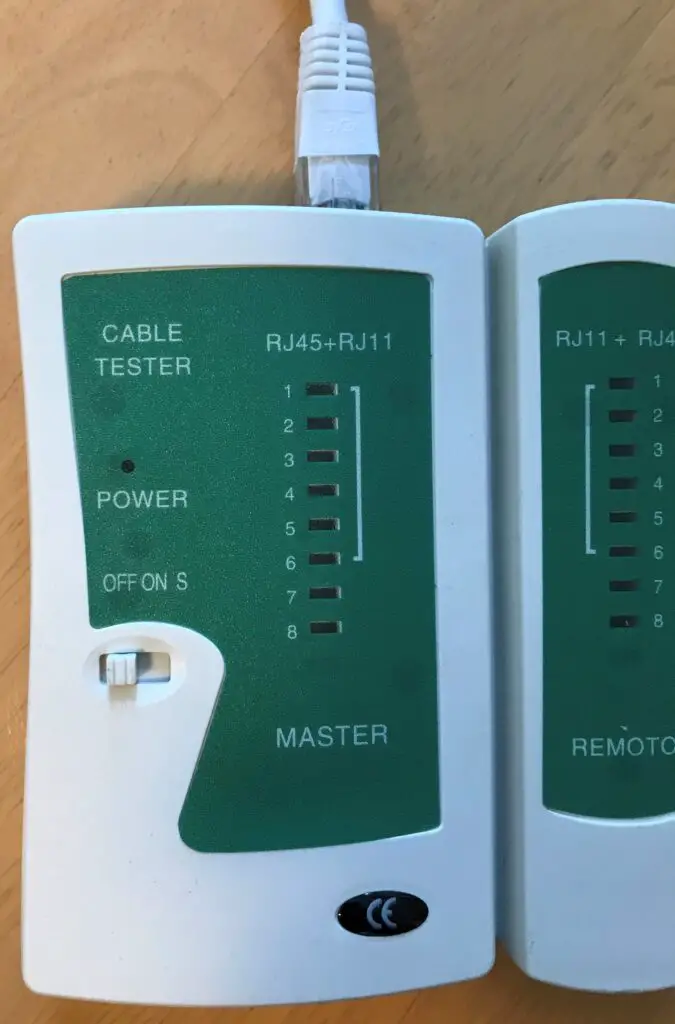
Ethernet cable testing device
When you’ve finished crimping an ethernet cable, you want to be able to check your work.
That’s why ethernet cable testing devices are so helpful.
Here’s an example of what they look like:
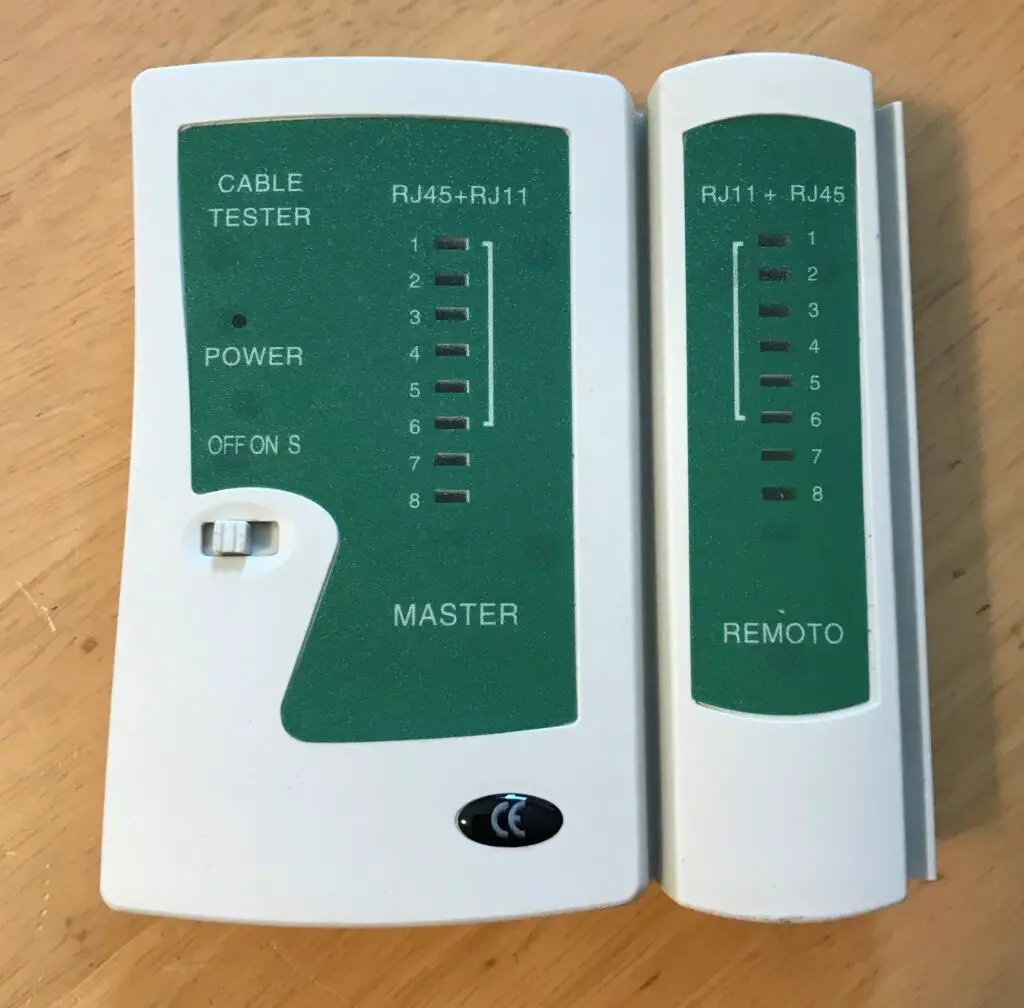
An ethernet cable testing device will tell you if a cable is working properly. In other words, it’ll tell you if you correctly crimped your cable.
These devices are also handy because you can use them to troubleshoot if you think one of your ethernet cables has gone bad.
I recommend one of these devices for anyone who uses multiple ethernet cables in their home network. You can also buy them separately if you don’t want the other items that come in a crimping kit.
How to crimp ethernet cables
Ok, now you have everything you need to get started crimping some cables.
I’d recommend gathering all the items you need to crimp an ethernet cable so you can complete the process without getting interrupted.
Let’s get started.
1. Identify the length of cable you need
Like most things in life, preparation is key. Before you start chopping up your cables with reckless abandon, there are some things you need to consider first.
One question you need to ask yourself is: how long do I want my ethernet cable to be?
If you’re just replacing an RJ45 connector on an ethernet cable, this is a simple question. You don’t need to worry about changing the length of the cable.
It’s a little bit different if you’re making your own cables, however.
You’ll want to make sure you take a measurement of the length of cable you need.
2. Cut the ethernet cable a few inches longer than you need
Once you’ve identified the length of cable you need, you’re ready to cut the cable.
The key here is that you’ll want to add a few inches to the length of the cable when you’re cutting it. This gives you a little extra length to work with when you’re adding the RJ45 connector to the cable.
As you’ll see, you’ll lose a few inches of the cable when you’re preparing to attach the RJ45 connector.
If you have to add an RJ45 connector to both ends of the cable, you should cut the cable even longer. You’ll want to give yourself even more room to work with.
Cutting the cable longer than you need has multiple benefits. It ensures the cable is long enough after you’ve attached the connectors to it. It also gives you room for error in case you make some mistakes and have to crimp the cable multiple times.
When you’re ready, I recommend you cut the cable with your crimping tool if you have one. It should come with a blade on it that’s made specifically for cutting ethernet cables.

If you don’t have a crimping tool with a cutter on it, you can use a pair of scissors. You just want to make sure the cut is even across the cable.
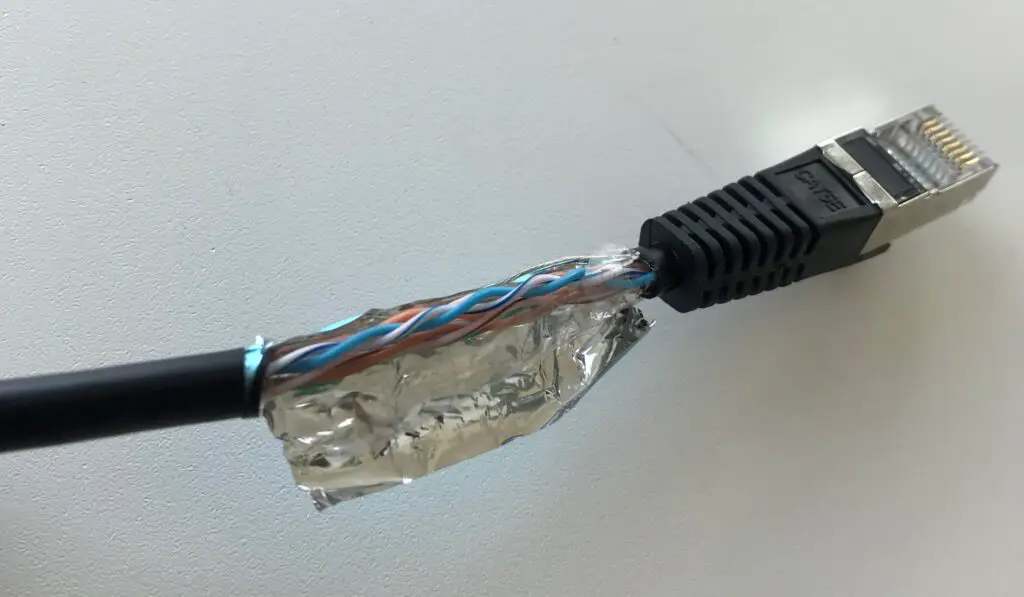
3. Expose more than 1 inch of wires at the end of the cable
Ok, you’ve gone ahead and cut the cable.
The end of the cable should now look like this:
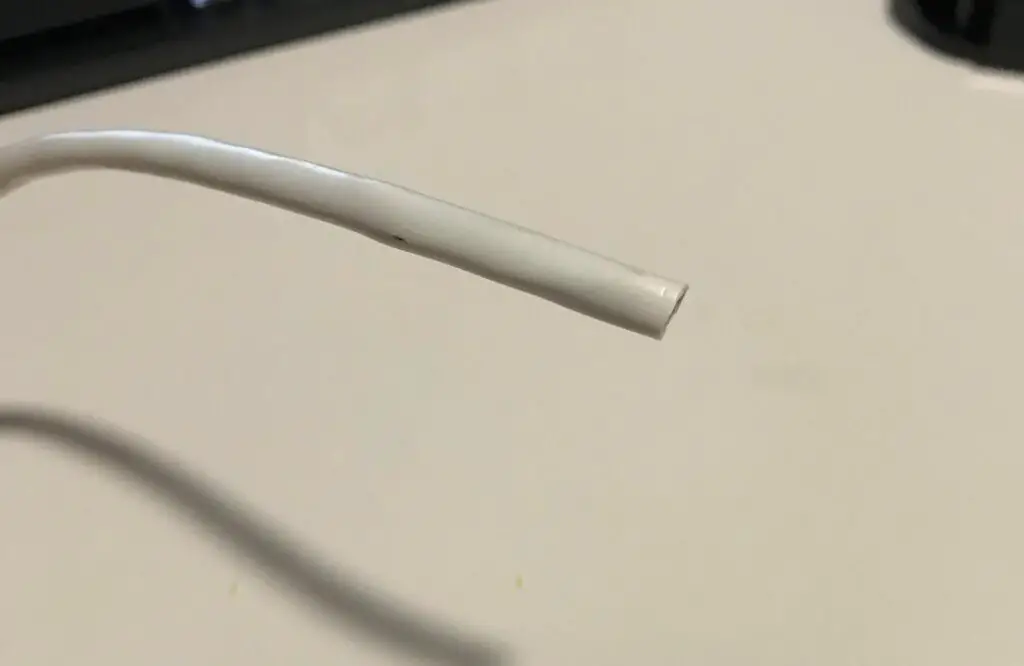
In order to attach an RJ45 connector to your ethernet cable, you’ll need to be able to access the wires inside it. That’s the next thing we need to take care of.
This is where our ethernet cable stripping tool comes in handy. It’ll remove the sheath from the cable without damaging the wires inside it.
How to use the stripping tool
The first thing to do is identify at what point you want to strip the sheath from the cable.
I recommend you remove more than an inch of the cable’s outer layer. This’ll give you more room to work with when preparing to insert the wires into a connector.
To remove the outer layer of the cable, press down on the lever at the top of the stripping tool and insert the cable into the notch that it fits in. Once the cable is in place, release the lever at the top of the stripping tool to lock the cable in place.
Make sure the blade on the stripping tool is at the location on the cable from where you want to strip the sheath off of it.
At this point, the cable and stripping tool should look like this:
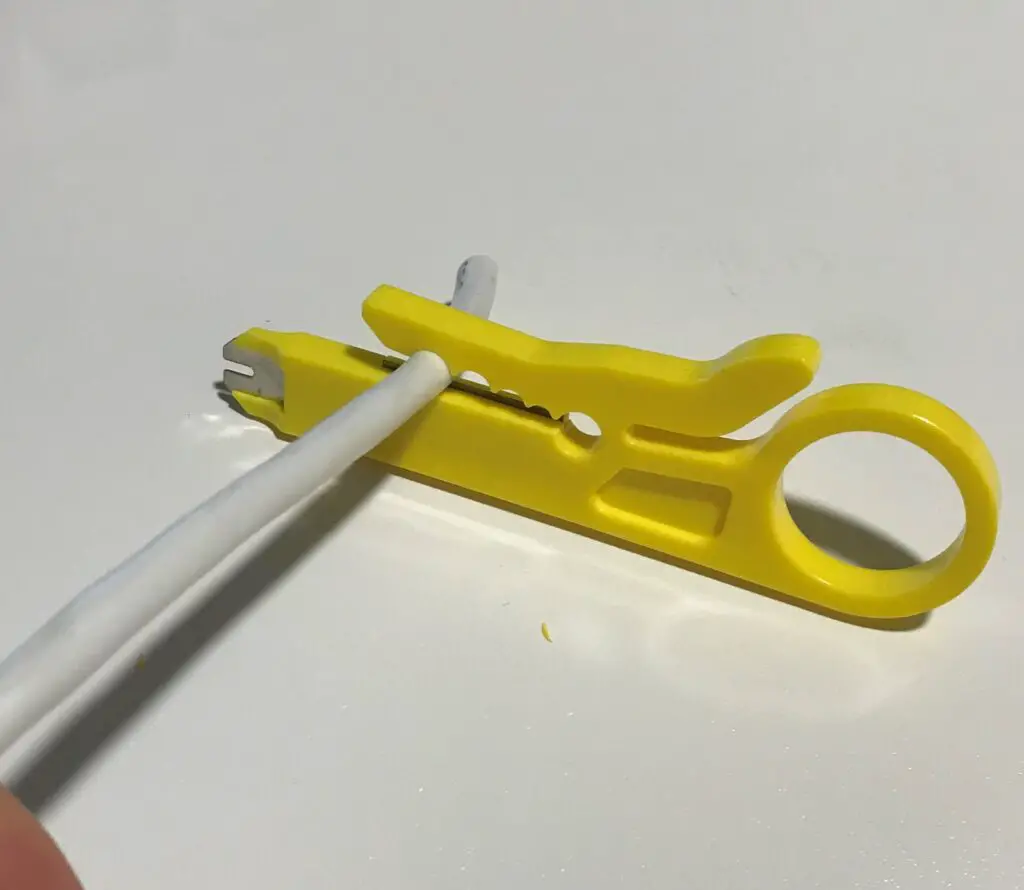
Now that everything is in place, you’re ready to cut the sheath.
Stick a finger into the circular part of the stripping tool and rotate the tool in a circular motion all the way around the cable.
Once the outer layer of the cable has been cut all the way around, you can unclip the cable from the stripping device and remove the sheath. This’ll expose the wires inside the cable.
It should look something like this:
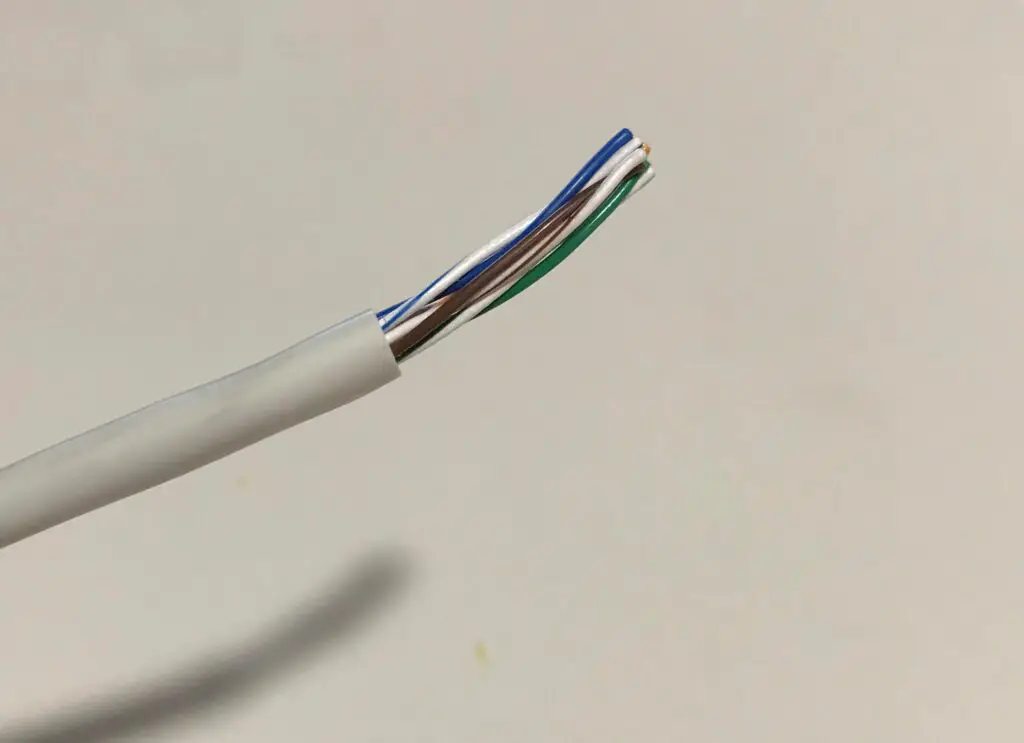
As a reminder, make sure you have more than an inch of exposed wires to work with.
Ok, let’s move to the next step.
4. Put a boot on the ethernet cable
If you’re going to put a boot on your cable to protect the RJ45 connector, now’s a good time to do it.
I’ve made this mistake too many times. Once the RJ45 connector is on the cable, you can’t put the boot on. It won’t slide over the connector.
It’s best to put the boot on now before things get complicated.
Feel free to slide the boot far down the cable so it’s out of your way. Here’s a good example of what I’m talking about.
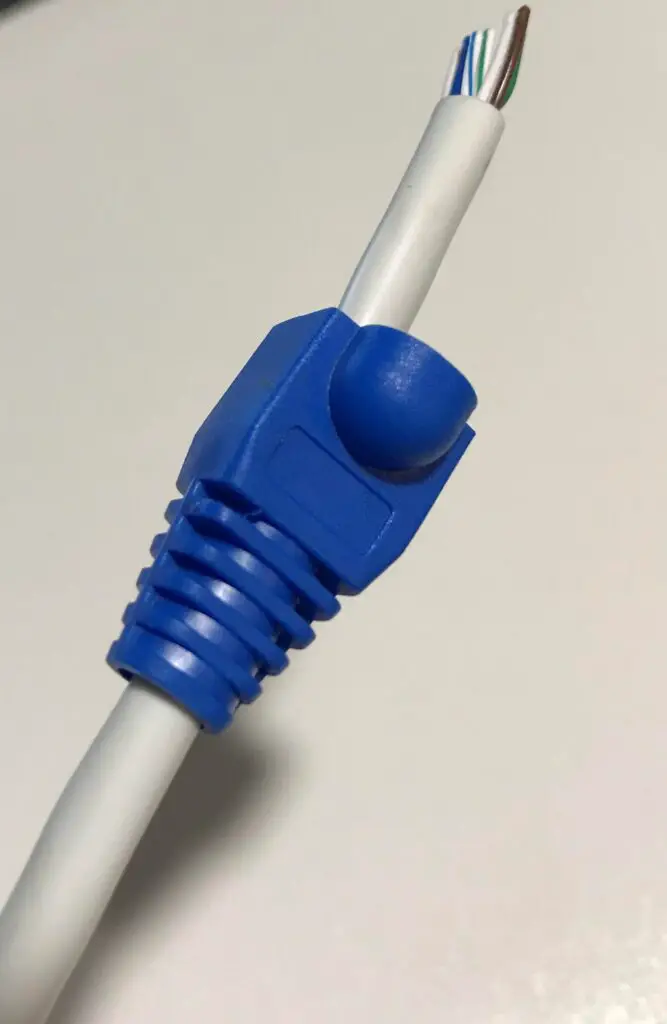
By adding the boot now, it makes things easy once the connector has been attached to the cable. All you have to do is slide it up and over the tab of the connector.
Keep in mind that you don’t have to use boots on your cables. They just serve as a layer of protection so the tabs on the RJ45 connectors don’t break.
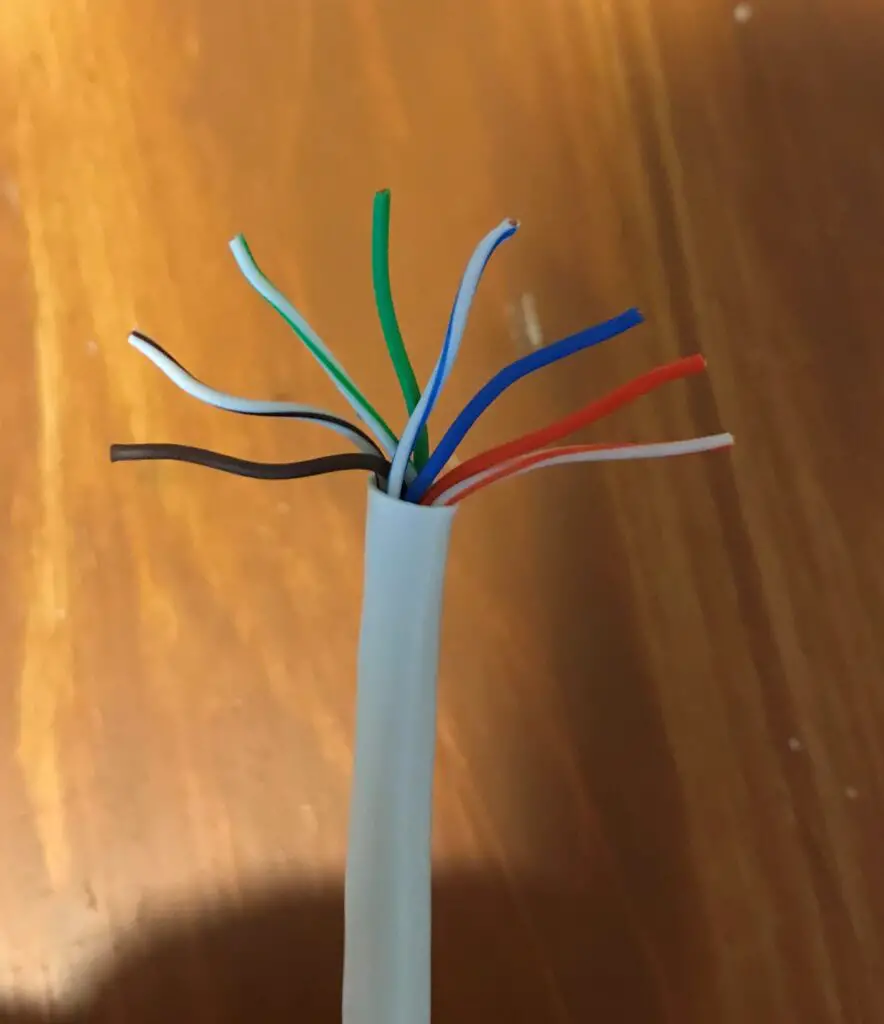
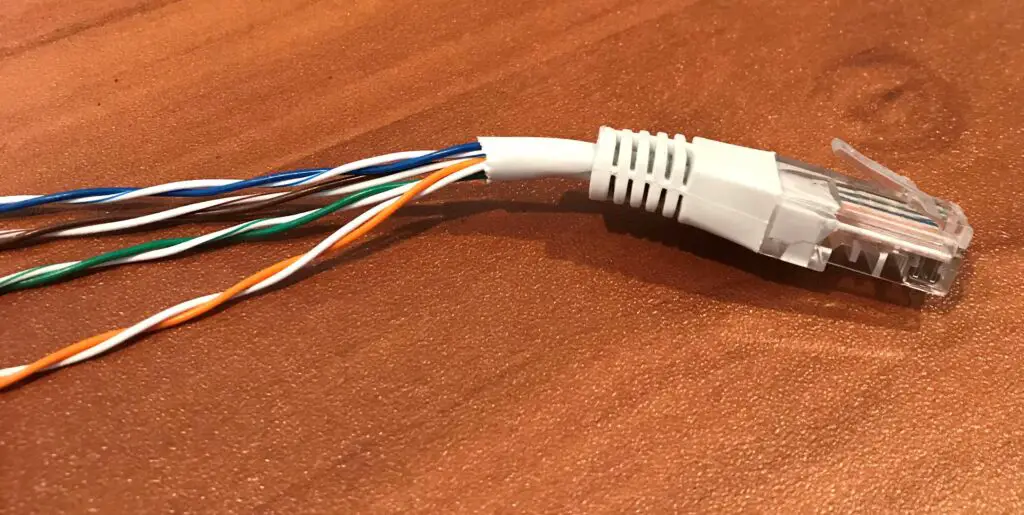
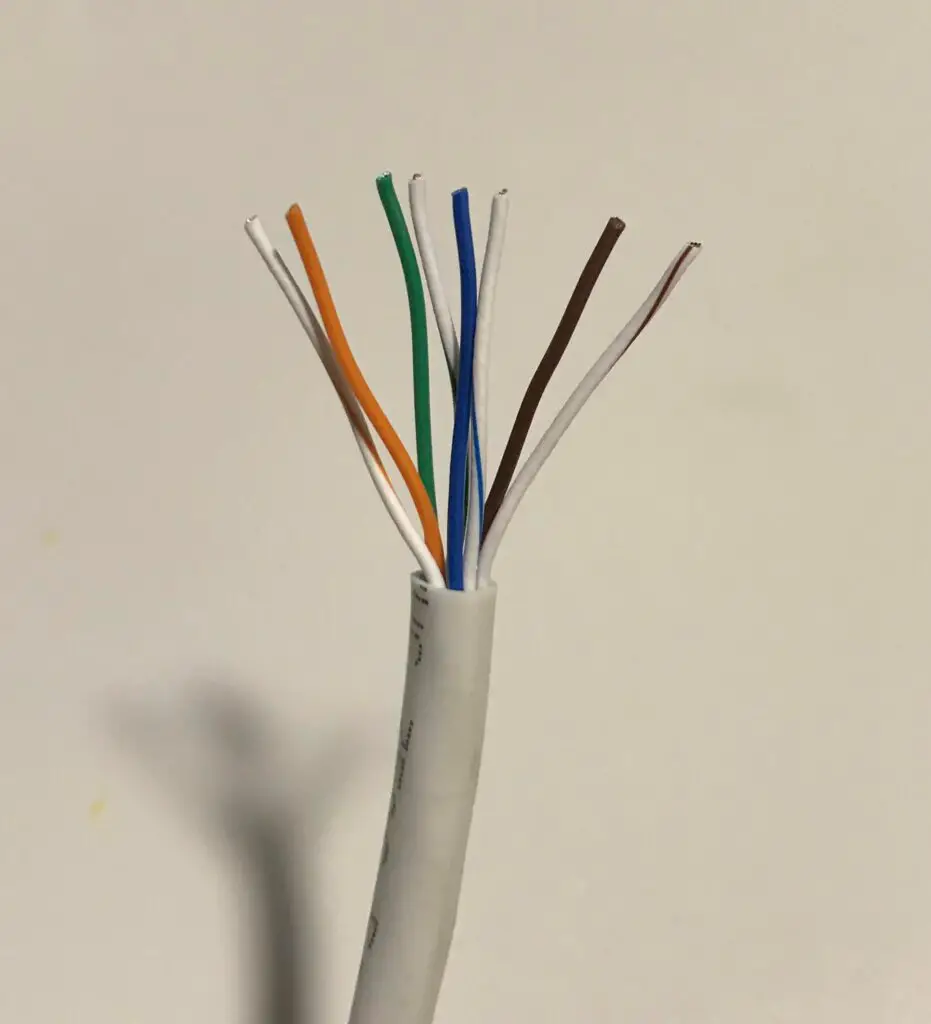
5. Untwist the exposed pairs of wires
This next step is pretty easy.
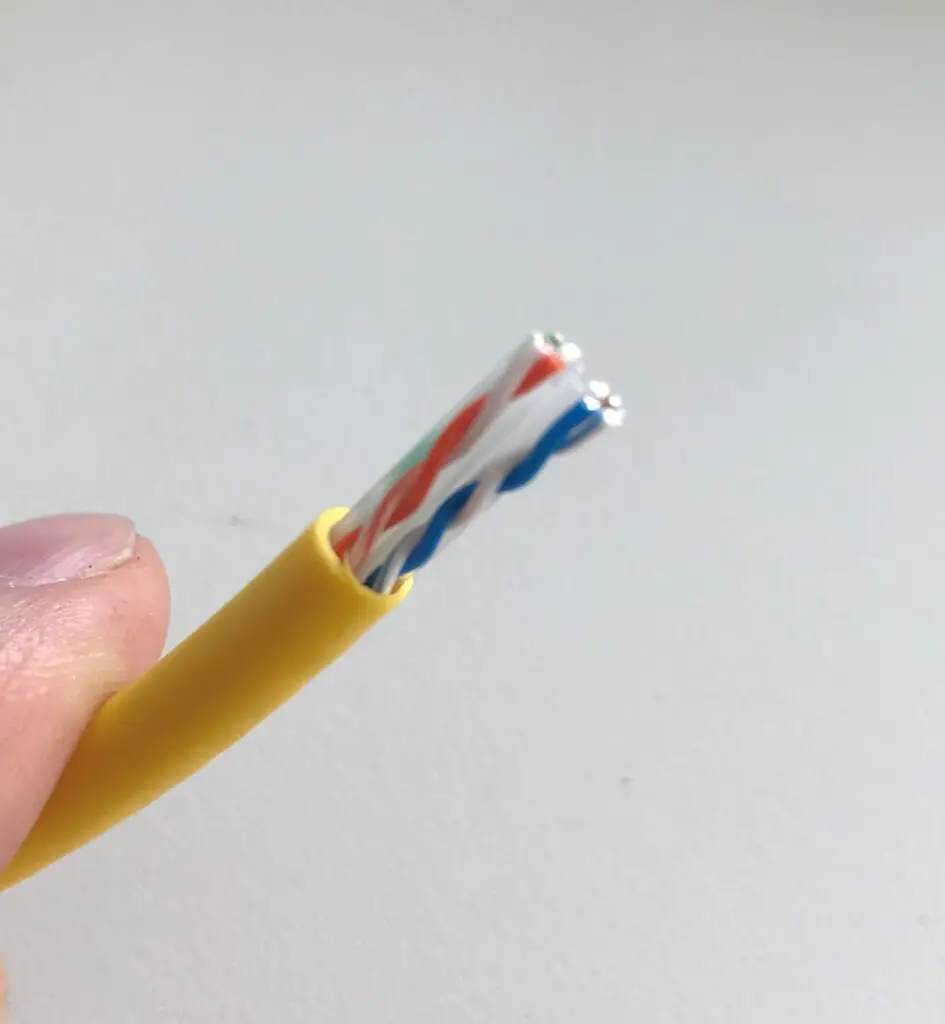
Take a look at the wires you exposed with the stripping tool. Hopefully you’ll notice that the wires are twisted in pairs of two inside the cable. In total, you should have 4 pairs of twisted wires.
Go ahead and separate these pairs of twisted wires so you can clearly see the 4 pairs.
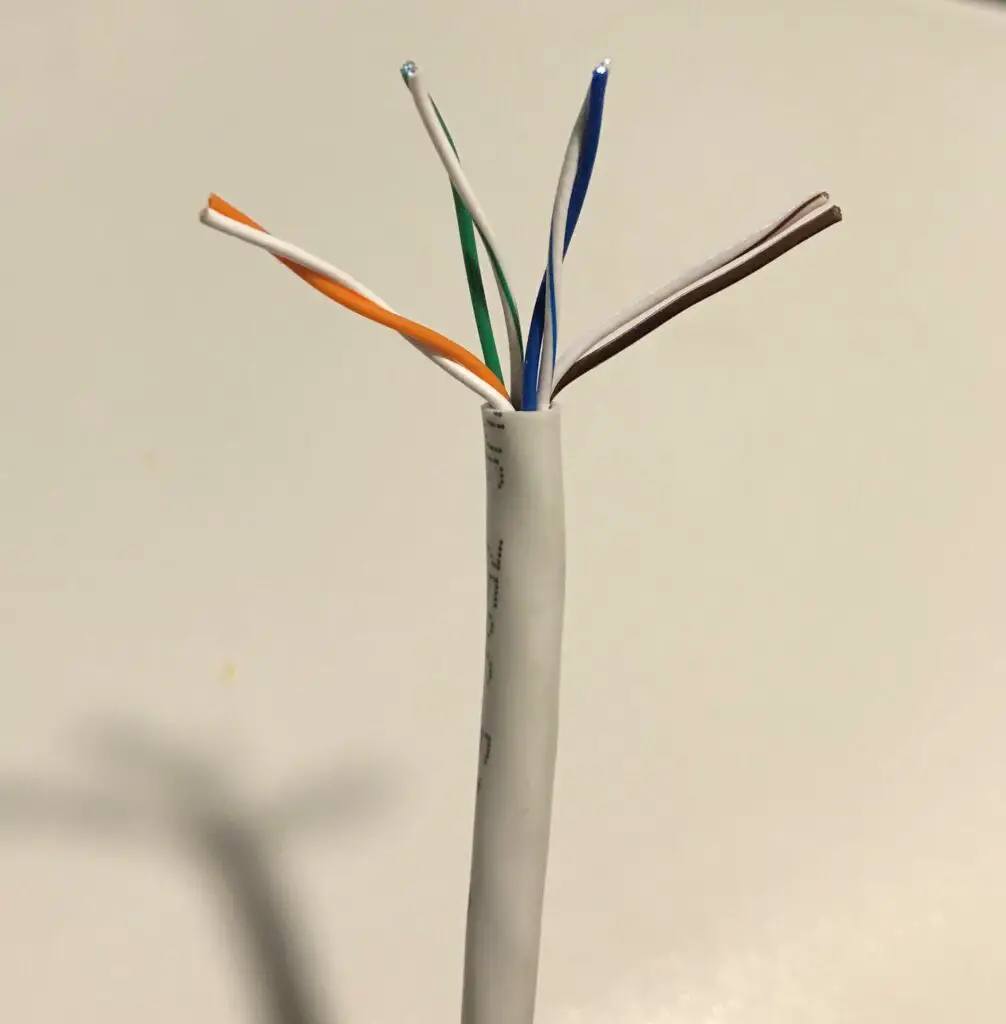
Now that you have the 4 pairs of twisted wires separated, go ahead and untwist them.
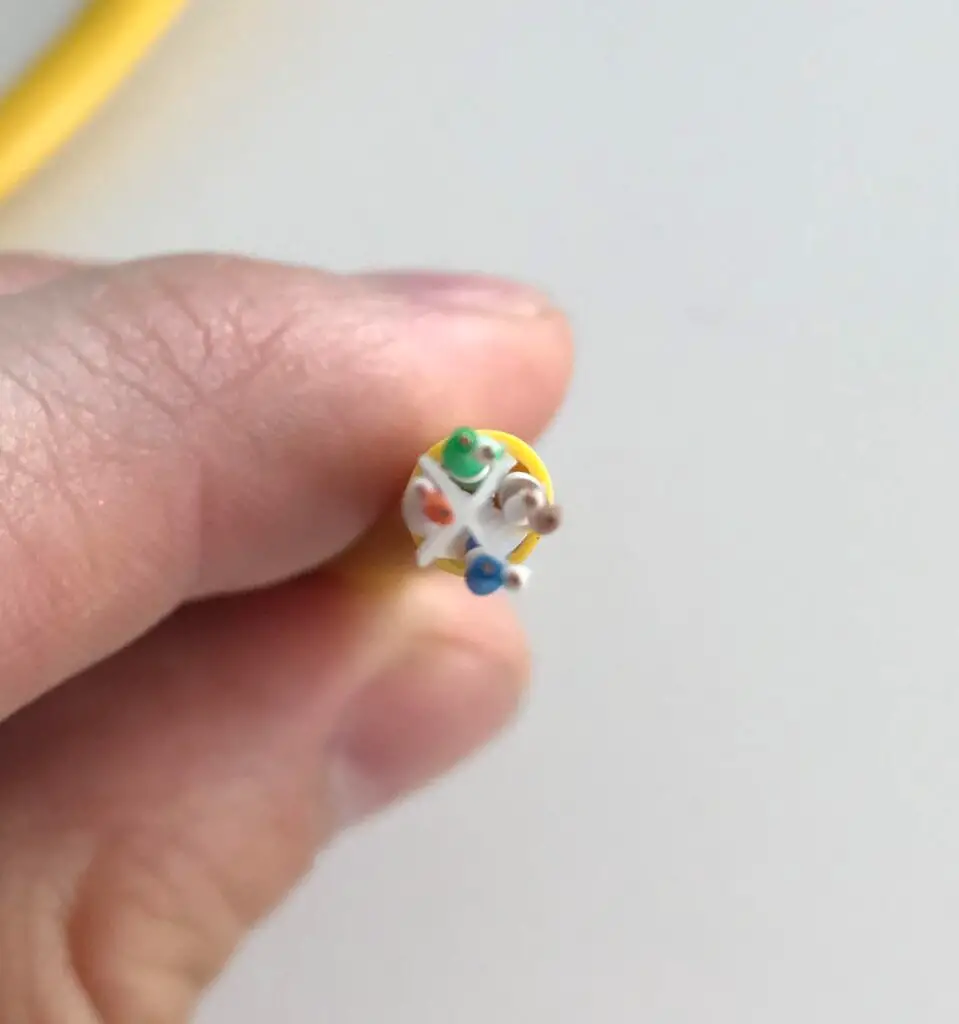
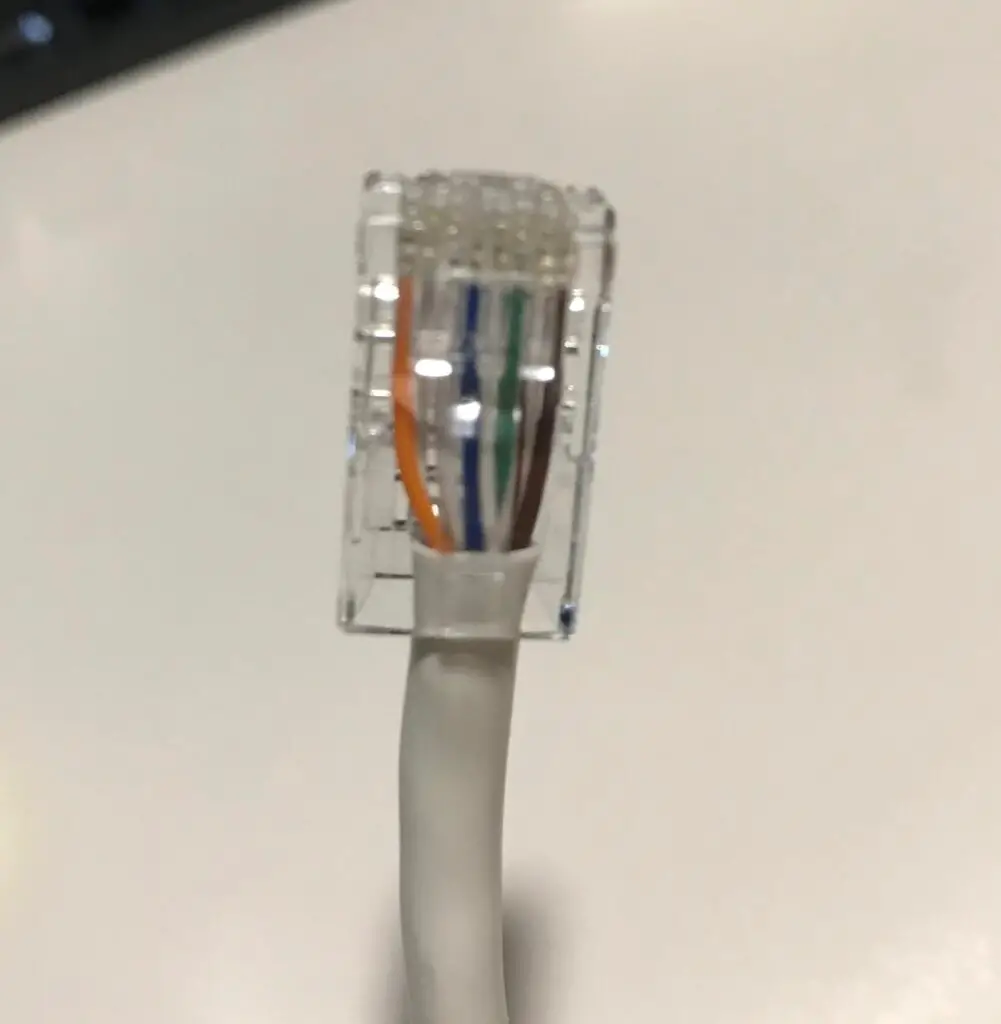
For the next step, you’ll want all the wires separated like the picture below.
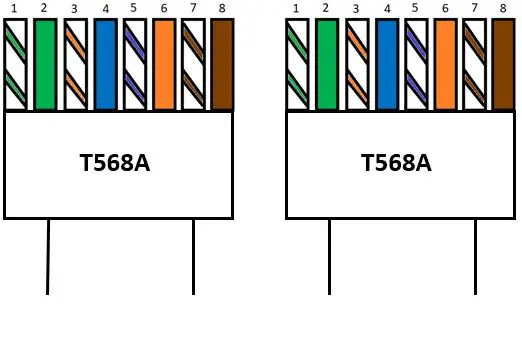
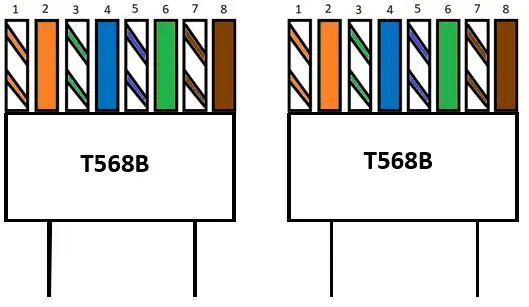
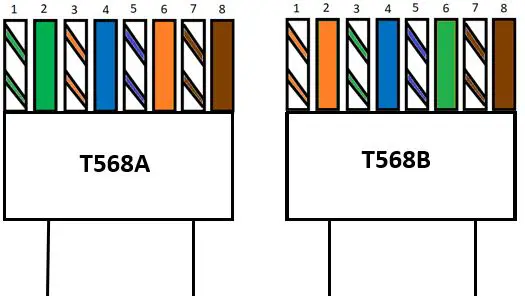
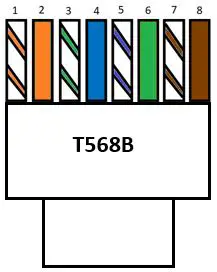
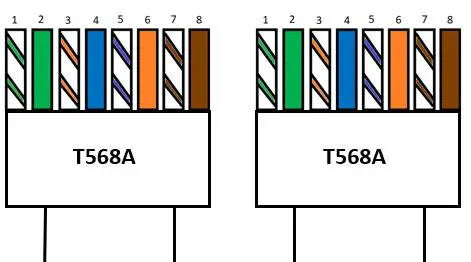
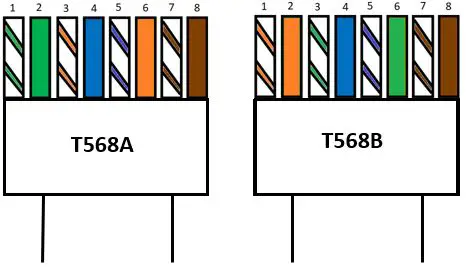
6. Order the wires in a standard ethernet cable pinout configuration
This next part is where it can start to get a little tricky.
Now that you’ve separated the wires, you need to line them up in a certain order.
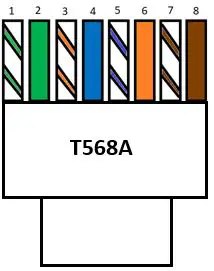
There are two possible ways to line up the wires. These are called pinout configurations.
The two different pinout configurations are called T-568A and T-568B. Here’s the order of the wires in each configuration:
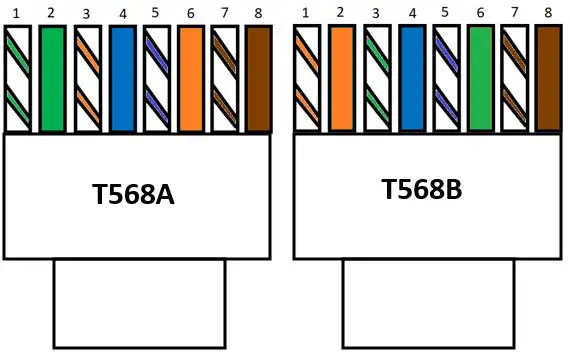
Due to advancements in ethernet cable technology, you can pick the pinout configuration you want to use. The cable will work regardless of the pinout configuration.
With that said, if you’ll be adding a connector to each end of the cable, I recommend using the same pinout configuration at each end.
If you want to follow the crowd here, most ethernet cables I’ve come across have a T-568B configuration.
Go ahead and pick a pinout configuration and get the wires lined up next to each other.
7. Cut the untwisted wires so they are all the same length
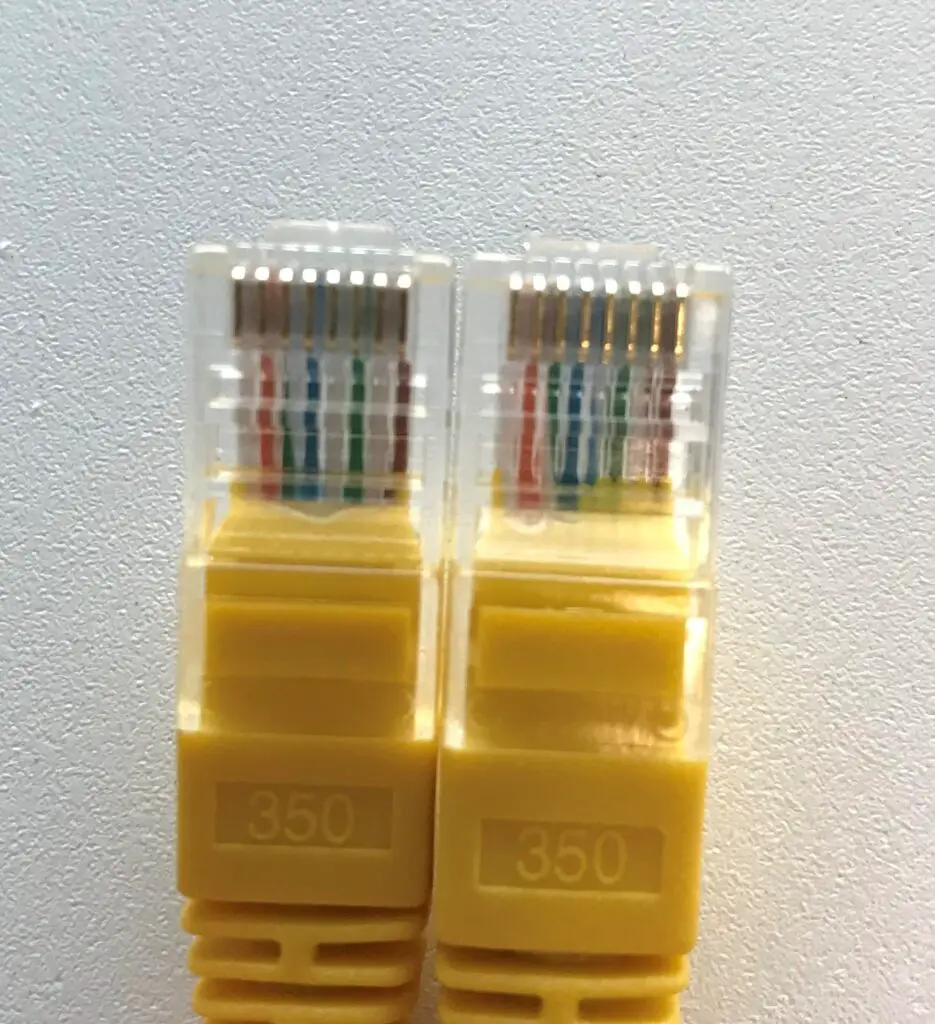
Once all your wires are lined up in a pinout configuration, your cable will probably look like this:
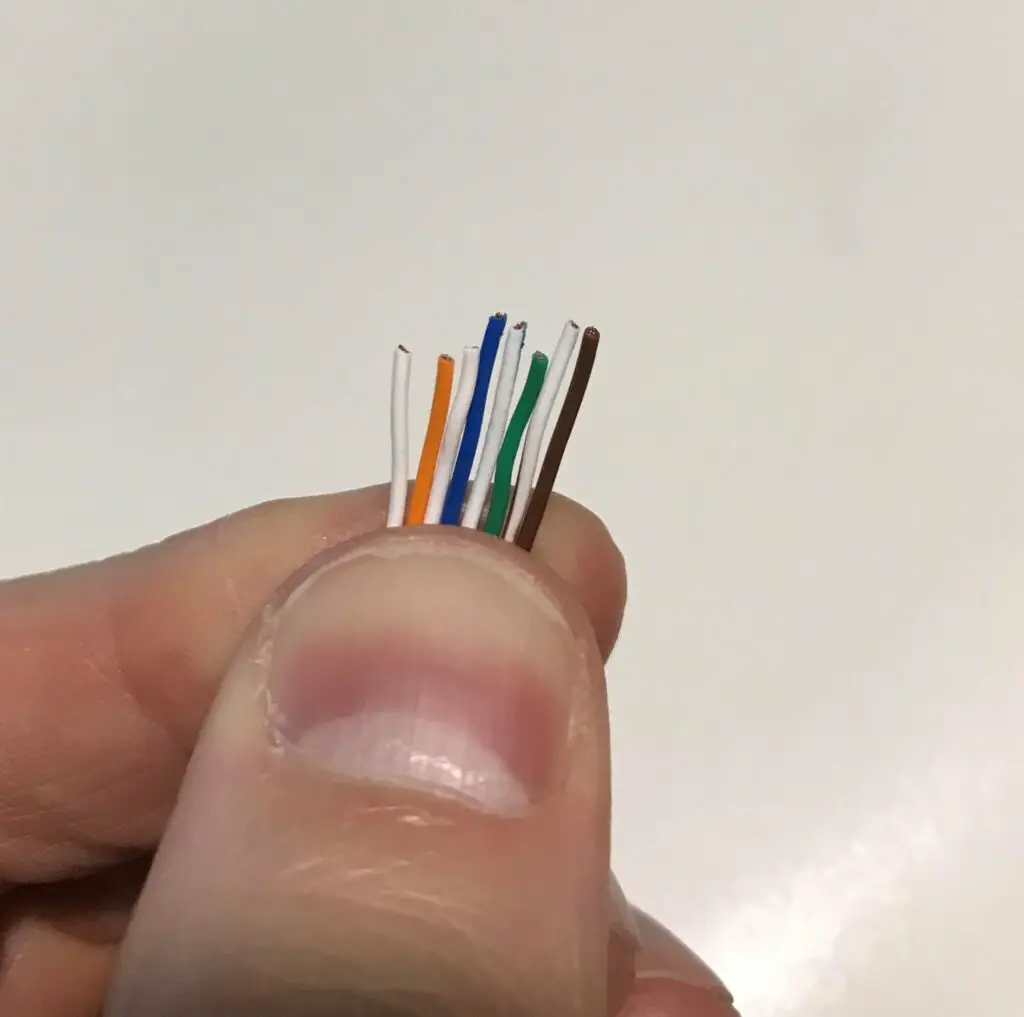
As you can see, the wires are not all the same length.
To get a good fit with the RJ45 connector that goes on the end of the cable, you’re going to want the wires to be the same length.
Here we can use our trusty crimping tool to even the wires out. Once again, if you’re in a pinch you can probably get away with using scissors to do this.
After cutting the wires, they should all be the same length.
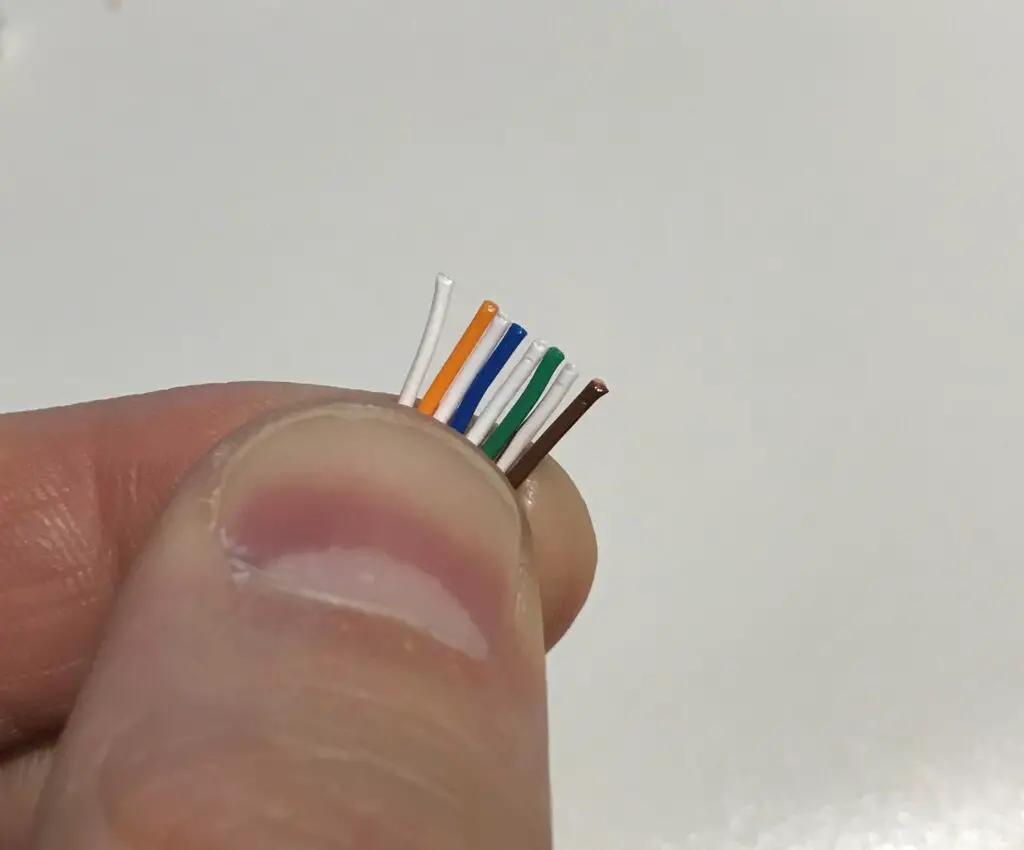
Just make sure you don’t cut the wires down too much. They still need to fit into the end of the connector when you attach it.
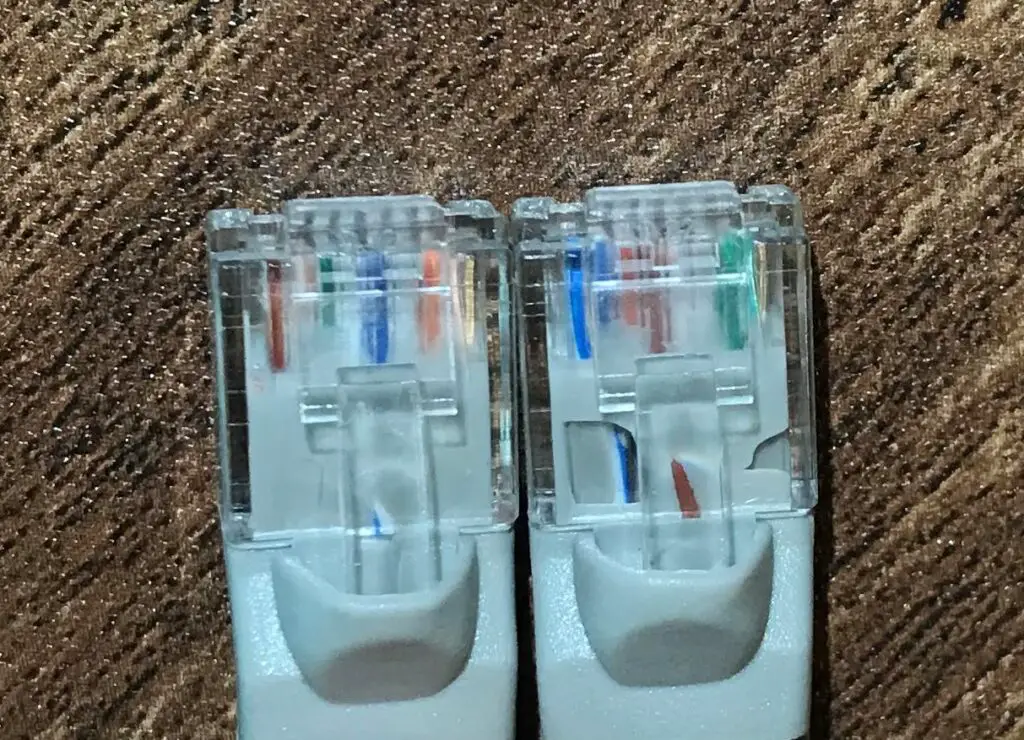
8. Insert the wires into an ethernet cable connector
After trimming the ends of the wires, make sure they stay in order. The ethernet cable won’t work if the cables aren’t in one of the standard pinout configurations.
After ensuring the wires are still in order, you’re ready to insert the wires into an RJ45 connector.
Carefully insert the wires into the connector. The tab of the connector should be on the side facing away from you when you do this. Insert the wires all the way into the connector until they reach the metallic pins at the end.
At this point, it should look like this:
It’s very important that the wires of the cable reach the pins at the end of the connector.
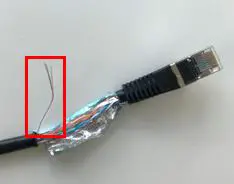
Unfortunately I’ve made the mistake of cutting the wires too short before. Here’s the evidence:

As you can see, the colored wires don’t reach the gold pins in the connector. When I tested the cable above with my ethernet cable tester, it indicated that the cable wasn’t working. It was at that time I realized my fatal mistake.
Don’t let this happen to you.
9. Crimp the wires inside the connector
Now you’re ready to finish the cable. Make sure your crimping tool is on hand.
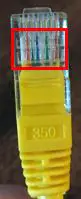
Before your take any action, take a look at the side of your crimping tool. You should see two openings that’re labeled “8P” and “6P”.
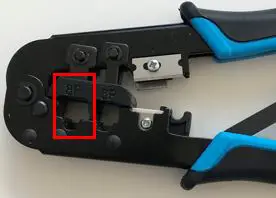
These openings are designed for crimping RJ45 connectors. The 8P refers to 8-pin connectors, while the 6P refers to 6-pin connectors.
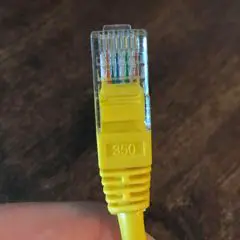
In this case, we’ll want to use the 8P opening because there are 8 pins (and 8 wires) in your RJ45 connectors. To prove this point, you can count the gold pins on an RJ45 connector.
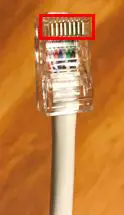
See? There’ll be one pin for each wire inside the cable.
For your information, the 6-pin opening on your crimping tool is for RJ11 connectors. RJ11 connectors are used in phone line connectors.
Now that we’ve identified the 8-pin opening, we’re ready to crimp your ethernet cable.
All you have to do is place the RJ45 connector into the 8P opening in your crimping tool. Make sure the connector is inserted all the way into the tool.
Once it’s fully inserted, squeeze the handles of the crimping tool all the way.
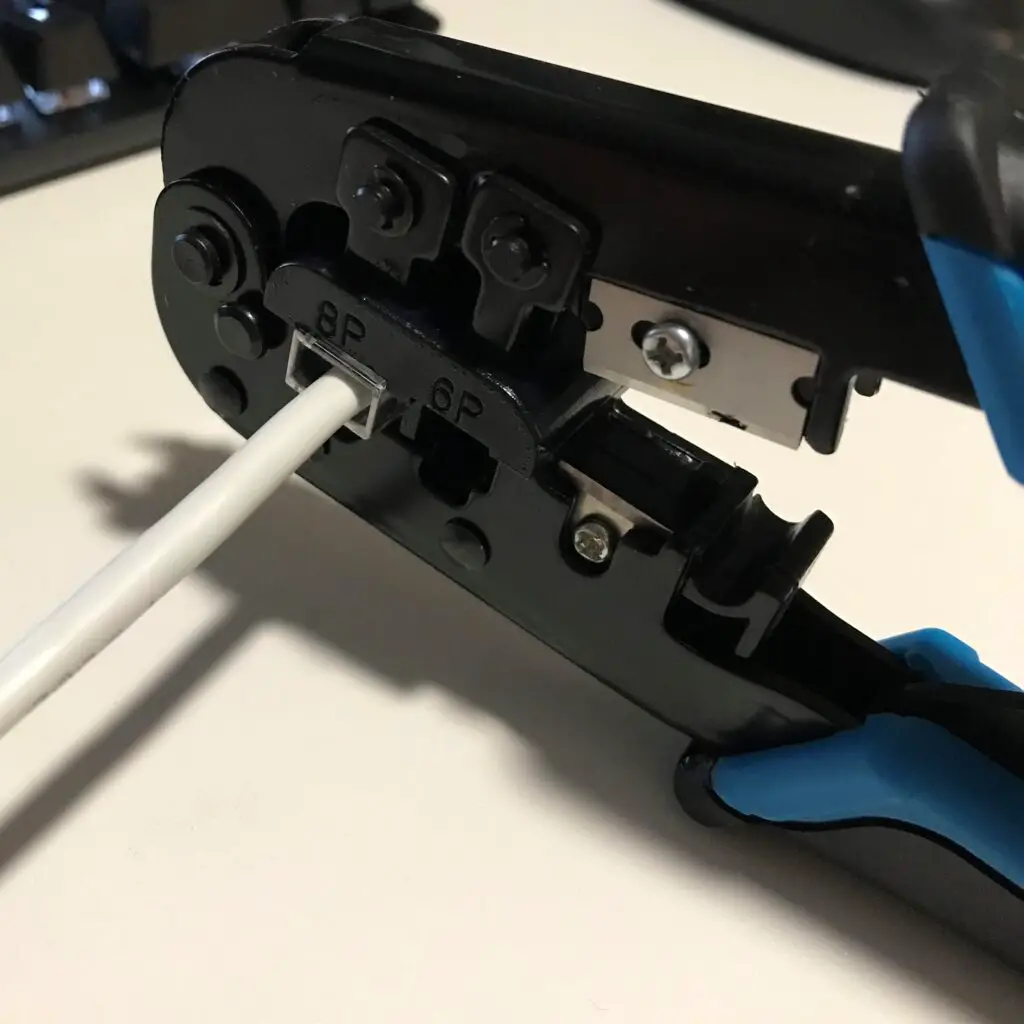
Next, release the handles all the way and squeeze them again. By squeezing the handles twice, it’ll ensure the cable is crimped correctly.
Once you’ve crimped the cable, remove the connector from the crimping tool and make sure it’s securely attached to the ethernet cable.
Next, you want to make sure it works properly. Before we get into testing the cable, there are a few things to keep in mind while crimping your cable.
Important notes when crimping
When crimping your ethernet cable, there are a few things to take note of.
For one, you need to make sure that the RJ45 connector goes into the side of the crimping tool that’s labeled “8P”. If you put the ethernet connector into the crimping tool from the side that isn’t labeled, it won’t crimp correctly.
When you crimp a cable, the 8 pins on the RJ45 connector get pushed down into the 8 wires in the cable. If you look closely, you’ll see that your crimping tool has teeth on it on one side.
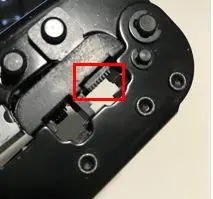
If you don’t put the connector into the crimping tool from the correct side, the teeth won’t match up with the pins it needs to push down.
And yes, I’ve made this mistake before.
The other thing you need to be aware of is the fact that you can’t crimp a connector more than once. In other words, you can’t reuse your connectors.
I didn’t realize this when I first started crimping cables.
If you think about what’s happening when you crimp a connector, it makes sense. As I mentioned above, when you crimp a connector onto an ethernet cable, the pins of the connector are pushed down onto the wires in the cable.
After you’ve crimped a cable, the pins will be pushed down on the connector. Once they’re pushed down, you can’t reset them again.
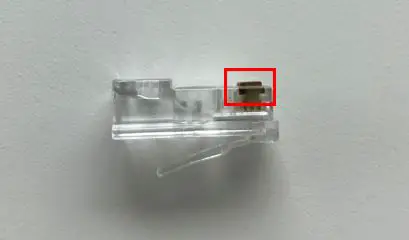
Here’s what the pins on a connector look like before they’ve been crimped down:
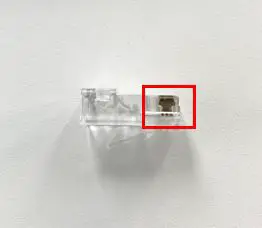
And here’s what a connector looks like after it’s been crimped:
Just make sure the connector that you’ll be crimping has its pins up. Otherwise, it won’t crimp onto the cable properly.
And yes, I’ve made this mistake before as well.
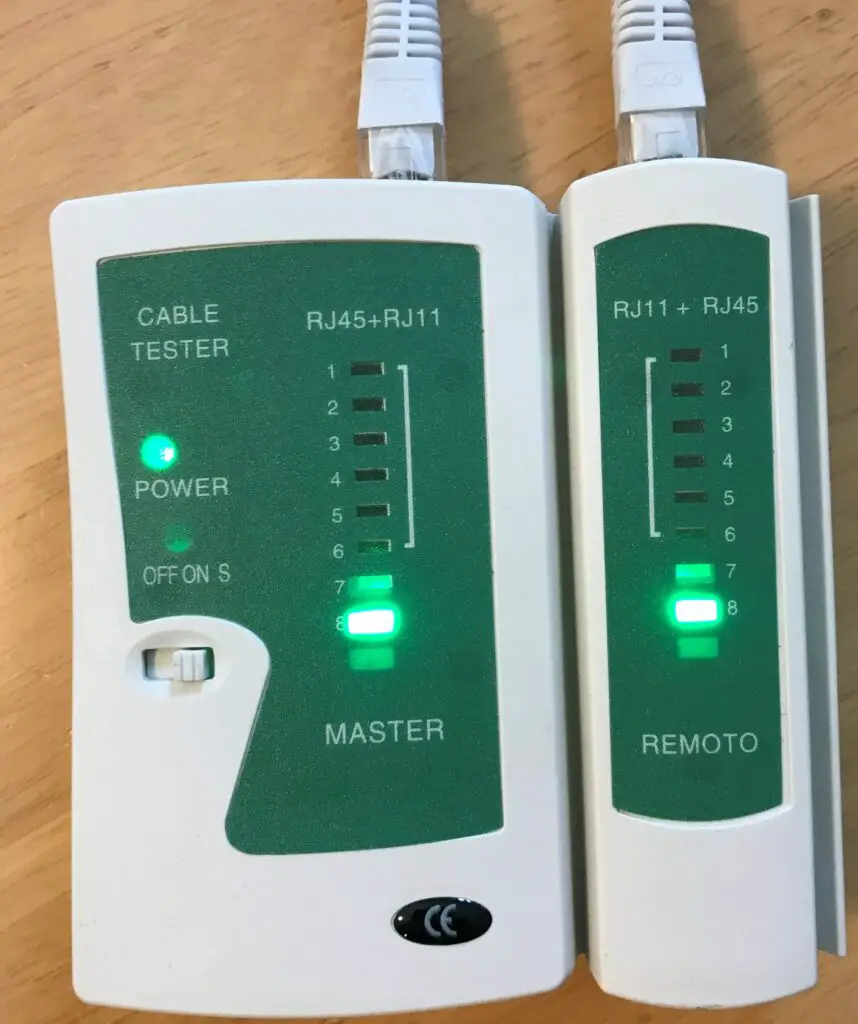
10. Test the cable to make sure it works properly
So you’ve successfully crimped your ethernet cable.
Before we do somersaults and celebrate your accomplishment, let’s make sure the cable works first.
The fastest and easiest way to test your newly crimped cable is with an ethernet cable tester. Many crimping kits will come with a tester, and they make things much easier when you get to this point.
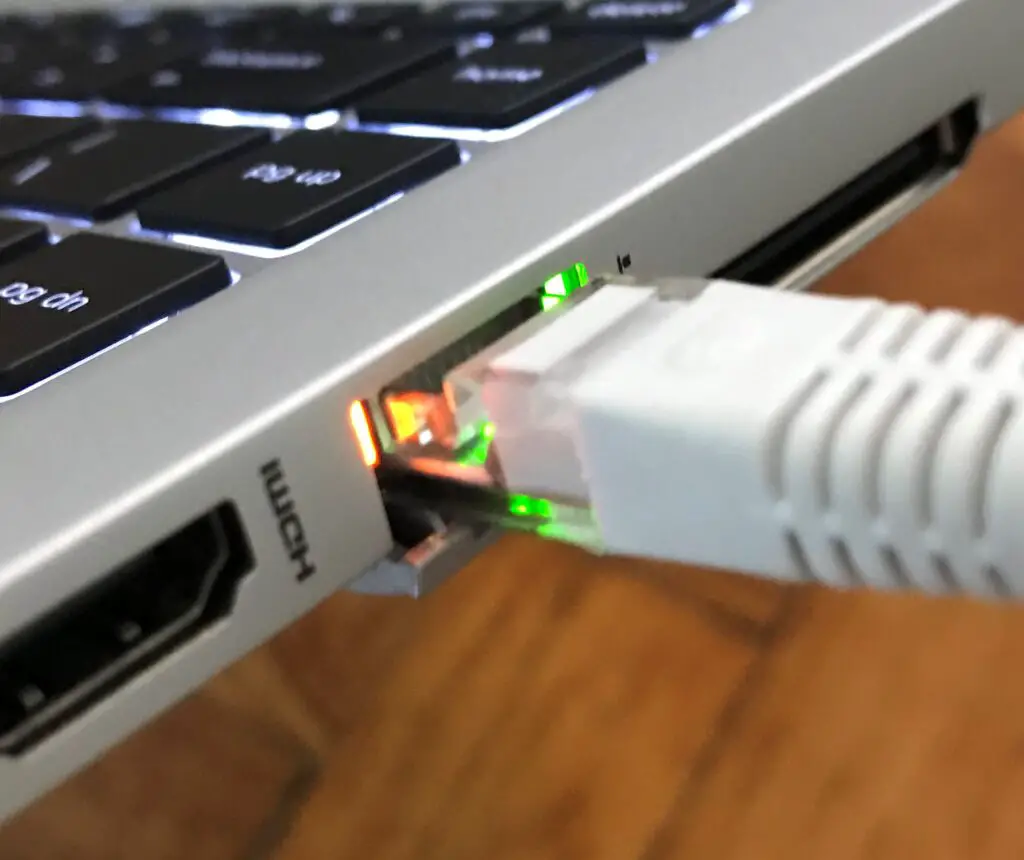
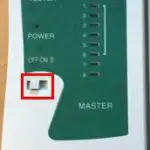
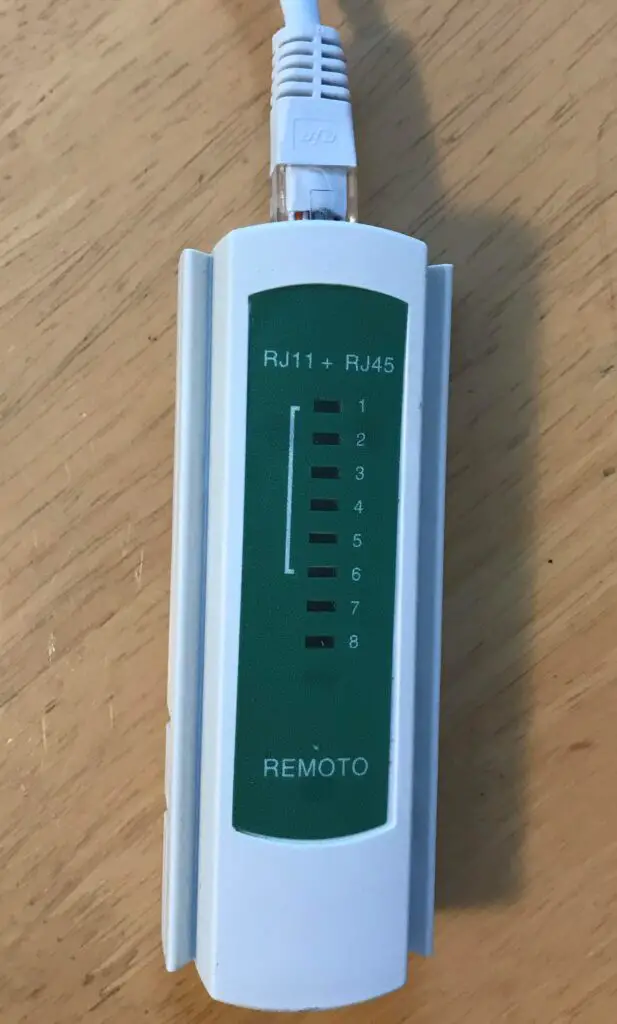
Essentially, all you have to do is plug each end of the cable into two of the RJ45 connector ports on the device. One connector goes in the Master side of the tester, while the other plugs into the Remote side.
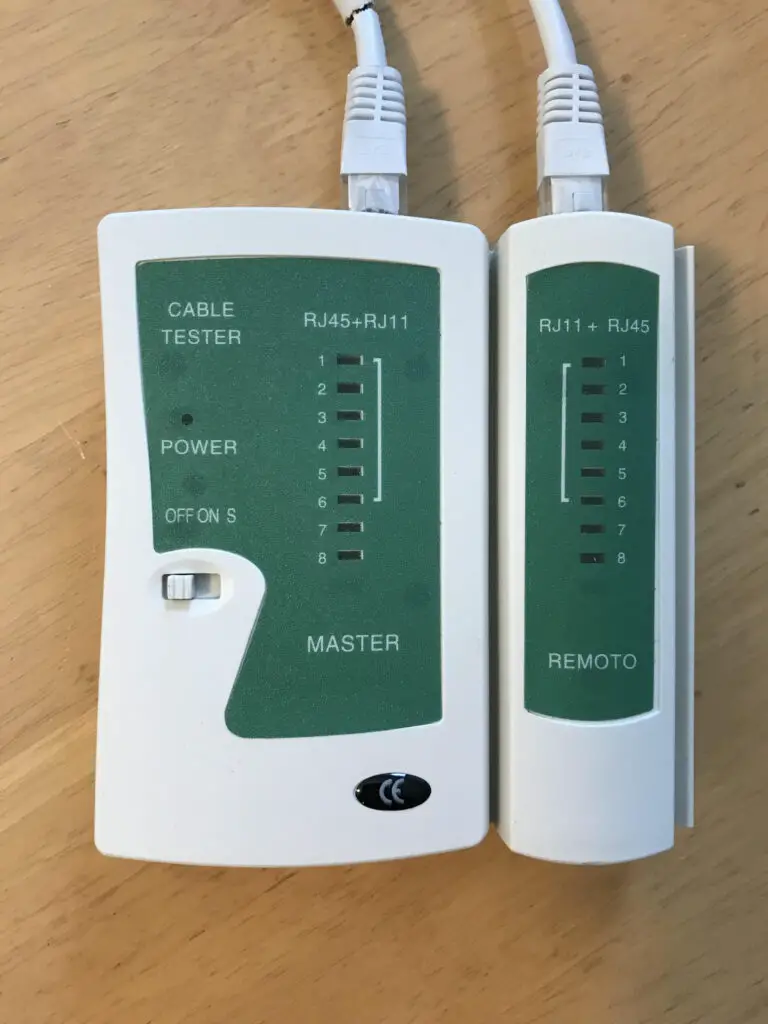
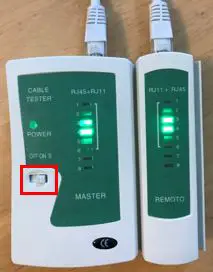
Once the cable is connected, just turn the tester on.
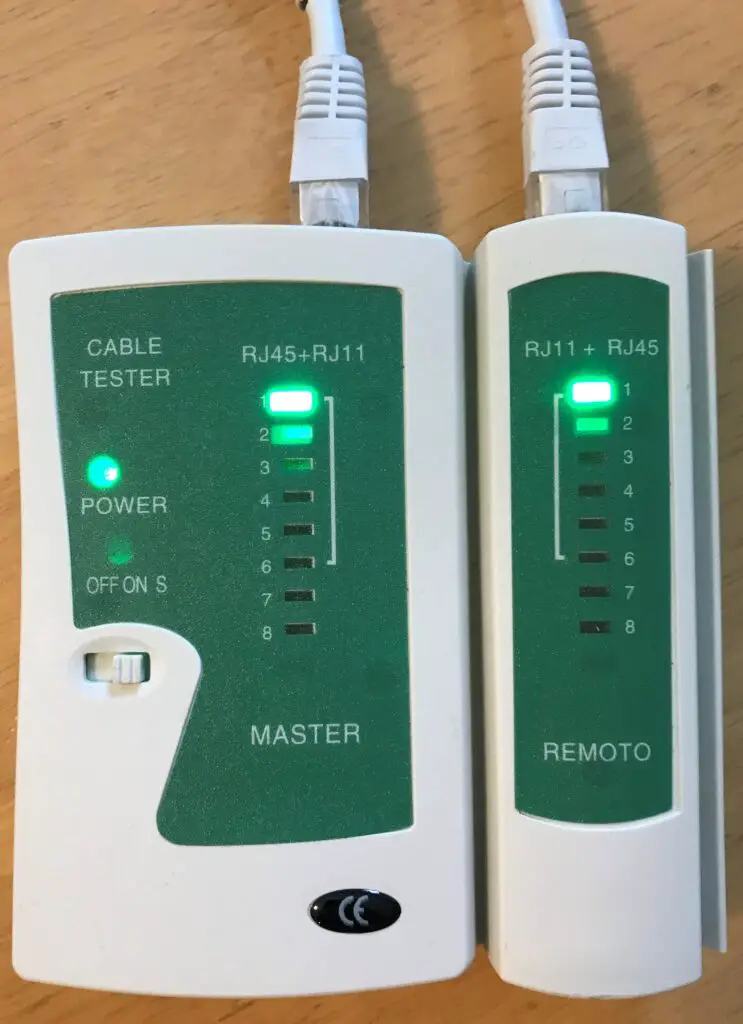
Each light numbered 1 through 8 will light up in order (one at a time). If the lights on the master and remote tester devices light up at the same time and in the same order, you’re in good shape.
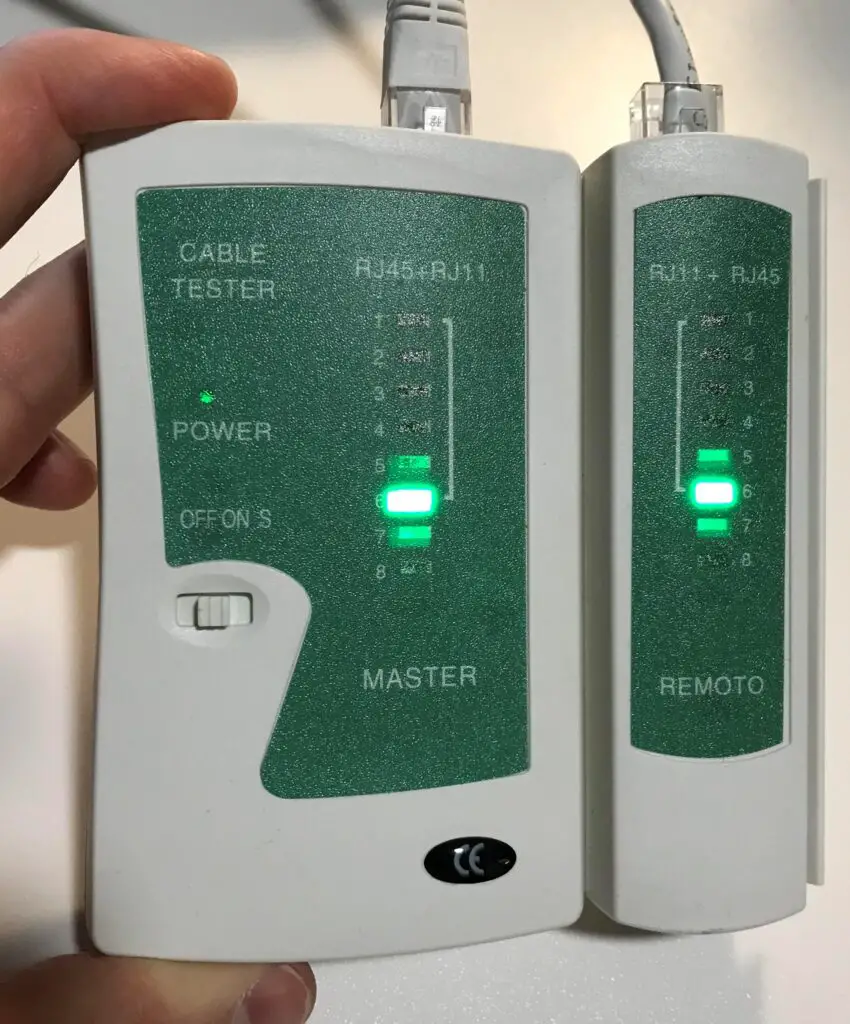
How to tell if a cable fails the test
Something is wrong with your cable if:
- One of the lights on either device is skipped
- Any of the lights on either device turn red
- The numbered lights on both devices don’t light up at the same time
If something is wrong with your cable when you test it, you may want to try crimping it again. Carefully go through the steps detailed in this post to see what might’ve gone wrong.
It’s also possible that something is wrong with the cable you crimped. If you try to crimp it a few times and the cable isn’t passing the test, you might need to get a new cable.
Alternative to using an ethernet cable tester
The other alternative here is to connect the cable to two devices and see if they’re able to communicate.
The trouble with this is, there might be other reasons why the devices can’t communicate. It might not be because the cable was crimped incorrectly.
That being said, if you use the cable to connect two devices and they’re able to communicate, you know you’re all set.
To know for sure if your cable is in good shape, it’s worth getting a cable tester.
Wrap up
Now you should be able to crimp your own ethernet cables.
You’re officially dangerous.
Knowing how to crimp your own cables provides a lot of flexibility for you in your home network. You’ll also find that with these skills, you’ll be able to help a lot of your friends with their networks, if you so choose.
If you have any questions about this procedure, or you’d like to share your experiences and frustrations crimping cables, please leave a comment below.
If you’d like to learn more about similar topics that I’ve written about, check out the following posts:
How Long Do Ethernet Cables Last?
How to Extend an Ethernet Cable
Does Ethernet Cable Length Affect Network Speed?