Do you know which devices in your home have IP addresses? Have you wondered why knowing the IP addresses of your devices is important?
A common subject of these questions is your modem. Modems are probably the most overlooked device when it comes to your home network. In fact, many home internet users don’t understand what a modem does.
So let’s take a closer look at a few questions surrounding modems.
Does a modem have an IP address? And why do we care if it does or not?
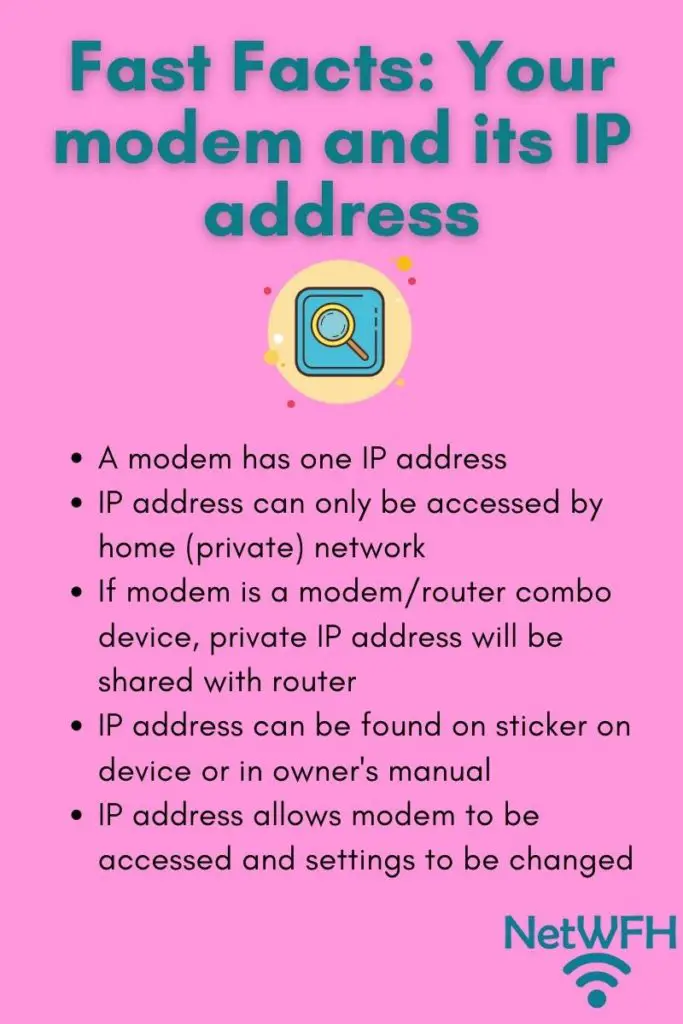
All modems have one IP address associated with them. Modem IP addresses are used for communicating with the modem and making changes to the modem’s settings.Theyare private addresses that can only be accessed from the network the modem is on.
The bottom line is, it’s definitely worth your time to find out what your modem’s IP address is.
Read on to find out all you need to know about your modem’s IP address.
Why Does a Modem Have an IP Address?
A little bit of background information will help here.
An IP address basically just defines the location of a device so other devices on your network can find it. Just like all the houses on a given street have a different address. If your devices didn’t have an IP address, no one would be able to find or access them.
To make this simple, all of the Wifi devices in your home will have an IP address. This includes your:
Those are just a few examples. At this point, it’s not surprising if someone has 50 or more internet devices on their network at one time.
All of these devices will have an IP address.
So why does a modem have an IP address?
For the same reason as all your other internet devices. Having an IP address allows you to find your modem on your network. In accessing your modem, you can review and change its settings. This is very important, because there are a few easy changes you can make to your router to make your internet more secure (we’ll talk more about this later).
How to Find a Modem’s IP Address
As I mentioned at the beginning of this article, there are two different situations when it comes to your modem and its IP address. Your modem will either have its own unique IP address if it’s a standalone device, or it’ll share an IP address with your router if your modem and router are combined into one device.
Thankfully, the process for determining your modem’s IP address is very similar in both cases. In fact, there are a few ways to do it.
Also please note that these procedures will provide you with the default IP address of your modem. If you’ve already accessed your modem’s settings and changed its IP address, these references won’t be helpful to you.
If you have any problems with these procedures or still have trouble finding the IP address of your device, please leave a comment in the section below this post.
Finding a Modem’s IP Address From the Sticker on the Device
This first one is pretty simple. Most modems (or modem router combo devices) will have stickers on them that call out the IP address of the device.
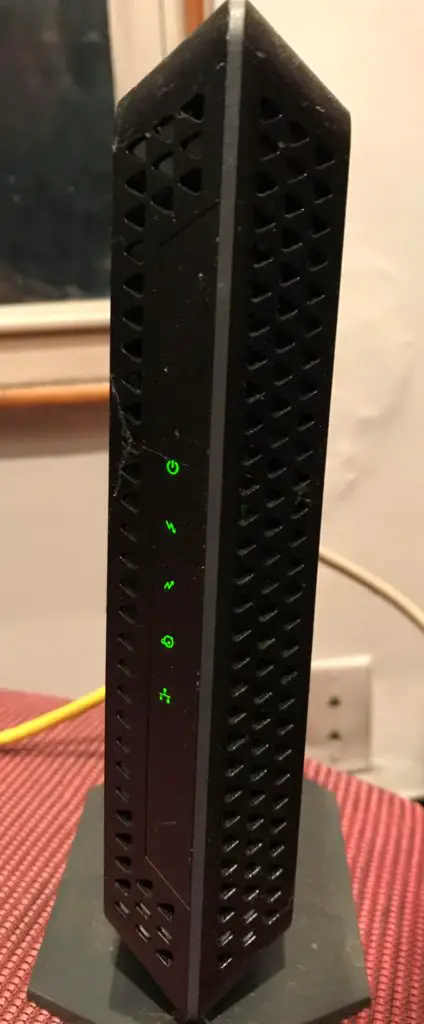
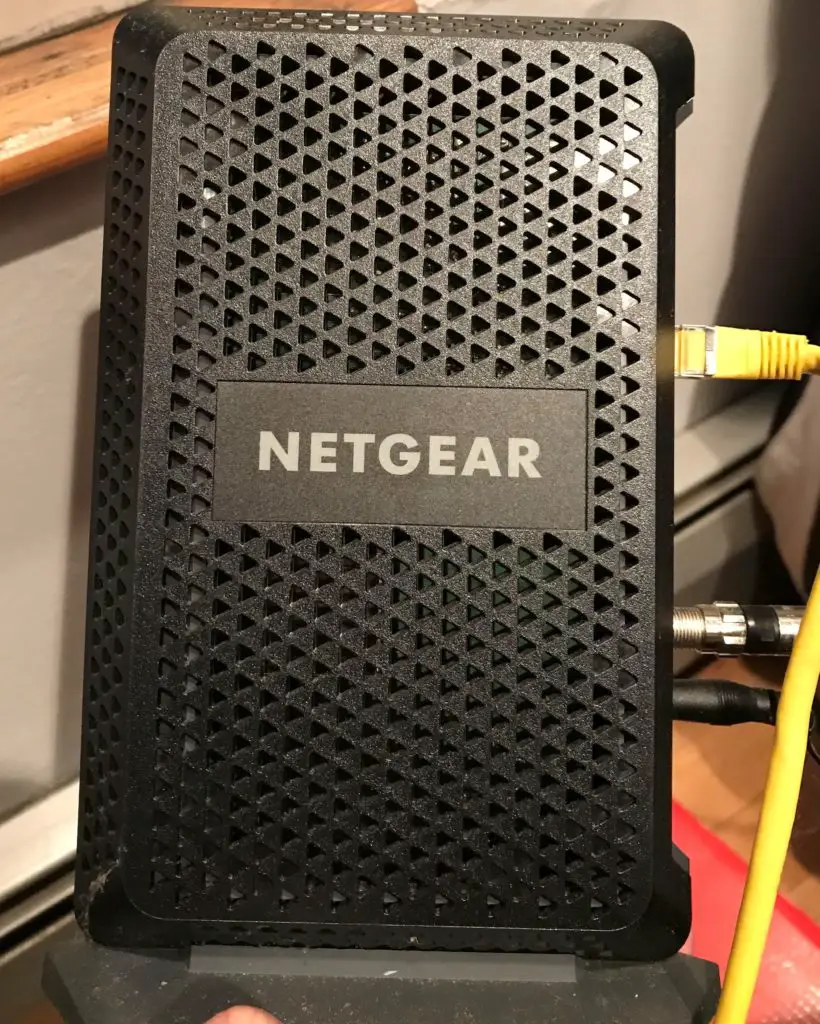
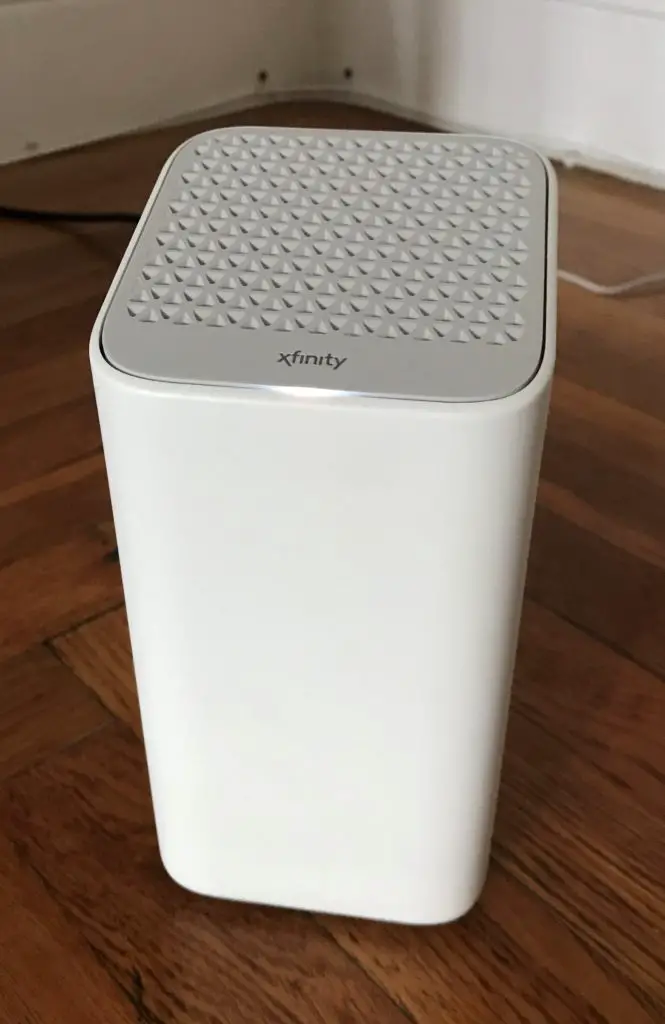
Take a moment right now to go check out your modem. If your modem is a standalone device that’s separate from your router, you’ll be looking for the device without the antennas on it.
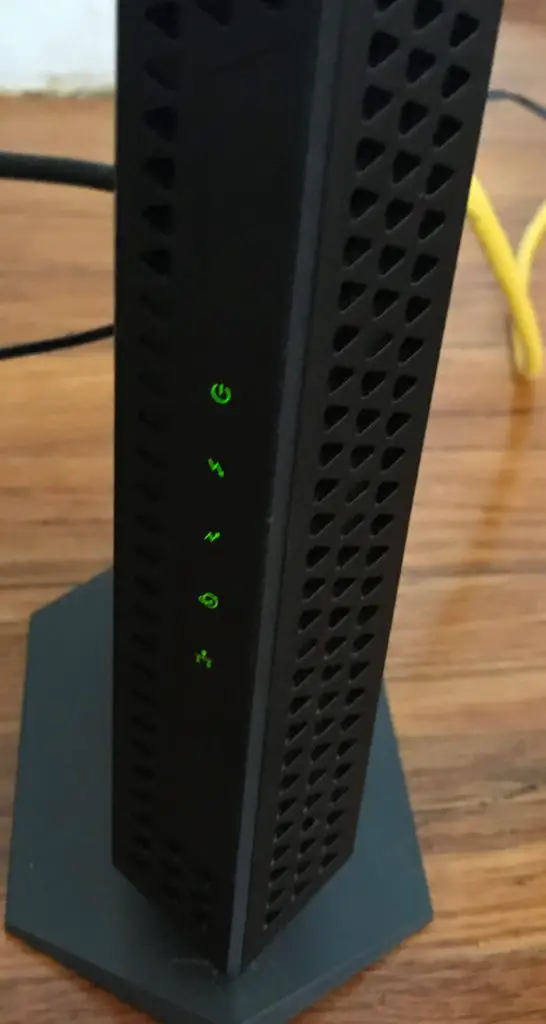
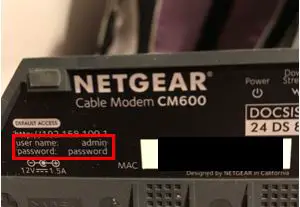
For a reference, let’s take a look at my modem. Here’s the front of the modem:
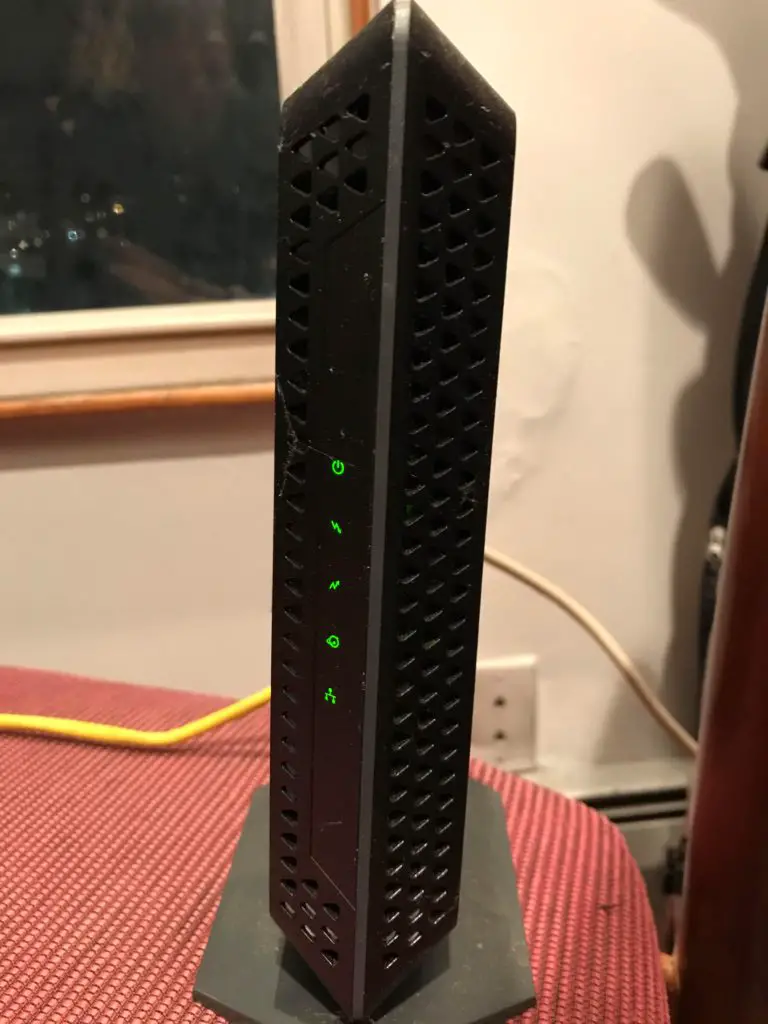
And here’s what the side looks like:
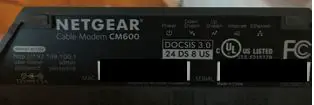
Ok, now you’ve found your modem. Carefully take a look at the bottom of your device. This is usually where the sticker is located.
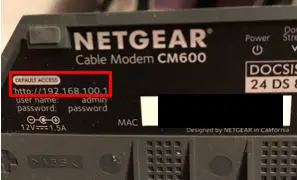
You should have a label with a bunch of information on it. Here’s what mine looks like:
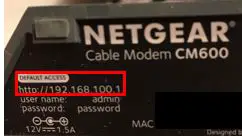
On this label should be a section titled “IP address” or “Default Access”. This is the section that’ll give you your IP address.
As you can see, my modem’s default IP address is 192.168.100.1.
See? That wasn’t so bad.
If you have a modem router combination device, the above steps should be the same.
The only difference is you won’t need to know the difference between your modem and router. There should only be one device that makes up your home internet. In any case, the sticker will give you the default IP address.
If the default IP address isn’t listed on the sticker for some reason, here’s another method to try.
Finding a Modem’s IP Address From the Modem’s Owner’s Manual
Another way to find your modem’s default IP address is by looking at its owner’s manual.
There should be a paper manual that came with your modem when you first got it. If you don’t still have it, it’s not a problem. You should be able to get an electronic version online.
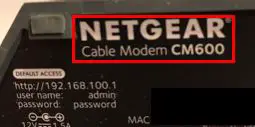
If you’re looking for the electronic version of your owner’s manual, all you need to do is Google the make and model of your modem (or modem router combo device). Your device’s make and model should be listed on the sticker that we previously looked at.
As you can see, I have a Netgear CM600 modem. If I didn’t have my owner’s manual handy, all I would have to do is search online for “Netgear CM600 modem owner’s manual”.
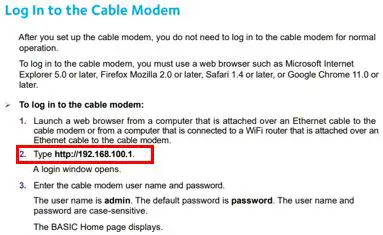
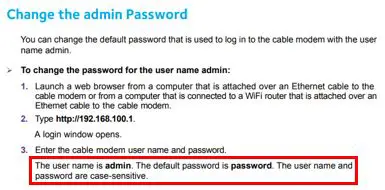
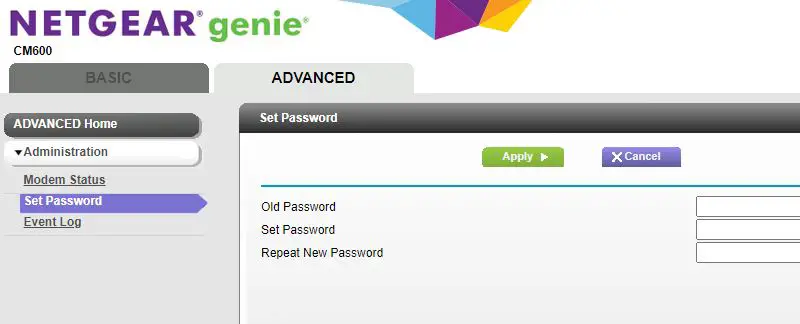
In the owner’s manual for your modem, there should be a section detailing how to access your settings. That section will provide you with the default IP address for your device.
This is what the section looks like in my owner’s manual:
Depending upon the manufacturer of your device, the default IP address of your modem may be listed in another section. Regardless of where it’s detailed, your modem’s IP address will be listed somewhere in the owner’s manual.
Although this method isn’t as easy as having it on the device’s sticker, it’s a trustworthy backup option.
Why Is Knowing the IP Address of a Modem Important?
As I mentioned earlier, everyone should know the IP address of their modem. At the very least, you should know where to find it (which we’ve just covered).
Why?
Because you need to be able to view and change your modem’s settings.
One important thing to understand here is that when you first set up your modem, it’s not very secure. Your modem is shipped to you with a default username and password that’s used to access the modem’s settings.
This default password needs to be changed as soon as you set up your modem. I can’t stress this enough.
The default passwords for your modem are all over the internet, and it would take someone less than 5 minutes to determine the default password of your device. With that information, anyone with access to your Wifi could access your modems settings and either monitor your internet activity or make changes to your network.
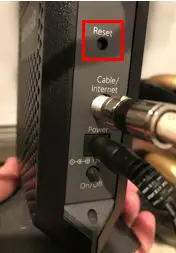
In addition to changing your default password, accessing your modem’s settings allows you to troubleshoot your internet connection if something isn’t working properly. You can even factory reset it to restore it to its previous settings if you want to start over with it.
None of this is possible without knowing your modem’s IP address. Hopefully you now understand how important this is.
Does a Modem Have a Public IP Address?
Due to the fact that modems are so important to our internet connections, it’s important that they’re protected. To add a layer of security to your modem, it’s only accessible on your private network.
Unlike your router, your modem isn’t accessible by anyone on the internet. This means your modem has a private IP address. The only way to access it and get to its settings is by being on the same network that it’s on.
On the other hand, because your router communicates with both your internal network and the public internet, it has both a private IP address and public IP address. Public IP addresses can be accessed by any device on the internet (hence the “public” label).
You can tell your modem has a private IP address by the numbers that make it up. I won’t get into it here, but the fact that your modem’s IP address starts with 192.168 is a dead giveaway.
Your modem will only have a private IP address. You don’t have to make any changes to your modem for this to be the case. It’ll always be a private address.
Can a Modem and Router Have the Same IP Address?
If you have a modem and router combination device in your home network, the device will be assigned one IP address. In this sense, your modem and router will share the same private IP address.
Keep in mind that a router not only has a private IP address, but it has a public IP address as well. This doesn’t mean your modem’s settings will be accessible by the internet. It can only be accessed from your internal network regardless if it’s combined with your router or it’s a standalone device.
If your modem and router are separate devices, they’ll always have two different IP addresses. This is because they are two different devices and each connected device in your home network will get its own unique IP address.
If by some chance your standalone modem and router were both assigned the same IP address, your internet wouldn’t work properly anyway. The traffic on your network wouldn’t get sent to the right place because there would be two places with the same address.
Imagine if two houses on a street had the same address. That wouldn’t go so well if you tried to send one of them a package.
You get the picture.
Wrap Up
There you have it.
That’s all you should need to know about your modem and its IP address. It’s very important you at least know how to find your modem’s IP address so you can change your modem’s default password. Hopefully you can use this as a reference if you ever get stuck.
If you have any questions about this information or would like to connect with me, please drop a comment below.
If you found this article interesting, here are some posts on relevant topics that you might enjoy:
Spoiler alert: saving the configuration of your router is a smart thing to do.
The problem is, not many people do it.
What ends up happening is people have trouble with their router or forget their password. Then they find out that they have to change each one of their router’s settings all over again after they perform a factory reset on it. This can be a painful process and consume hours of your time.
In other words, you end up wishing you had backed up your router.
So let’s avoid this situation entirely.
In order to save your router’s configuration, you have to log in to it first. From there, you can access the back up option in the Advanced Settings section.
Once you’ve saved your router’s settings to your computer, flash drive, or other storage device, you can restore them any time you want.
The good news here is restoring your router’s settings is just as easy as saving them. All you have to do is access your router’s advanced settings again.
In total, it only takes a few minutes to back up or restore your router.
Did I mention it could save you hours of frustration?
Yeah, it’s totally worth doing.
In this post I’ll break down the steps you need to take to back up your router. I’ll also detail why you should take the time to do it.
Let’s dive in.
Why should I save my router’s configuration?
I get it.
You might be hesitant.
“Why would I save my router’s configuration when I never have problems with my router?”
The thing is, it’s good to have a backup of your router even when you’re not having problems with it.
Let’s look at the cases where saving your router’s settings will come in handy.
When you have to factory reset your router
If you have to perform a factory reset of your router, it’s helpful to have a backup of your settings.
Completing a factory reset will return all your router’s settings to what they were when you first got it.
In other words, a factory reset will return your router to its brand new condition.
There are a few main reasons why you would need to factory reset your router:
You forgot your router’s login password
When your router isn’t working properly and you’re not sure why
Both of these cases are possible scenarios.
Who hasn’t forgotten a password before?
In either case, you need to bring your router back to square one. This is something a lot of people are hesitant to do. They don’t want to lose all the hard work they’ve put in to set their router up.
I get it.
This would be a lot less scary if you knew you could return your router’s settings to what they were before in a matter of minutes. That’s where a backup comes in handy.
If you have a backup of your router’s settings from a time when it was firing on all cylinders, you have nothing to worry about. You can rest easy knowing that you can factory reset your router and have it back in a working condition in a matter of minutes.
When upgrading your router’s firmware
Any time your router needs an update, it can be a good idea to have a saved copy of your configuration files before you perform the upgrade.
In fact, some router manufacturers will request that you save your routers settings before an update. That way, you’ll be able to restore any custom settings to your router after a major firmware update if they’re not correctly carried over.
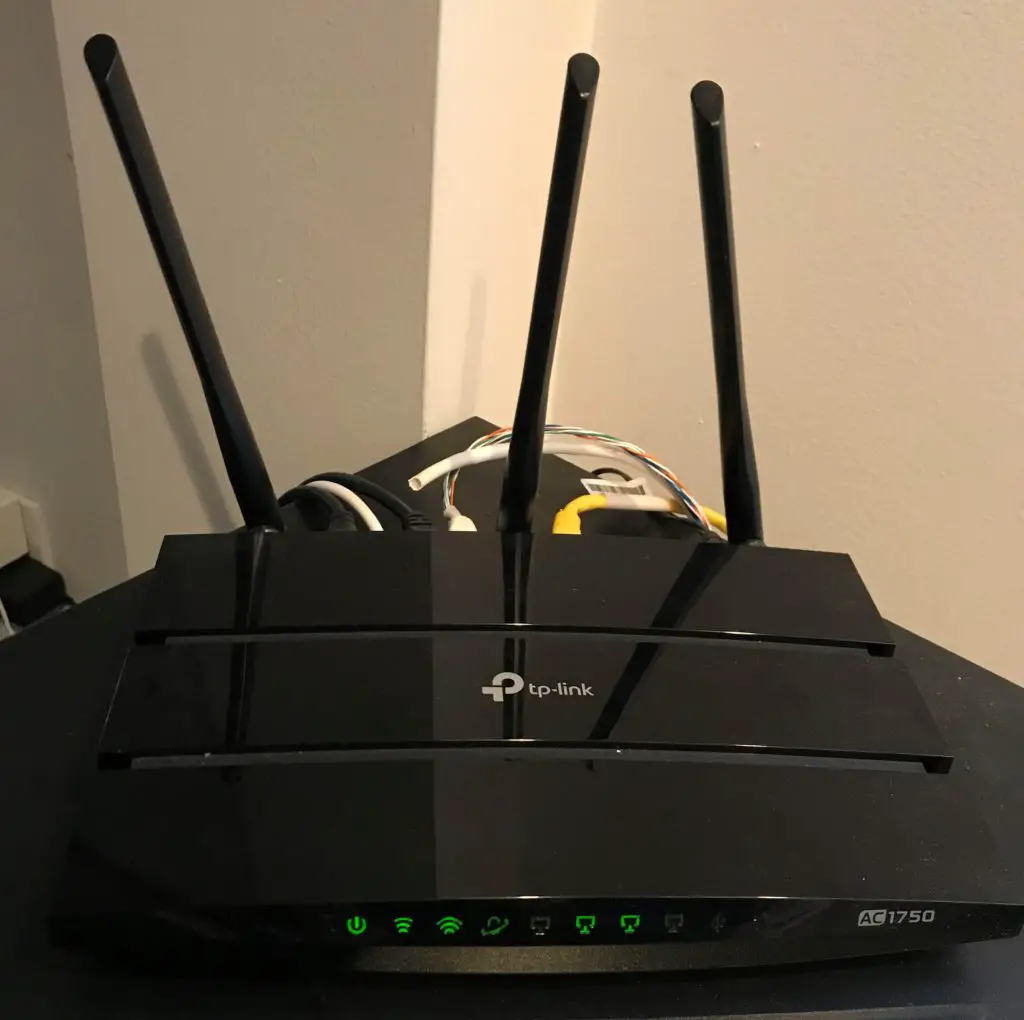
For example, I have a TP-Link router. In the documentation for my router it says to save my router’s settings before the firmware update.
The reason for this is that the firmware update may remove any custom settings I previously had on my router.
If that happens, it’ll be much faster to restore my previous settings after the update instead of manually changing each setting back to what it was before.
Take note that this may not be the best practice for all routers. Make sure you read the documentation for your router before restoring saved settings after a firmware update. Sometimes the new firmware that you just installed won’t work properly with old firmware settings that you’ve saved.
In other cases, your router settings will be saved after a firmware update and you won’t have to take any further action.
It’s better to be safe than sorry. Make sure you do your homework before restoring your settings after a firmware update.
When you want to test out new settings on your router
Routers can be complex devices.
They offer a lot of choices when setting them up. This allows you to customize your router to your unique internet situation at home.
For the technically savvy, your router can be a playground for tinkering and optimizing your internet experience.
What’s bad about this is that not every change you make will work out in your favor. If you make a mistake or change the wrong setting, it can hurt your internet’s performance.
Wouldn’t it be nice to have a saved copy of your router’s configuration from a time it was working well?
I thought so.
With a good backup of your router, you can try out new settings as much as you want. Worst case scenario, you can return your router’s settings to what they were before by restoring the backup.
In this sense, a good backup of your router serves as a great safety blanket.
How comforting.
What settings are saved when I back up my router?
Before I answer this question I’ll start by giving a little background information.
Inside your router it has a processor and memory, among other things.
Some of your router’s memory is dedicated to saving your router’s settings. That way, if the power goes out or your router is turned off, it’ll have the same configuration when you restart it.
Why’s this important?
It’s important because when you back up your router, you’re essentially taking a snapshot of the memory that stores your router’s settings. In other words, your router’s memory from that moment in time will be copied to your computer’s hard drive or other storage device.
Ok, so a copy of your router’s memory will be saved. What sorts of settings does your router store in memory?
The easy answer is, just about all of them.
Essentially any configuration change you make to your router will be saved if you back it up.
To give a few examples, your router stores the following in memory:
Your router’s settings password
Your wireless network names (i.e. SSIDs) and passwords
Think of it this way: Anything you’ve changed on your router will be saved if you back it up.
This is important information to know. If you plan on performing a factory reset of your router and you have a backup you’re planning on restoring after the reset, you need to know what to expect.
The good news is, all the settings that were in place when you performed the back up will be restored.
How to save your router configuration
Ok, now we have all the background we need. We’re ready to back up our router’s settings.
So how do we do this?
There’s only one way to back up your router, and that’s through your router’s settings.
As a note, I’ll perform these steps on my TP-Link Archer A7 router. Even if you have a different router, the steps you need to take will likely be similar to mine.
Let’s take it from the top.
First you need to get to your router’s login page.
Accessing your router’s login page
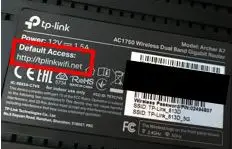
If you don’t know how to get there, you have a few options. The first one is to physically inspect your router. There should be a sticker on it that tells you the address of your router’s login page.
Here’s what the sticker on my router says:
As you can see, I can access my router’s login page at http://tplinkwifi.net.
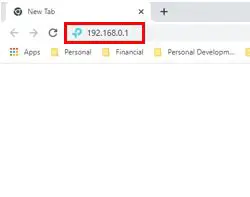
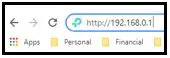
The second option is to enter the IP address of your router into your browser’s search bar.
You can find out your router’s IP address by using the ipconfig command on a Windows computer that’s connected to your home internet.
Start by typing “cmd” in your computer’s search bar. In the results that pop up, select “Command Prompt”
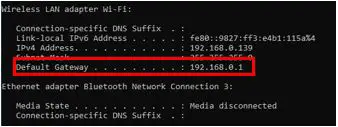
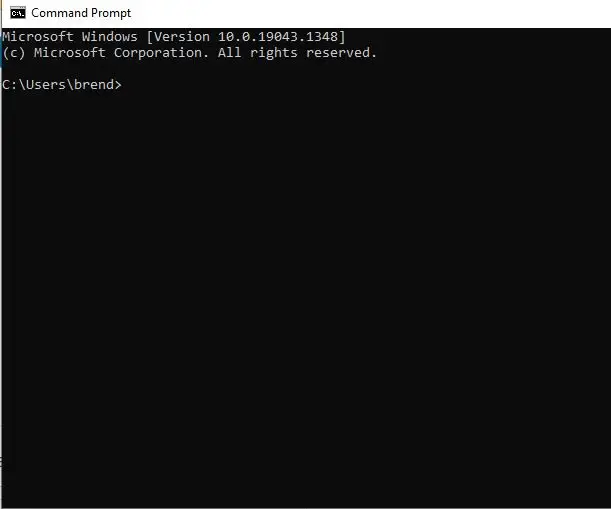
When the Command Prompt window opens, type “ipconfig” and press enter.
In the results that pop up, search for “Default Gateway”. That’ll give you the IP address of your router.
From the results above, you can see that my router’s IP address is 192.168.0.1.
You can access your router’s login page by entering your router’s IP address in your browser search bar.
As a note, if you have a Mac or Linux computer the steps are very similar but you need to use the “ifconfig” command instead of “ipconfig”.
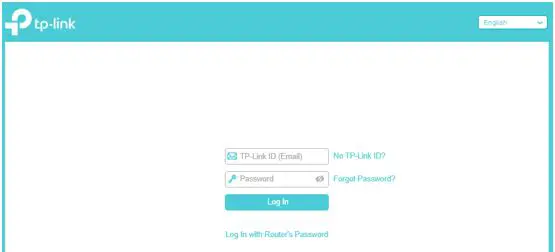
Logging in to your router
Ok now you should be on your router’s login page.
Log in to your router with your username and password. If you haven’t set a personal password for your router, you should be able to log in to it with its default username and password. This information can most likely be found on the sticker that’s on your router as well.
As a side note, if you haven’t changed your router’s password away from the default, I suggest you do so immediately. It’s a great security risk to keep the default password for your router.
Ok back to the task at hand.
Now you should be logged in to your router. What’s next?
Back up your router
Now that you’ve logged into your router’s settings, you need to find the option for backing it up.
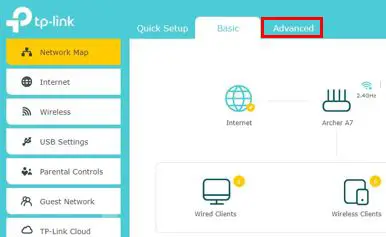
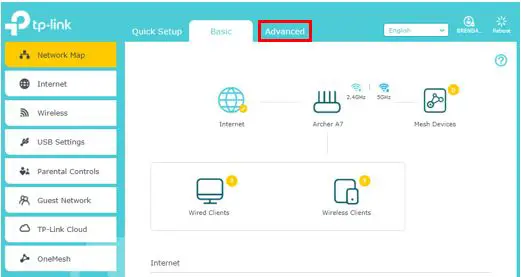
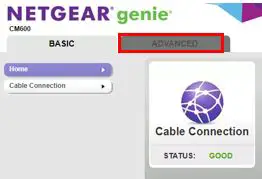
This will most likely be on the Advanced Settings page.
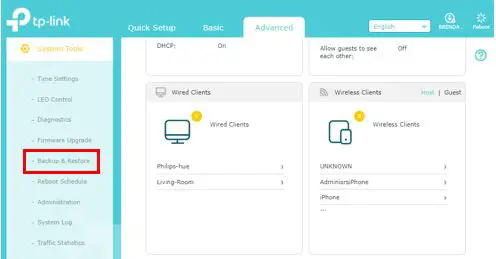
I can access my Advanced Settings tab from the main settings page.
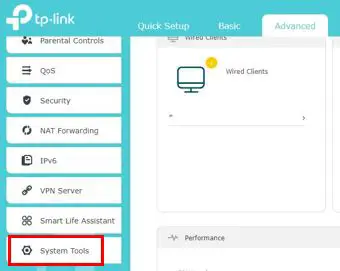
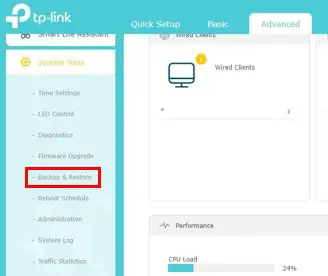
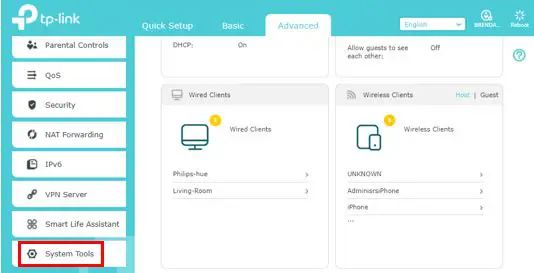
On the page that pops up, there are categories of advanced settings on the left-hand side. I need to select the “System Tools” option.
When I click the System Tools option, a list of settings is shown. One of the options is the Backup and Restore settings category. This is what we’re looking for.
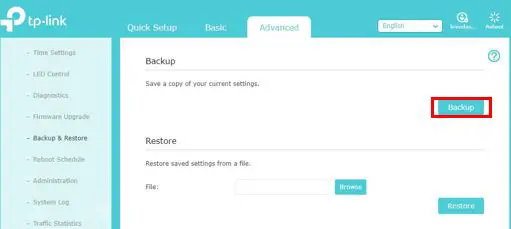
This brings us to the Backup and Restore settings page.
On this page, it’s pretty easy to see where I need to go next. I need to select “Backup”.
After selecting “Backup”, you’ll have the option of selecting where you want to save your router’s settings. You have a few options here.
You can save your router’s settings somewhere on your computer, or if you have one you can save it on a portable flash drive.
Another option would be to store your router’s settings on the cloud or an external hard drive if you want to get really crazy.
Once you’ve determined a location to save your router’s settings, press “OK”. Almost as soon as you’ve done this, the file will be saved to the location you chose.
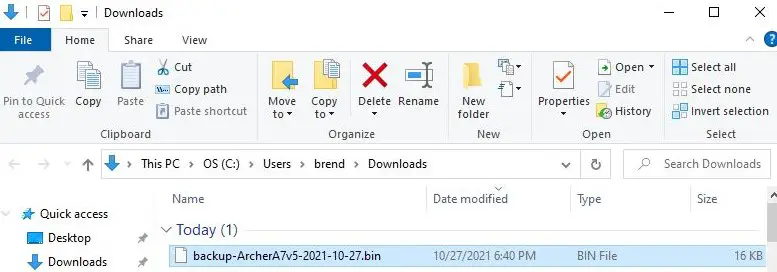
Here’s what my backup file looks like:
The settings file is a binary file that doesn’t take up hardly any space at all. As you can see it’s only 16 kilobytes in size. For those that are not technically-savvy, that’s really small.
At this point the process is complete.
Congratulations, you’ve officially saved the configuration of your router.
How do I restore my router’s settings?
Now that you’ve backed up your router, how do you load these saved settings back onto your router?
After all, that file you saved is no good unless you can actually put it to use.
You’ll be happy to hear the process is very similar to the steps you followed for backing up your router. Basically, you need to get back to the “Backup and Restore” settings menu in the Advanced Settings tab of your router’s settings.
Let’s recap. Here are the cliff notes to help you get back there:
Log in to your router
Access the “Advanced Settings” tab from your router’s main settings page
Select the “System Tools” settings heading
In the dropdown selections that appear, select the “Backup and Restore” settings page
Restoring your saved file
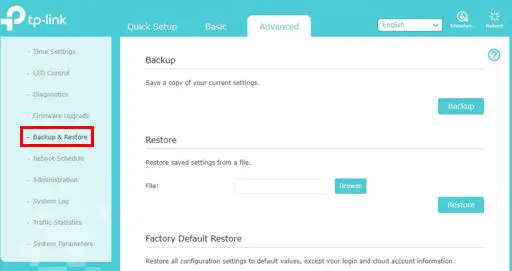
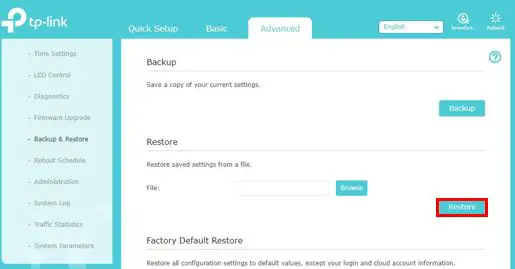
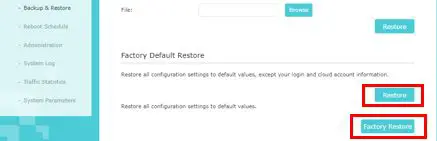
If you followed the steps above, your screen should look like this:
From here the steps are pretty simple.
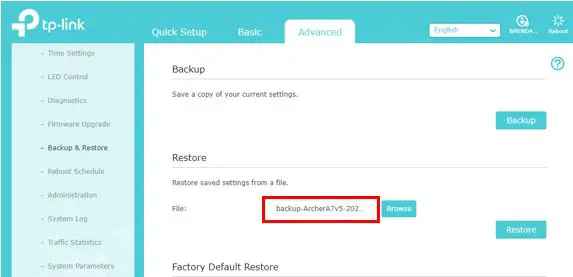
First, you want to select the “Browse” button under the Restore header. This will allow you to select the router backup file you want to restore to your router.
Once you’ve navigated to the location where you saved your router’s configuration file, select it and press “Open”.
You should see the name of your router’s settings file in the text box.
Now you’re ready to restore your settings to your router. Select the “Restore” button.
This will kick off the process of restoring your settings. It’ll take a few minutes for this task to complete, because your router will need to:
Load the settings from the file you selected
Write the settings from your backup file to the router’s memory
Reboot with the settings from the backup file
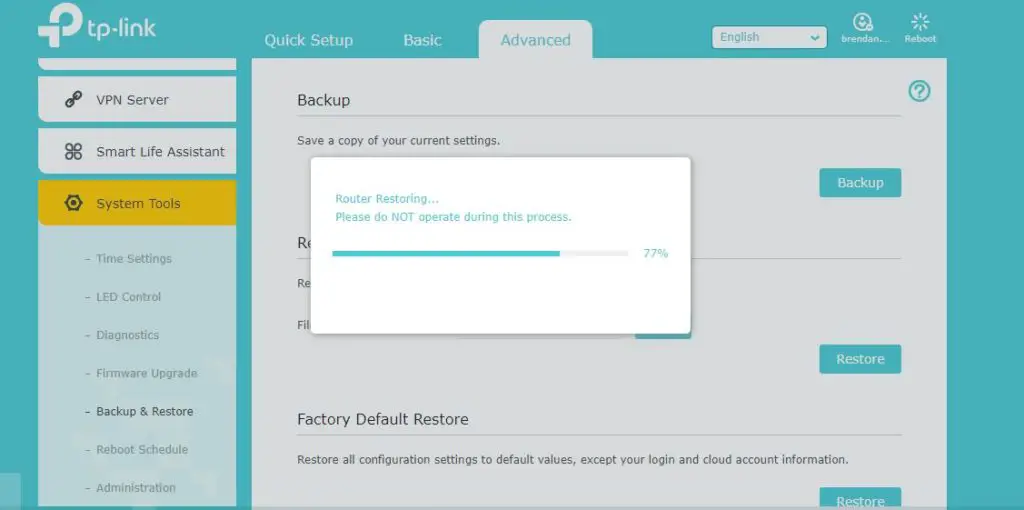
During this process, you’ll see a status bar indicating how the restoration is going. Here’s an example:
Once the status bar reads 100%, the process will be complete. Your router will have a connection to the internet and it’ll have the same settings as it did when you backed it up.
In performing this process, you’re ensuring that all the time you spent configuring your router wasn’t a waste.
You should also have peace of mind because you have an insurance policy in case you ever need to factory reset your router in the future. Hopefully that day never comes, but at least you’ll be prepared if it ever does.
Wrap up
Congratulations, now you know how to back up and restore your router’s configuration.
I know I’ve said this before, but I feel like I need to hammer the point home: Take a few minutes to save your router’s settings. You won’t regret it.
If you have any questions or you’d like to share your experiences with backing up and restoring your router’s settings, please leave a comment below.
If you found this post interesting, check out some similar posts that I’ve written:
Your router isn’t like the other internet devices in your house.
It’s the gateway that allows the devices on your home network to access the internet. Without one, you wouldn’t be able to check your email, stream your favorite show, or post on social media.
Your router is vital to your internet connection, but it’s unique for another reason as well.
Let’s talk about how many IP addresses a router has.
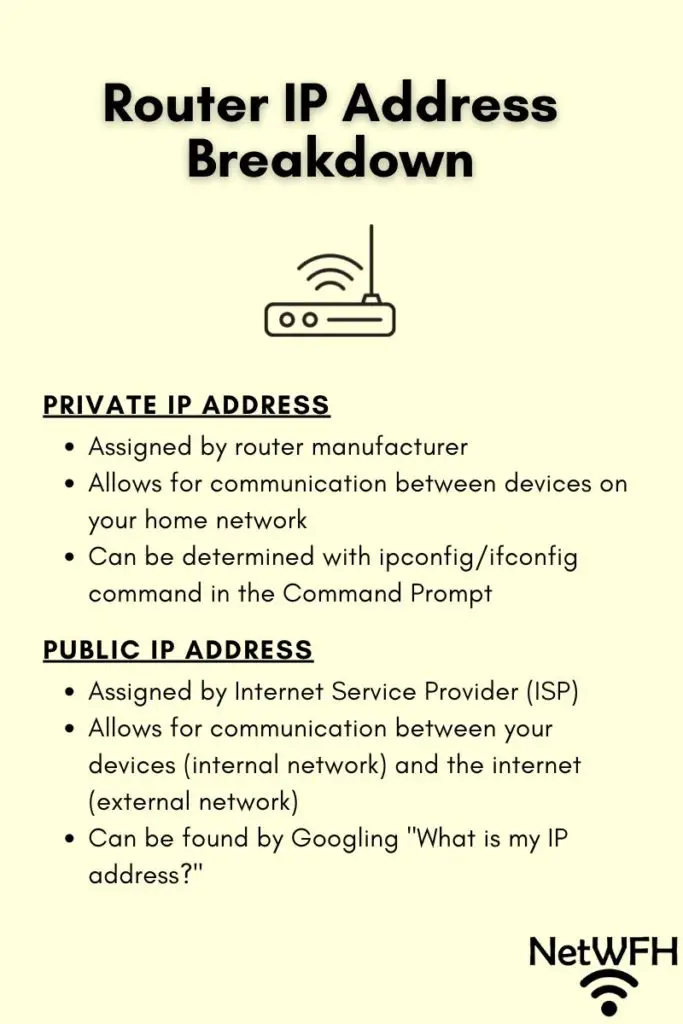
Routers have two IP addresses: One private IP address that is used when the router is communicating with the private home network it is connected to, and one public IP address that is used when the router is communicating with the broader internet.
This makes a router unique because the rest of your internet devices will only have one IP address.
So why does a router have two IP addresses while your other devices have one?
Read on to find out all you need to know about your router’s IP addresses.
What Are IP Addresses Used For?
Let’s go through a quick refresher of IP addresses.
IP addresses are unique sets of numbers that are used to identify your internet devices. Think of them like your phone number or home address. Each phone or house gets a unique number so phone calls or packages get sent to the right place.
Your internet equipment works the same way.
Each device in your home network will have an IP address so it can easily be identified. This includes your:
Cell phone
Smart TV
Modem
Router
Laptop
The list goes on and on. Any device in your home that connects to the internet will have an IP address.
Why Are IP Addresses Important to Routers?
Without IP addresses, your router wouldn’t be able to do its job.
Routers are in charge of making sure your data gets to the right place. In this sense, they’re kind of like the post office.
Every time your laptop sends a request to the internet, your router makes sure the request goes to the right website.
The same goes for your internal network. Every time your wirelessly print something, it’s your router that allows that to happen.
How does this work?
Much like the post office, your router has an address book of all the devices in your network. Whenever your laptop says “I need to print out this document”, your router makes sure that request goes to the address of the printer.
The same goes for a request to the internet. When one of your devices tries to access a website, your router makes sure that the request goes to the location of the web server that contains the requested page. On top of that, it keeps track of the address of the device that made the request so when the website is returned from the web server, it ends up at the device that made the request.
If our devices weren’t assigned IP addresses, our routers would have to guess where to send the data it receives.
Could you imagine if the post office had to guess the destination of all the letters and packages it received?
Yikes. That’s a scary thought.
How Many IP Addresses Should a Router Have?
Ok so your router directs the traffic from your network to the internet using IP addresses.
What does this have to do with the IP address of a router? And how many IP addresses does a router have?
IP addresses affect how your router functions. Not only is your router in charge of directing the traffic on your internal network, but it’s also responsible for the communication between your devices and the public internet.
Due to the fact that your router handles traffic on both internal and external IP addresses, it must be able to communicate with both. This impacts the number of IP addresses your router has.
As a result of the internal and external IP addresses it needs to communicate with, your router will have two IP addresses. One internal IP address and one external IP address.
Let’s break down each of your router’s IP addresses and the purpose of each.
The Purpose of Your Router’s Private IP Address
Your router needs to have an internal IP address so the devices on your home network can communicate with each other.
Private IP Address Assignment
Your router’s private IP address will depend upon its manufacturer. Manufacturer’s design their routers to have specific private IP addresses when they’re made. Many manufacturers use the same private IP address for their routers.
In fact, there are many websites that list the default IP addresses of common routers.
What Is My Router’s Private IP Address Used For?
If routers didn’t have an internal IP addresses, home networks wouldn’t exist.
Let’s map this out.
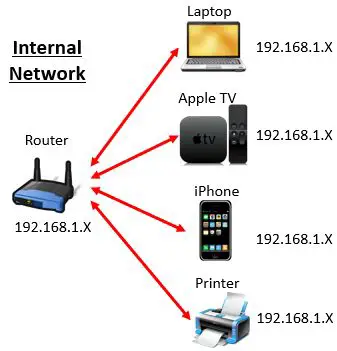
Above is an example of a router and devices in a home network.
You may notice that each device has a 192.168.1.X IP address listed. These are called private IP addresses. Each device on your home network will be assigned a private IP address by your router.
Private IP addresses are reserved for devices on home networks. In order for a device on your home network to communicate with the other devices on your home network, it must have a private IP address.
Also of note is that private IP addresses can’t communicate with external (or public) IP addresses. They’re reserved for internal traffic only.
This is why your router must have a private IP address. It needs to coordinate the requests sent between the devices on the internal network. It can only communicate with these devices if it has a private IP address as well.
For example, when your phone is on your WiFi and it sends a command to turn on one of your WiFi-connected smart outlets, your phone sends the request to your router. Your router is able to receive this request because it has a private IP address.
Once your router gets the request from your phone, it forwards the command to the smart outlet on your network at the requested internal IP address. Your WiFi outlet will then turn on as requested.
If your router didn’t have an internal IP address, your home network devices wouldn’t be able to communicate with each other.
Hopefully you can see how important your router is to your home network.
How Do I Find Out My Router’s Private IP Address?
There are several different ways to find out what your router’s internal IP address is.
The first (and probably easiest) way to find out your router’s IP address is by using your phone.
With Your Phone
I have an iPhone, but the process will be similar if you have an Android device.
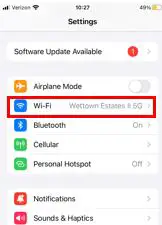
In your phone, you need to go into Settings.
From there, you need to go into your WiFi settings. Select your home’s WiFi network.
On the next screen, select the information icon next to your home’s WiFi network that you’re connected to.
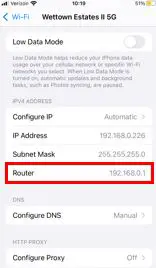
When your WiFi network screen opens, scroll down towards the bottom. You’ll see your router’s IP address listed under the IPV4 Address header.
Now I know my router’s internal IP address is 192.168.0.1.
That’s probably the easiest way to find your router’s private IP address. You can also find your router’s IP address with your computer.
With Your Computer
The second way to find your router’s internal IP address is to use the ipconfig (or ifconfig) command on a computer that’s on your network.
First things first. Grab your computer and make sure it’s connected to your home WiFi.
To start, type “cmd” into the search bar on the bottom of your computer. This will allow you to select the Command Prompt application.
Once you select the Command Prompt application, a new window will open that looks like this.
In this window, type “ipconfig” and press enter.
You’ll see a bunch of information pop up on the screen. Look for the “Wireless LAN adapter Wi-Fi” header.
Under this header you’ll see Default Gateway. The IP address next to Default Gateway will be your router’s internal IP address.
As you can see, my router’s internal IP address is 192.168.0.1.
If you have a Mac or Linux computer, the above steps will be very similar. The only difference will be that you need to use the “ifconfig” command instead of the “ipconfig” command.
If you have any trouble with this, please leave a comment below this post.
The Purpose of Your Router’s Public IP Address
Ok, so your router’s internal IP address allows your home network’s devices to communicate with each other.
What about its external IP address?
Public IP Address Assignment
Your router’s public IP address is assigned by your Internet Service Provider (ISP). When you set up an internet plan and connect your modem and router to the internet, the ISP will give your router a unique IP address that hasn’t been used yet.
What Is My Router’s Public IP Address Used For?
Your router’s external IP address is used for communication with the internet. In other words, it allows the devices on your home network to access the internet.
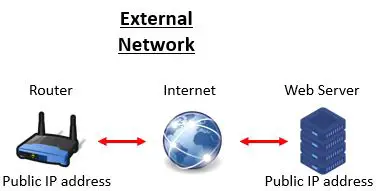
Let’s take a look at an example.
Unlike your home network, all websites on the internet have a public (external) IP address. This public IP address is what your devices use to identify the location of a website they want to access.
If you can remember from above, internal IP addresses can’t communicate with public IP addresses.
So how do your devices with internal IP address communicate with websites that have external IP addresses?
As you may have guessed, your router can help with that.
By having both an internal and external IP address, your router can communicate with both your internal network and the external internet.
If a device on your internal network wants to access a website, it reaches out to your router indicating the external location of the site it wants to access.
Your router receives this request on its internal IP address. It then passes the request out to the public internet from its public IP address.
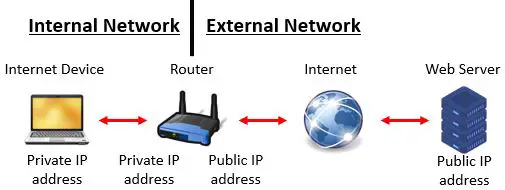
Here’s an example of an internet request from one of the internet devices on your home network:
As you can see here, your router is bridging the gap between your internal network and the rest of the internet. It needs an IP address that can communicate with both in order to do that.
That’s why it must have a public IP address.
How Do I Find Out My Router’s Public IP Address?
You’ll be happy to hear that finding your router’s public IP address is less complicated than determining its private IP address.
All you need is a device connected to your home internet and an internet browser.
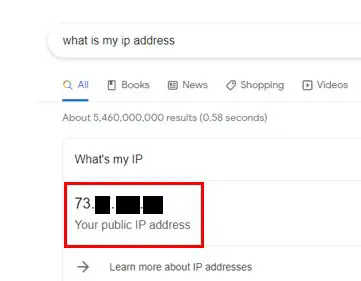
Open up your internet browser (e.g. Chrome) and Google “what is my IP address?”
The top result in Google should indicate your router’s public IP address.
Here’s what it looks like when I google “what is my IP address?”:
As you can see, my router’s public IP address is 73.X.X.X (I have blocked my full IP address for security reasons).
See? Simple as that.
This public IP address will be the location that websites use to send your internet devices the data they request. This can be websites, video streams, email, etc.
Without a public IP address, any request you send to the internet wouldn’t be returned to your devices.
Going back to the mail analogy, if a package doesn’t have a return address, you’d have no idea where it came from. Without a public IP address showing where the internet request came from, a web server wouldn’t know where to send the website that was requested.
Wrap Up
Routers have two IP addresses so they can bridge the gap between your internal home network and the public internet. They allow your devices to not only communicate with each other, but with the internet as well.
Hopefully you realize what an important role your router plays in connecting your devices.
If you found this information useful, check out the following related posts:
I’ll just come out and say it: your modem might not be as universal as you think.
I’ve seen this scenario play out a thousand times.
Let’s say someone is going through the process of moving. They’ve packed up all their things and moved them to their new home or apartment.
At this time they realize they want internet access in their new home.
Thankfully, they remembered to pack their modem from their previous location. They’ve already set up an internet service, so it should be a simple process. All they have to do is plug the internet cable into their modem and they’re good to go, right?
Not so fast.
An internet modem can be moved to another house, but a few things need to be in place for it to work properly. Most importantly, the modem must be compatible with the internet service provider (ISP) of the new home. In addition, an active internet connection must be in place at the new location.
Fortunately, I recently moved and I was able to use my modem in my new home. In this post I’ll share what I learned throughout the process.
Hopefully my experience can prevent you from having any surprises when moving your modem to a new location.
Moving My Modem to a New House
Before sharing what I learned about moving my modem, I’ll give you some background about my personal situation.
Let’s set the scene.
Background
I’ll start by saving my move was not a major one. My new home was about 5 miles from my previous apartment.
This was convenient because I could use the same ISP at my new home that I had before. This made things easier because I was familiar with my provider (Xfinity). I was also able to use the same type of internet connection for my new place (cable internet).
Unfortunately, I couldn’t just transfer my existing internet service to my new home because my roommate was in charge of the internet account at my old apartment. On top of that, the move took a few months to complete, so I temporarily rented a modem and router combination device from my ISP so I could have internet at the new place while I slowly moved in.
One thing I had working for me was that I owned the modem and router that we used at my previous apartment. I planned on taking it with me and using that same equipment for my internet setup.
Which brings us to the big question: could I take the modem that I owned and use it in my new home?
My Experience Moving My Modem
I decided I was ready to move my modem to my new house.
I unplugged my modem and carefully packed it up along with my router. After moving them to my new place I prepared to make the switch from the modem and router combination device I was renting to the devices I own.
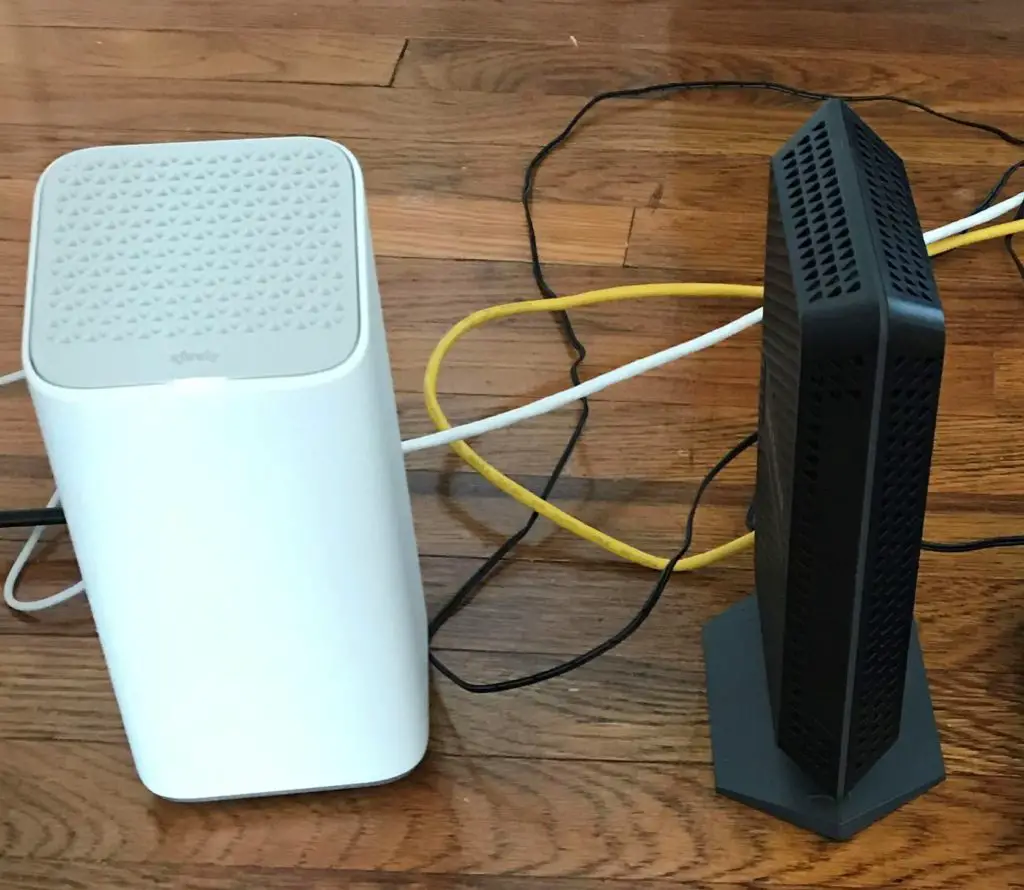
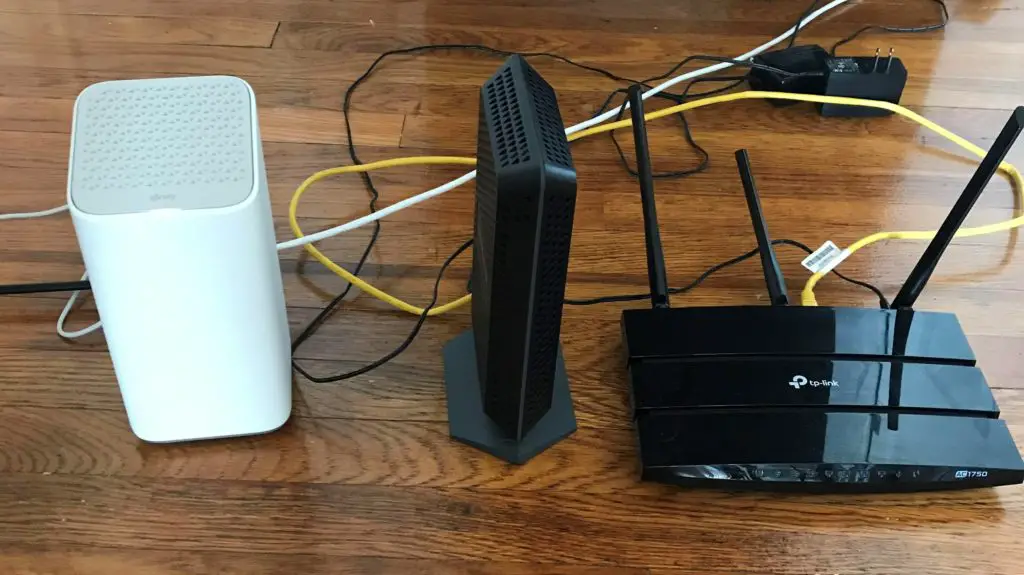
I compared my modem and router combination device with the modem that I own.
The rented modem and router combination is on the left and the modem I own is on the right
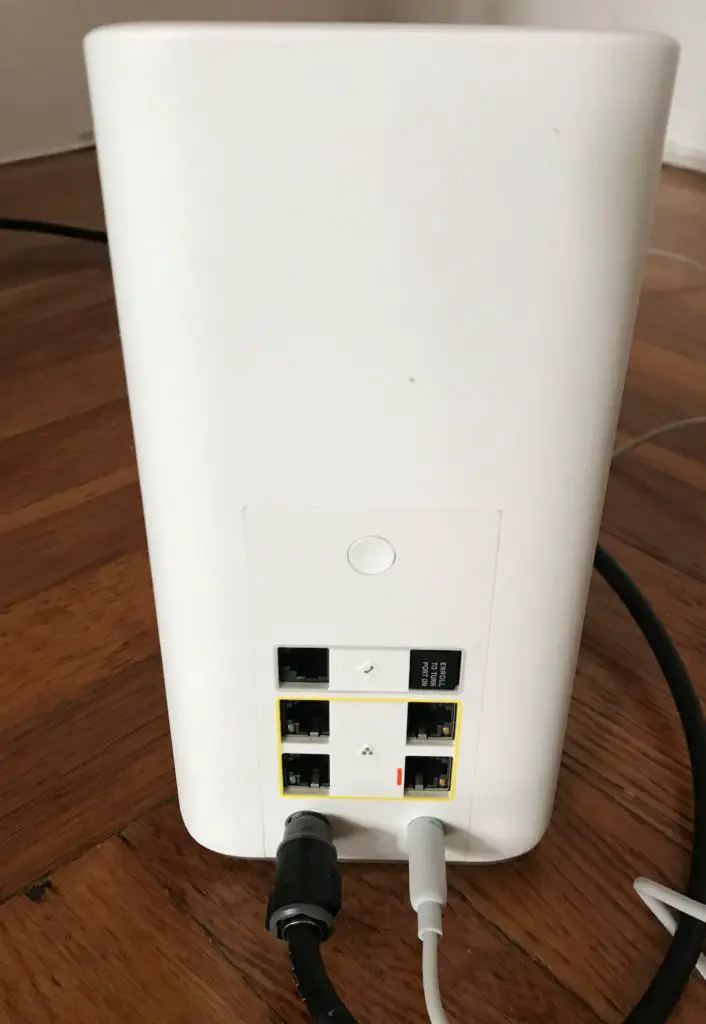
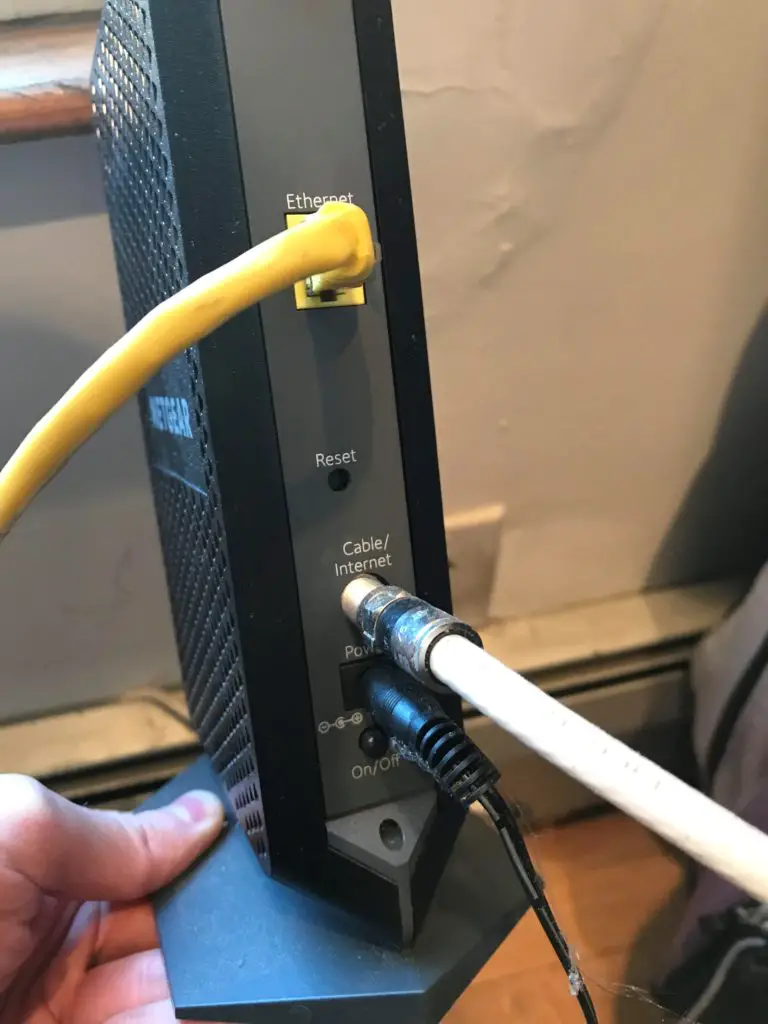
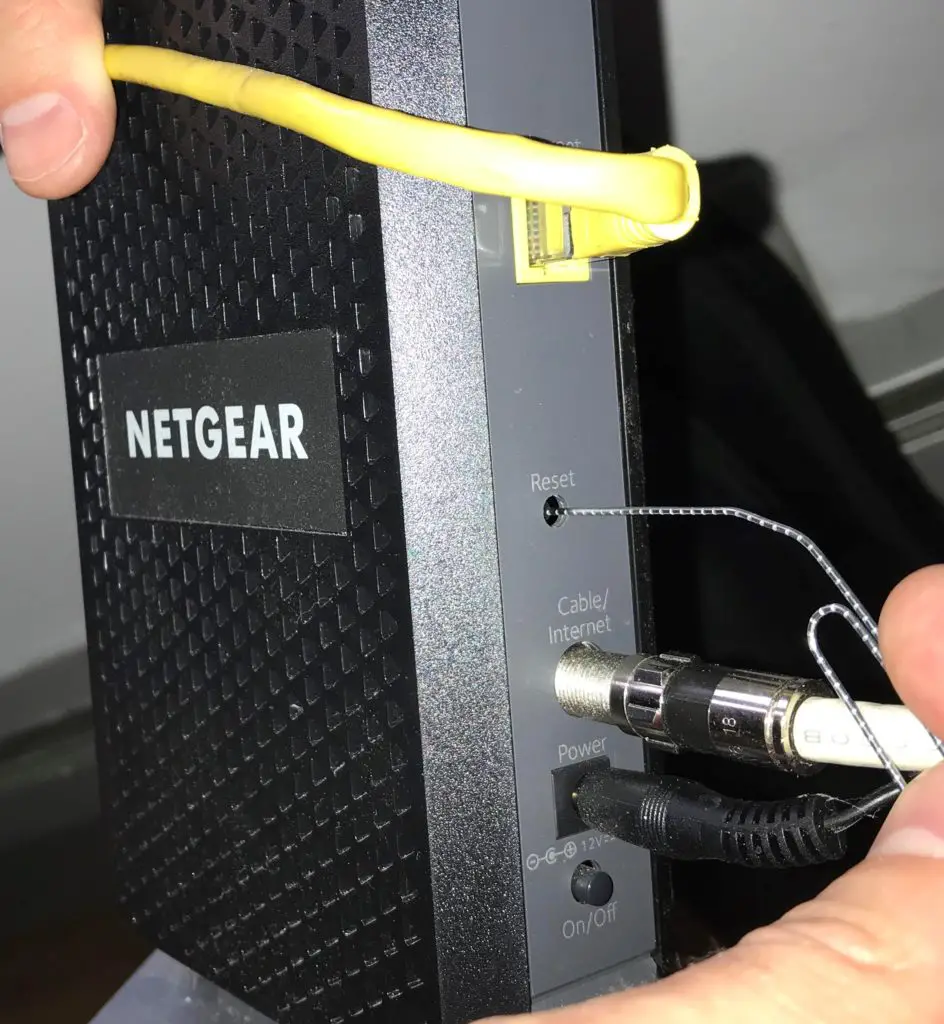
After putting them side-by-side, I saw how easy it would be to make the switch. All I had to do was remove the cable internet cable from the rented device and plug it into my modem.
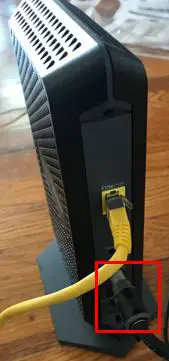
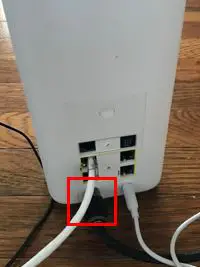
This was the internet cable I needed to remove from my rented modem and router combo device:
After I took that internet cable and plugged it into my modem, it looked like this:
The yellow cable in the picture above is the ethernet cable I used to connect my modem and router together.
Other than that I just needed to plug in the power cords of my modem and router and I would be good to go right?
Not so fast.
Troubleshooting Modem Connection Issues
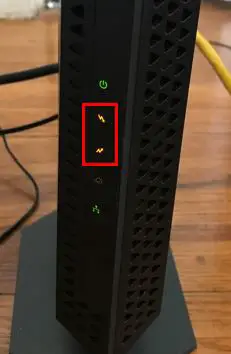
After powering on and booting up for a few minutes, my modem didn’t look like it normally does.
I’m used to seeing all the lights turn green on my modem, so I was surprised when a few of them turned orange.
Once I recovered from my state of shock, I looked into the issue at hand.
It turns out, these two orange lights were telling me I had a problem with my internet connection. For some reason, my modem was not communicating with the ISP like it should.
The good news was that it was an easy fix. All I had to do was register my modem’s MAC address with my ISP, which I’ll describe how to do later in this post.
After registering my modem’s MAC address with my ISP, here’s what my modem looked like.
Success!
The two lights that were orange turned green. When this happened I was able to use the internet in my new home.
All in all, my experiment was a success and I was thankful I didn’t have to spend any money on new equipment.
Considerations When Moving a Modem to a New House
There’s an important takeaway I want you to understand if you’re planning on moving and you want to take your modem with you.
Just because I was able to use my modem at my new house doesn’t mean that you will be able to.
With that said, there are a few things you can look into before you move to determine if you’ll be able to use your modem in your new home or not.
Let’s take a look at each of these considerations.
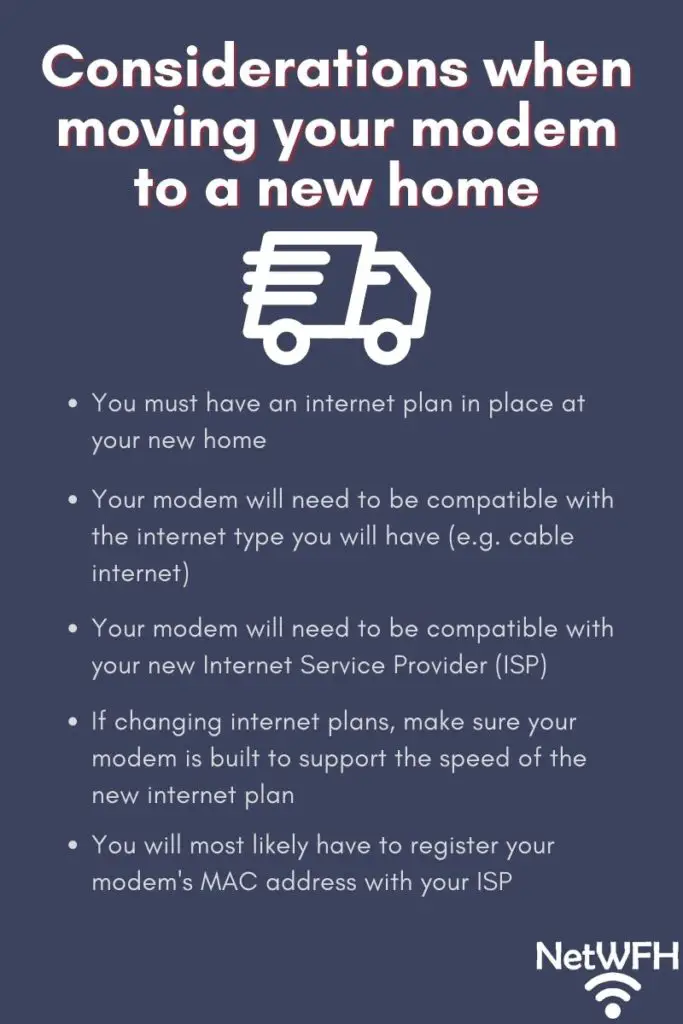
You Must Have an Internet Plan in Place at Your New Home
This one may seem obvious, but it’s sometimes overlooked.
Your modem will not work in your new home if you don’t have an internet plan in place.
If you’ll be able to use the same ISP that you currently have in your new home, I suggest trying to transfer your service to the new location. This is the easiest way to make sure you have an internet connection for your new home. The ISP will just take your existing plan and move it to your new address for you.
As I mentioned above, I wasn’t able to do this because my roommate was in charge of our internet plan at my old home and he wasn’t moving with me. As a result, I had to call the ISP to have them turn on internet service to my new house.
This is a fairly straightforward process, but you need to make sure you do it before you try to set up your internet. Just make sure you plan in advance so you’re not doing this after you move in to your new place.
Your Modem Must Be Compatible With the Internet Type of Your Internet Plan
Depending upon the type of internet you’ll have at your new home, you may need a different type of modem.
The most common type of internet is cable internet, which is delivered through a coaxial cable. If you’re situation is like mine, you have nothing to worry about. I moved from a house with cable internet to another home that had cable internet.
Due to the fact that the type of internet delivered to my home didn’t change, I knew there was I chance I could use my modem in the new location.
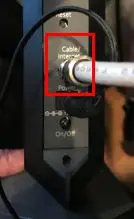
My modem is built for cable internet, and as a result it has a coaxial cable connection.
As you can see, the internet port is labeled “Cable” to indicate it’s meant for cable internet.
If you’re changing the type of internet you’ll have at your new home, you’ll probably have to get a new modem. On the other hand, if your internet type will be the same, you may be able to use the same modem.
Your Modem Must Be Compatible With Your Internet Service Provider
When I moved I was able to keep the same ISP, so I didn’t have to worry about my modem not being compatible. It worked with the ISP at my old apartment so I knew it would work in my new one.
If you’re in a scenario where you’ll be changing ISPs, this is something you have to consider. This will most likely be the case if you’re moving to a new home that is far from your current one.
It goes without saying, if your modem isn’t compatible with your ISP, your internet won’t work. You’ll most likely have to rent a modem from your ISP or buy a new one.
You May Have to Register the Mac Address of Your Modem With Your ISP
In many cases, you’ll have to register the MAC address of your modem if you want your internet to work.
In my case, I had to register my MAC address with the ISP because the modem and router combination device I was renting was already registered with the ISP.
Without getting into too much detail, the ISP uses your modem’s MAC address to provide you with a connection to the internet. This MAC address becomes tied to your account. When you unplug a modem and connect a new one, it confuses the ISP because it’s looking for the MAC address of the modem you unplugged. As a result, the ISP can’t establish an internet connection with your home and you don’t get internet service.
In my scenario, the ISP was looking to establish an internet connection with the MAC address of the modem and router combination device I was renting. When I unplugged the internet cable from the combination device, the ISP didn’t recognize the MAC address of the modem that I owned when I plugged it in.
The fact that I was switching my modem caused me a few extra steps to get my internet up and running.
Even if you’re starting a new internet plan with your ISP, you’ll have to register the MAC address of your modem with them.
It’s better to go into it expecting to have to do this. It’s a pretty easy process depending who your ISP is. Read on to find out how to do this.
Make Sure Your Modem Can Handle Faster Speeds if You Are Upgrading Your Internet Plan
If you’re going to be upgrading the speed of your internet at your new home, you need to make sure your modem can support it.
Look up the make and model of your modem online to find out the maximum internet speed it can handle. If you plan on getting an internet plan that’s faster than that maximum speed, you have two choices. You can either get a slower internet plan, or get a new modem that can handle the speed of your new internet plan.
Too often people assume their modem will work with any internet plan they purchase. Unfortunately that’s not the case.
How to Know if a Modem Is Compatible With an ISP
It’s fairly easy to see what ISPs your modem is compatible with.
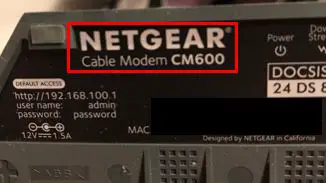
The first thing you need to do is determine what make and model your modem is. You can usually find this information on a sticker on the device.
My modem has a sticker on the bottom that tells me these details.
As you can see, I have a Netgear CM600 modem.
So what next? How can I find out what ISPs it’s compatible with?
It’s easy.
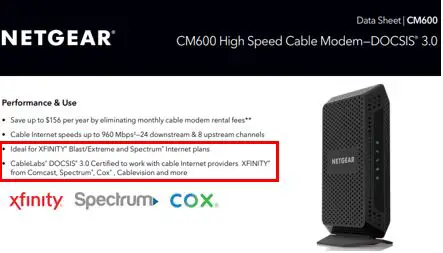
I googled “Netgear CM600 modem” and one of the first results that came up was the product data sheet.
As you can see on the data sheet, my modem is compatible with most major service providers.
If you have a brand name modem and you’re going to be using a major ISP, you shouldn’t have too much to worry about. With that said, if you’re using a less well-known ISP or your modem is not from a major manufacturer, you’ll want to make sure you take a look at this.
It only takes a few minutes to verify the ISPs your modem is compatible with, and it could save you a headache if you know up front if you’ll need a new modem or not.
How Do I Activate My Modem With My ISP?
Registering your modem with your ISP is something you’ll most likely have to do.
But first things first. In order to register your modem with your ISP, you need to know your modem’s MAC address.
How to Find Your Modem’s Mac Address
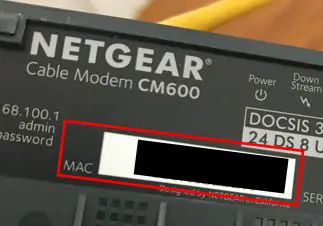
For your modem’s MAC address, we need to go back to the sticker on the device.
It’s usually clearly marked so it shouldn’t be too hard to find.
Here’s what it looks like on my modem’s sticker:
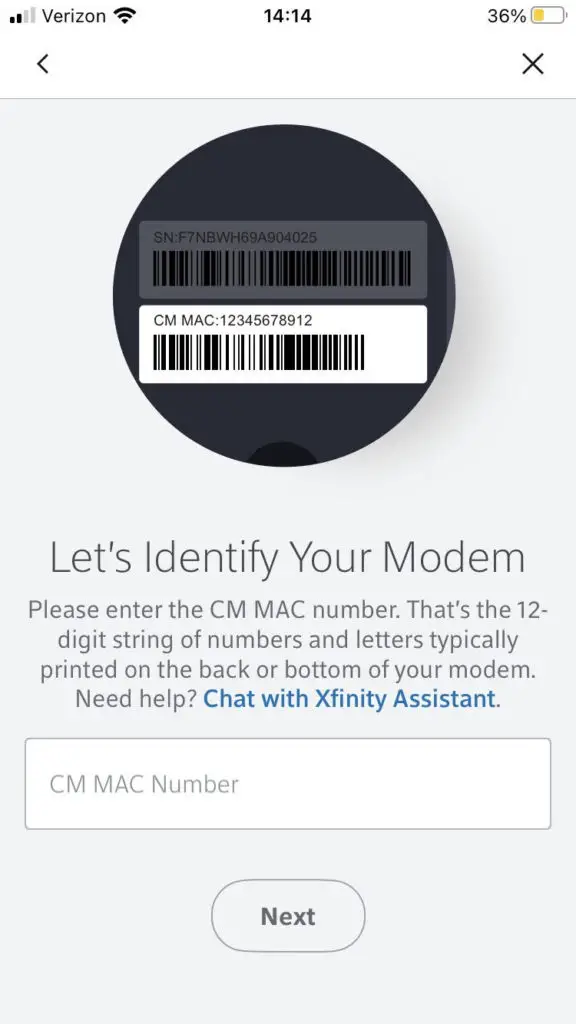
As a note, I have covered the MAC address of my modem for security purposes. It should be a twelve digit mix of numbers and letters. Sometimes you will find your MAC address in the format “XX:XX:XX:XX:XX:XX”.
Once you have the MAC address of your modem, you should be in good shape.
Activating Your Modem With Your ISP
With your MAC address in hand, you can activate your modem with your ISP.
In my case, my ISP has an app for setting up your internet service. This allows you to set up you internet on your phone without needing an internet connection.
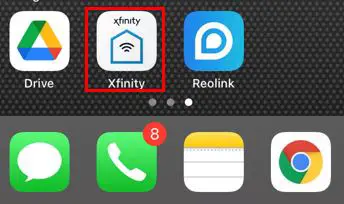
To register the modem I own, I first needed to download the Xfinity app. Xfinity is my ISP.
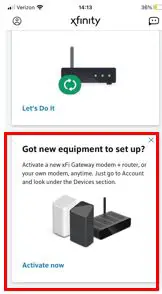
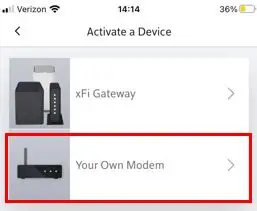
After opening the app, I was given the option to set up new equipment.
From there, I just had to select that I wanted to register my own modem.
After following a few simple prompts, I was then able to enter the MAC address of my modem.
Upon completing the setup steps, my new modem was registered with my ISP and an internet connection was established.
It’s important to note that the process for registering your modem may be slightly different depending upon the ISP you use. At this point, I expect that most have a mobile app for you to complete these steps.
Wrap Up
In many cases, you should be able to take your modem with you when you move to a new home. I recommend you perform the checks detailed in this post before you move so you know if you’ll need to get a new modem or not.
The last thing you want to do is move all your stuff to your new house or apartment and not be able to set up your internet. We are too dependent on it in our daily lives to even go a few days without it.
If you have any questions about moving your modem or you want to share your experiences, drop a comment below.
If you found this article useful, here are relevant posts that you might find helpful as well:
If you’re moving, the last thing you’re thinking about is if your WiFi router will work in your new house or apartment. Chances are, this won’t cross your mind until you’re setting up your internet in the new location.
So the question remains: can a WiFi router be moved to another house?
As a general rule, a WiFi router can be moved to any house with a working modem and active internet connection. As long as the modem that will be connected to the router is functioning properly, the router will work regardless of its location.
I know this may sound confusing, but I will untangle this mess for you in this post.
I can speak from experience because I recently moved to a new house and I’m using the same modem and router that I had in my old apartment.
Hopefully my experience will help you get your internet humming along after you move.
My Experience Moving My WiFi Router
When I was getting ready to move, I had the same question that you did.
I wasn’t sure if I’d have to buy a new router for my home, or if I could use the one I already had (which was working perfectly).
I decided to find out for myself.
Hopefully in hearing my story you’ll understand what you might have to do with your router when you move.
Getting a New Internet Service
Before I go into the details of my experience, there’s important background you should know first.
When I was moving, I didn’t transfer my existing internet plan.
I needed to start a new internet plan, because my roommate was in charge of our internet account at my previous apartment. Both my previous internet plan and new internet plan were for cable internet.
As you’ll see later, this caused me to register my modem with the ISP to get my internet working.
Now that the necessary background information is out of the way, let’s get into the experiment.
Setting Up My Own WiFi Router
Let me set the scene.
At this point I had a working internet connection at my new home. I was using my the modem and router combination device that I was renting from my ISP.
This is what my internet setup looked like:
I was all packed up and ready to move from my apartment. At this point I wanted to set up my own modem and router in the new place.
I unplugged the modem and router at my apartment and moved them to my new home.
To make the setup easier, I put my rented modem and router combo device next to my own modem and router. That way, I’d be able to easily unplug the rented device and connect my own devices.
At this point, here’s what it looked like.
It was time to connect my own modem and router to my internet connection.
First, I made sure the rented modem and router combo device was powered off. Then I removed the internet cable from the back of the device.
I attached the internet cable to the internet port of the modem that I own.
Next, I connected my modem and router together with an ethernet cable.
Lastly, I plugged both the power cords of my modem and router into outlets and crossed my fingers. Both of my devices powered on.
At this point, I was expecting my internet connection to start up and work like it did in my old apartment.
Unfortunately that’s not what happened.
Further Modem and Router Configuration
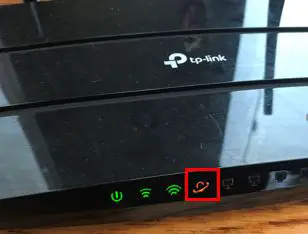
Much to my surprise, a few of the lights on my modem and router lit up orange instead of green.
Here’s what my modem looked like:
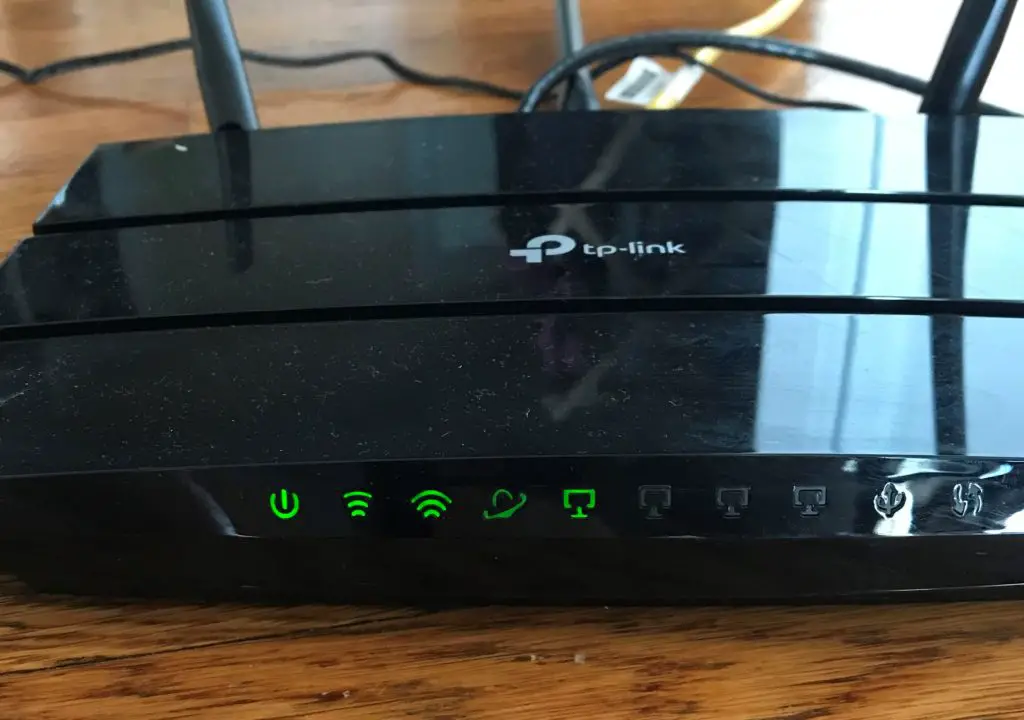
My router looked like this:
The bad news was that my internet wasn’t working and there seemed to be a problem with my modem and router.
The good news?
I knew what my modem lights and router lights were telling me. Something was wrong with my internet connection to my ISP.
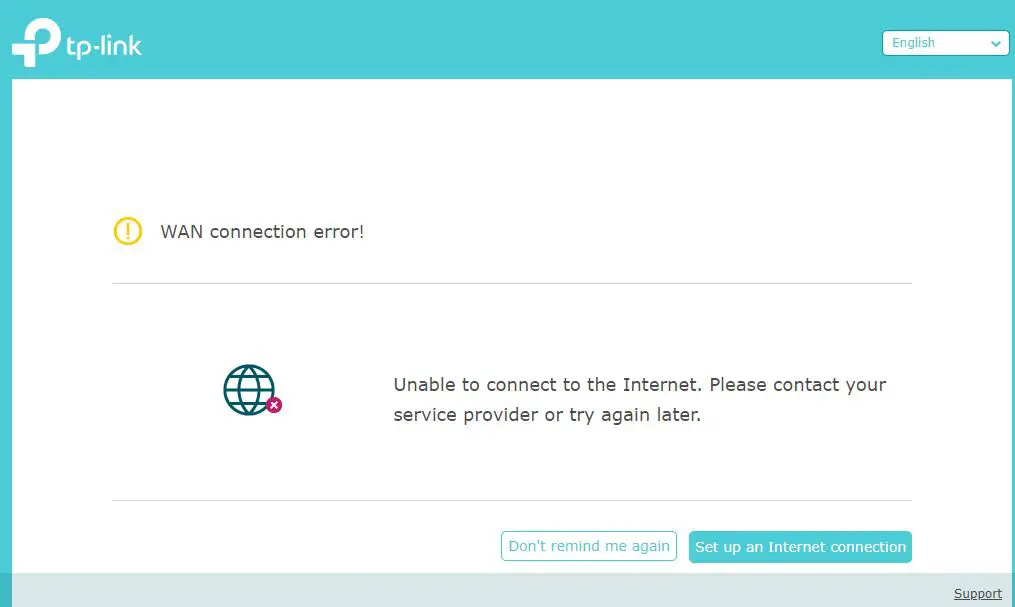
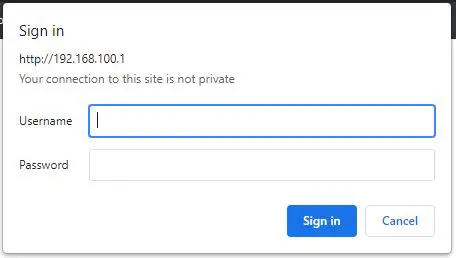
To confirm this, I tried logging into my router’s settings. Here’s the notification I got.
Thankfully, the fix was an easy one.
All I had to do was register the MAC address of my modem with my ISP. Once I did this (through my phone using the ISP’s setup app), the lights on both my modem and router turned green.
Here’s my modem after I registered its MAC address with the ISP:
And here’s what my router looked like.
No further configuration was needed for my router. Once the modem was registered with the ISP, it was able to get a good internet connection from my modem.
As you can guess, I was able to get an internet connection once the lights on my modem and router were all green on both devices.
I was relieved to be able to move my WiFi router to a different location without having to buy a new one. I was equally as happy that I could do the same with my modem.
The experiment was a success. I was able to put all my internet worries behind me and focus on the task at hand: moving the rest of my stuff to my new home.
Things to Think About When Moving a Router to a New Location
There are a few things I learned from my experiment with moving my WiFi router that are important to consider if you’re looking to do the same thing.
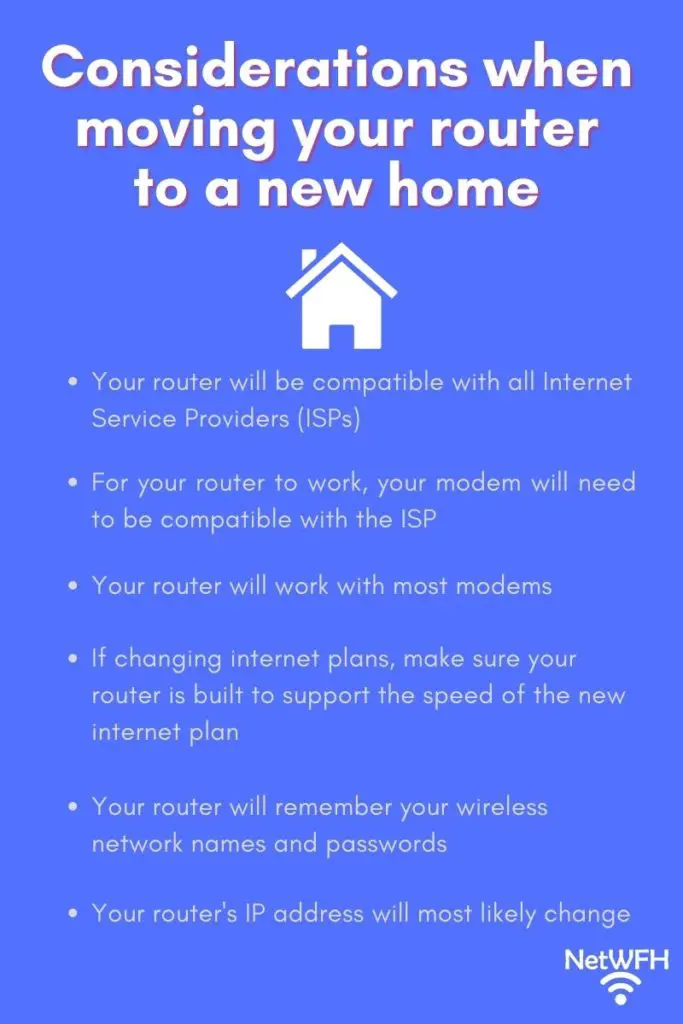
Your Router Is Compatible With All ISPs
When you’re moving your WiFi router, you don’t have to worry about the ISP you’re using. Routers work regardless of the ISP you have an internet plan with.
This is a bigger issue with modems. You need to make sure your modem is compatible with your ISP, or else it won’t work. If your modem won’t work, you won’t have internet access.
Your Router Will Work With Most Modems
Let’s say you’re moving and you’ll have a different ISP for your new home. As a result, you need to get a new modem that’s compatible with your new internet provider.
If this applies to you, you shouldn’t have to worry about your router. Routers that are used in home networks are compatible with the vast majority of modems. As long as they both have an RJ45 ethernet port (which almost all of them do), you should be in good shape.
What to Do if You Are Transferring Your Internet Plan
If you’re moving to an area where you can keep the same internet service provider, you should be able to transfer your internet service to the new location. This makes things easier on you because you won’t have to cancel your existing plan and go through the hassle of starting a new one.
When it comes to your router, you won’t have to worry about anything in this situation. So long as your modem is compatible with the ISP, it will work.
The only thing you may have to do is re-register your modem with your ISP at the new location. From there your router will be up and running.
What to Do if You Are Getting a New Internet Plan
Things aren’t much different if you sign up for a new internet plan. If this is the case, you won’t have to worry about your router as long as your modem works with the ISP.
The only consideration is if you sign up for a new internet plan with faster speeds. Depending upon the type of router your have, you may need to upgrade it so it can keep up with your internet plan.
Will My Wireless Networks Change if I Move My Router to A Different Location?
This is a big question that gets asked frequently.
If you move your router to a new location (and potentially get a new internet plan), will you have to set up your wireless networks again? Or will they stay the same?
When I moved my WiFi router to my new home, my wireless network names and passwords stayed the same. It was like I never left my previous apartment.
The reason for this is that your router has memory in it. When you change your router’s settings they get saved in your router’s memory. A perfect example of this is your wireless network names. Even when your device is turned off, it keeps that information in its memory for the next time it powers up.
This was a huge benefit for me.
All of my wireless devices automatically connected to my WiFi because they remembered the names of my wireless networks. This saved me from having to connect all my wireless devices to the internet again.
It was as if I never left my old apartment.
Will My Router’s IP Address Change if I Move to Another House?
Before I answer this question, it’s important to note that routers have two IP addresses. One IP address is used for your internal home network and is usually 192.168.0.1 or a similar address. The other IP address is externally facing. This IP address is used to allow devices on the internet to find the devices on your home network and vice versa.
Unless you’re moving to a location very close to where you were before, the external IP address of your router will most likely change. The internal IP address of your router will not change (unless you manually change it).
IP addresses are tied to geographic areas. If you move your WiFi router to a new house the geographic location of your device will also change.
This is not something you need to worry about.
Your external IP address change will happen automatically, as your modem will be assigned an IP address from you ISP. No action is required on your part.
In fact, you won’t even notice this has happened unless you have devices in your home network that can be accessed over the internet. If this sounds like your situation, you will need to reconfigure those devices for the new IP address.
Wrap Up
Hopefully your anxiety about moving your WiFi router to a new home or location has been relieved. You shouldn’t have much trouble moving it to your new home and keeping the same wireless networks that you had before.
If you have any questions or you would like to share your experiences about moving your router, please drop a comment below.
If you found this article interesting, you might be interested in these related topics as well:
Buying a modem and router for your home internet can be a daunting task. There are many different modems and routers to choose from and it can be overwhelming. On top of that, if you don’t buy the right devices your internet speed can be greatly reduced.
Thankfully, there’s an easy way to solve this problem.
The solution is a modem router combo device.
A modem router combo is a home networking device that combines the functionality of a modem and router into one device. It functions the same way as a separate modem and router does, in that it establishes an internet connection to an internet service provider (ISP) and broadcasts a wireless network.
In this post we’ll take an in-depth look at modem router combinations so you can determine if it’s the right device for your home network.
What Does a Modem Router Combo Do?
Let’s start with the basics here.
A modem and router combination device provides you with all you need to access the internet from your home. This includes connecting your home to your ISP, as well as providing a wireless network for your devices.
It’s basically a one-stop shop for your home internet.
What Is the Difference Between a Standalone Router and a Modem Router Combo?
You’re probably wondering what the difference is between a regular router and a modem and router combination device.
The biggest difference is that a router on its own doesn’t provide you with all you need to access the internet.
A router allows your devices to interact with the internet once an internet connection is already in place. It’s also used to take the already-established internet connection and create a wireless network in your home for your wireless devices to access the internet.
The key here is that on its own, your router can’t provide your devices with access to the internet.
That’s where the modem comes in.
A modem provides the internet connection that the router uses to make a wireless network. You need both a modem and router to create a working home internet network.
Using a router on its own to access the internet would be like trying to drive a train without train tracks. It simply won’t work.
That’s why a modem and router combination device can be so useful. As long as you have an internet plan, you can be confident that your home network will work well.
What Does a Router and Modem Combination Device Look Like?
Now that we know what a modem router combo does, let’s dive into what they look like.
The biggest difference you’ll notice is that modem and router combination devices are much simpler than standalone modems and routers.
In a combination device the modem and router are already connected within the piece of equipment. In other words, you don’t have to do anything to make sure they’re working properly with each other.
When the modem and router are separate, they need to be manually connected. On top of that, each standalone device needs its own connection to a power source, so each one will have its own power cord. Combination devices only need one power cord because it’s only one device.
Here’s what the front of a modem router combination device looks like:
See? It looks pretty clean and simple.
Now, let’s take a look at the front of a modem and router that are standalone devices.
The front of a standalone modemThe front of a standalone router
Not too overwhelming at this point right?
You might think differently after comparing the back of a modem router combination device and a standalone modem and router.
Here’s what the back of a modem router combination device looks like:
Just like the front, the back of the modem router combo is very simple as well.
How about the modem and router standalone devices? How do they look?
Here’s what the back of a standalone modem looks like:
Seems simple enough. In fact, it doesn’t look too different from the modem router combination device.
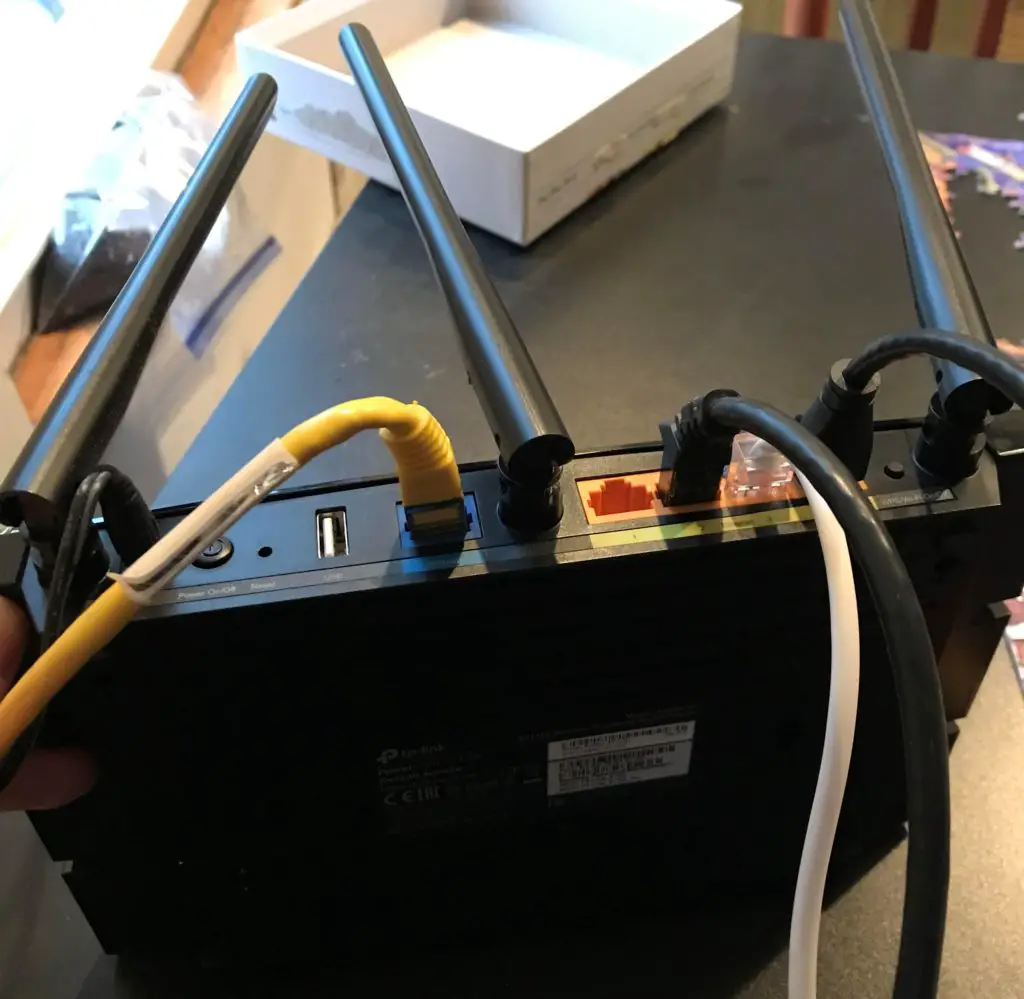
What if we throw a router into the mix? What does the back of a standalone router look like?
As you can see, the back of a standalone router is much more complex than the back of a modem router combination or a standalone modem.
This level of complexity is what can make a non-technical person feel uneasy. Especially considering the fact that you need to make sure both the modem and router are connected correctly when you buy them as separate devices.
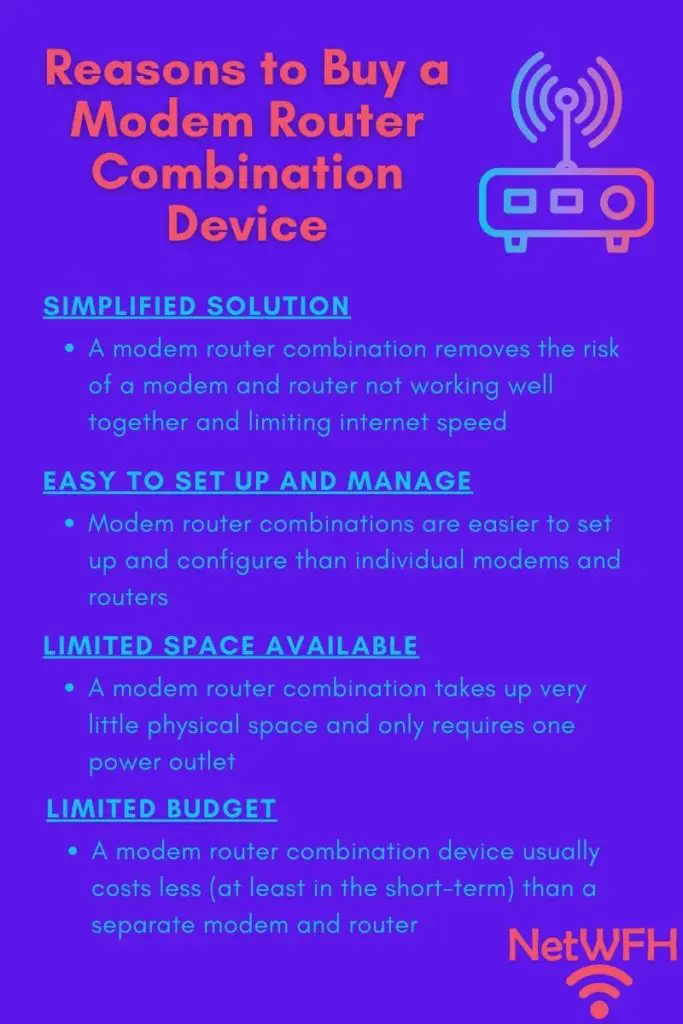
Reasons to Buy a Modem Router Combination Device
A modem and router combo can be very useful depending upon your personal situation. Before running out and buying one, it’s important to understand the benefits of these devices.
Let’s take a look at the situations where a modem router combo provides the most value.
When You Want an Easy Solution That Works Well With Your Internet Plan
I’ll just come out and say it.
Finding a modem and router that maximizes the speed of your internet plan can be a challenging task.
If you buy a standalone modem or router that doesn’t meet the needs of your internet plan, it can greatly reduce your internet speed. The last thing you want to do is pay a lot of money for a high speed internet plan and not get the most out of it.
I know, this is an intimidating concept.
In buying a modem router combo, you can save yourself hours of researching which individual modems and routers would optimize your internet speed. On top of that, you can rest easy knowing your modem and router will work well together.
A modem router combination removes several of the variables that go into your home internet speed. The less factors you have to worry about when setting up your home internet, the easier it is to get the performance you want out of your internet plan.
If You Want a Simple and Easy Way to Set Up Your Home Internet
If you don’t consider yourself a technical person and you get overwhelmed by the gadgets in your home, a modem router combo may be a great option for you. They’re much easier to configure and manage than individual modems and routers.
Sure, modem and router combos may not be as customizable as standalone devices, but if you’re not a very technical person you probably wouldn’t be utilizing those capabilities anyway.
With a modem router combo you’re choosing simplicity and functionality over high customizability. In other words, you’re ensuring your modem and router work well together at the expense of some advanced technical features.
If you just want a solution that will give you good internet performance and you’re not worried about squeezing every last drop of horsepower out of your internet devices, a modem router combination may be a good choice.
If You Want Your Internet Devices to Take Up as Little Space as Possible
This should be fairly obvious at this point.
When you have a separate modem and router, you’re dealing with two devices. That means you need to have the physical space for both of them in your home.
This doesn’t mean you can stack them on top of each other either.
Modems and routers need to be in open spaces that get good air flow. If you don’t give these devices enough space, you run the risk of your modem or router overheating.
Nobody wants that, especially the internet users in your home.
If you already have a surge protector and it’s running short on available outlets, it’s much more convenient to only need one for your home internet setup. This is a minor consideration because surge protectors are cheap, but it’s still a consideration nonetheless.
The bottom line is, if you’re going for a minimalist look with as few devices and tumbleweeds of cables as possible, a modem router combination device is worth considering.
If You Want to Save Money on Your Home Internet Setup
Another consideration to think about is your budget.
In general, modem router combinations are cheaper than buying a modem and router separately.
If you’re on a tight budget, you can probably save a few bucks by buying the combo device.
One thing I will add is that you should keep your future plans in mind here. If you plan on upgrading your internet devices in the future, with a separate modem and router you can upgrade each one individually.
Separate devices can save you money in the long run, because if you want to upgrade a modem router combo you have to buy a whole new one each time you want to upgrade.
In addition, router technology has been advancing much faster than modem technology. As a result, you can probably get away with upgrading your router a few times before you have to upgrade your modem. In this scenario it’s cheaper in the long run to have a separate modem and router.
With that said, if you don’t see your internet needs changing and don’t plan on upgrading your devices anytime soon, you’ll probably save some money by buying a modem router combo.
Should I Buy a Modem Router Combo?
If you like what you’ve read so far about modem router combinations, I have some advice before you run out and buy one.
Test drive one first.
In many cases if you rent a router from your ISP, they’ll provide you with a modem router combination device.
I’d suggest keeping what you have now and renting a modem router combination device from your ISP for a few months. They’re usually pretty cheap to rent (around $10 per month), so it’s worth trying one out. Worst case scenario is if you don’t like it, you can go back to what you were using before.
Keep in mind that the devices provided by your ISP are pretty general in nature and usually aren’t designed for your particular internet plan.
What does this mean?
It means you can probably get slightly better performance out of a modem router combo that you buy for your specific internet plan. In other words, if you like the performance you get out of the device you get from your ISP, you’ll probably be able to get even better performance if you buy your own.
You’ll ensure you’re happy with your decision if you try before you buy. Even if you’re curious about how modem router combinations work, it’s worth the short money to find out for yourself.
What Modem Router Combo Should I Buy?
If you’re convinced that a modem router combo is the best fit for your home, there are a few I can recommend.
The Budget Friendly Option
If you just want a modem router combination that works and you have basic internet needs, you can get really good bang for your buck with the Netgear C6220.
This modem router combo supports internet speeds up to 200 Mbps. This means it’ll work well for you if your internet plan is for speeds up to 200 Mbps. If your internet plan provides more than 200 Mbps, you’ll want to go in a different direction.
Most small families should get good performance out of their internet with 200 Mbps. If this is your situation, give this device a shot.
For More Demanding Internet Needs
If you need more than 200 Mbps to satisfy your internet needs, you can take a step up with the Arris Surfboard SBG7600AC2.
The Surfboard can support internet speeds up to 800 Mbps, so it’s a step up from the Netgear C6220. This’ll be a better fit for larger families where there are multiple people on the internet at all times.
If you have multiple people streaming and gaming at the same time, you won’t have any problems with this modem and router device (as long as your internet plan can support it).
This router is more expensive than the Netgear C6220, but it serves as a good middle ground if you want a good option that isn’t super expensive.
If you’re looking for off-the-charts performance at a higher price point, check out the next modem router combination device on the list.
Top of the Line
If you want to swing for the fences and budget isn’t a concern for you, you might want to try the Netgear Nighthawk AX6000.
This modem router combination is one of the best in the business. It will undoubtedly meet any of your home internet needs.
If you want to online game? Check.
If you have a large family that always has multiple devices streaming? Check.
If you have a blazing fast internet plan? This device has you covered.
In addition to the fact that it can support gigabit internet speeds, it also has WiFi 6 capability. This is the latest and greatest WiFi technology that allows for faster internet speeds. WiFi 6 can also support more devices at the same time when compared to the previous WiFi technology.
If you decide to buy this device you’ll future-proof your home internet and you won’t have to buy a new modem router device for a long time.
Wrap Up
I hope you now have a good understanding of what modem router combination devices are, and why you might want to consider buying one.
If you have any questions or want to share your experiences with these devices, please feel free to drop a comment in the section below.
If you found this reading interesting, check out some previous posts on similar topics:
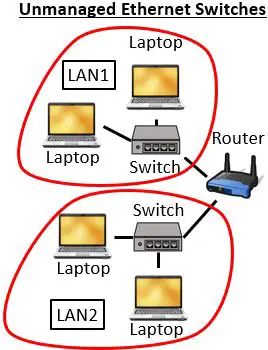
In a world where more home devices than ever before are being connected to the internet, ethernet switches are becoming all the more useful.
The problem is, many people don’t even know what ethernet switches are.
Ethernet switches are physical devices that enable the connection of multiple devices to one ethernet cable. They effectively turn one ethernet cable into multiple wired connections. Ethernet switches are used in situations where additional ethernet ports are needed.
This is especially useful if you have multiple devices that you want to connect to the internet through a wired connection. There are several benefits to using wired internet connections instead of wireless ones, so it’s worth considering if a switch would enhance your network.
This post will provide you with all the information you need to decide if a switch is a good fit for your environment.
What Is an Ethernet Switch?
Before we talk about what a switch can do, let’s discuss what a switch looks like.
A switch is a physical device (i.e. hardware) that is commonly found in home or office networks.
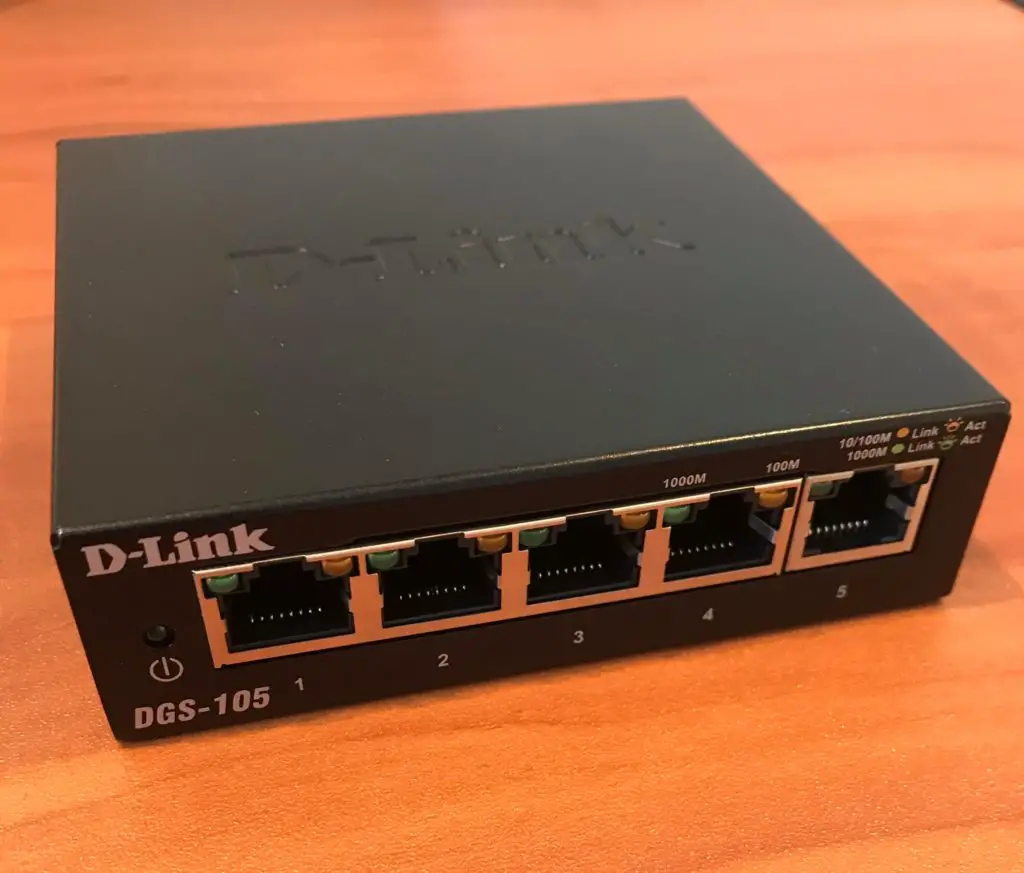
Here’s an example of what an ethernet switch looks like:
Switches have multiple ethernet ports. The switch in the picture above has five ethernet ports (numbered 1-5).
There are two types of ports on a switch: one of the ports will be the uplink port and the rest will be standard ethernet ports.
Let’s look at the difference between these two types of ports.
What Are the Different Ports on an Ethernet Switch?
Uplink Port
The uplink port is theethernet port that connects the switch to the rest of the network. If the devices plugged into the switch need an internet connection, the ethernet cable connected to the uplink port must at some point connect to a router at the other end (either directly or through other switches). Without a connection to a router, the devices won’t be able to communicate with the internet.
If you have a large network with many wired devices or devices that are not located close to each other, you can also use the uplink port to connect the switch to another switch in the network. This allows you to expand your network if you decide to get more wired devices or you have clusters of devices that are far away from each other.
On the other hand, if your devices just need to be connected to each other and not the internet, you don’t have to connect one of the ports on the switch to a router. In doing this your devices will be able to communicate with each other and no one else. It will be a closed network with no internet connectivity.
In other words, you don’t have to use the uplink port if the devices connected to it just need to communicate with each other.
Standard Ethernet Port
Standard ethernet ports are used to connect your home network devices to the switch. As long as your device has an ethernet port, it’ll be able to connect to the switch and become part of the local area network.
Some devices that are often plugged into switches are:
Printers
Desktops/laptops
Network storage devices
Which Port on an Ethernet Switch Is the Uplink Port?
Depending upon the switch you buy, it’ll be easy to determine the uplink port.
Many switches will have a label indicating which port is the uplink port. A good example of this is your router.
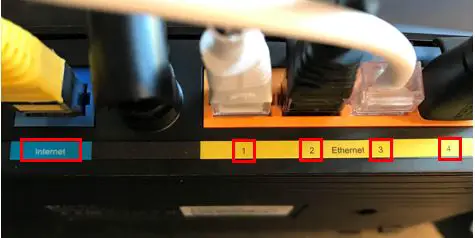
If you take a look at the back of your router, you’ll notice that there are multiple ethernet ports on it. That’s because routers also serve as switches. This allows you to connect several devices to the internet with a wired connection.
In the above router, there are five ethernet port connections. There is one port labeled “Internet” and the other four ports are labeled “Ethernet”.
Can you guess which port is the uplink port?
That’s right, the port labeled “Internet” on a router is the uplink port.
The other four ports in this case are the standard ethernet ports that you can plug your internet devices into.
In the case of the switch pictured above, there’s no port that’s clearly identified as the uplink port.
So which port is the uplink port?
This switch is an example of an unmanaged switch. In this unmanaged switch, you can use any of the ports as the uplink switch. In other words, you could connect a router or another switch into any port on the switch and have it serve as the uplink port. This is possible because newer switches have ports that can automatically sense which one is being used as the uplink port.
We’ll discuss managed switches in more detail in the next section.
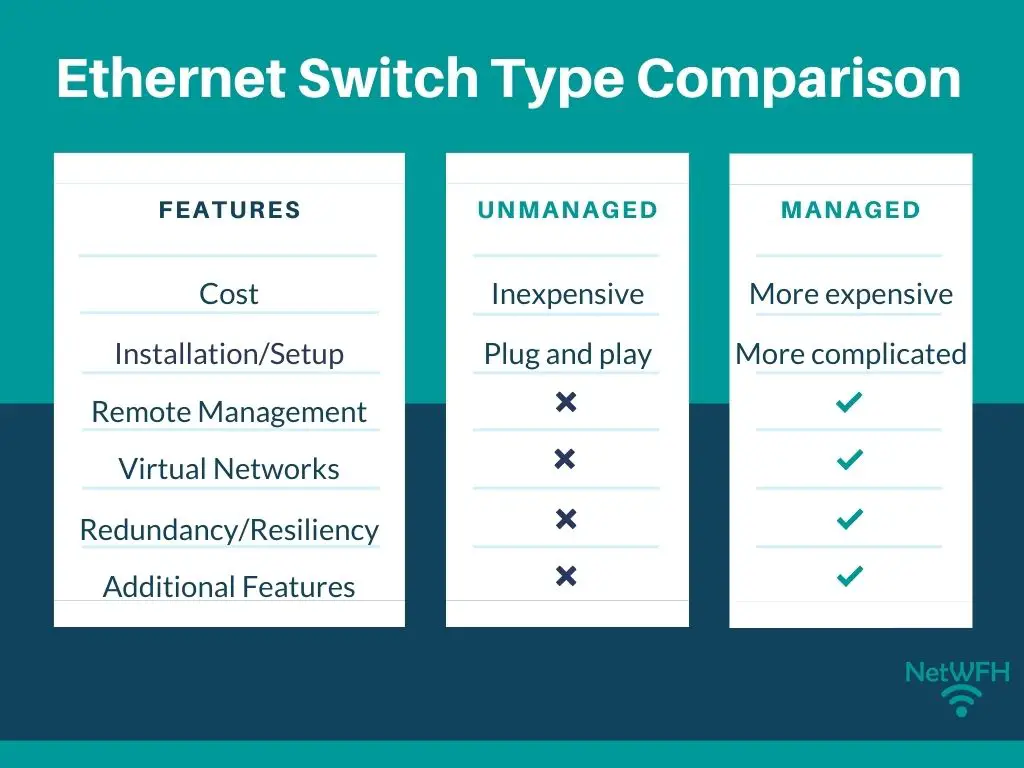
Managed vs. Unmanaged Switches
Switches are divided into two main types: managed and unmanaged. These categories indicate the basic functionality of the switch and their capabilities. Most of the switches you’ll come across in home networks are unmanaged switches. In larger office environments you’re more likely to find managed switches.
Let’s dive into both to see what their major differences are.
Unmanaged Switches
Unmanaged switches are used in many home networks because they:
Are inexpensive
Are easy to install
Don’t require any management/configuration
Are very reliable
These devices require no upfront configuration. Once you take it out of the box you just need to plug in the power cord and it’s ready to go. They are truly plug-and-play devices that even the most non-technical people can install.
Unmanaged switches provide the same experience to each port on the switch and are considered very reliable. With an unmanaged switch you can quickly expand the number of wired devices in your network with very little hassle.
All these factors are reasons why unmanaged switches are preferred in home networks. If you’re thinking about getting a switch for your network, you’ll probably want to go with an unmanaged switch.
Managed Switches
While unmanaged switches are very simple devices, managed switches can be the opposite.
Managed switches are used in many office environments because of how customizable they are. Managed switches:
Are expensive (when compared to unmanaged switches)
Offer robust capabilities like quality of service (QoS), virtual network creation, and others
Are remotely configurable
Allow for network monitoring
Are resilient to network downtime events
Managed switches are highly-technical devices that require a specific skillset to set up and install. In many companies, internal network engineers or third-party vendors will be responsible for the configuration and monitoring of these devices.
I know what you’re thinking: if they’re so difficult to install and maintain, why would you want to use managed network switches?
The reason for this is although they’re very complex, they allow you to do so much more than an unmanaged switch. When you have a lot of traffic on your network, managed switches allow you to optimize this traffic better than unmanaged switches can.
Let’s look at some of the features that managed switches provide.
Quality of Service (QoS)
Quality of Service refers to the ability to prioritize traffic on your network. If you own a company with limited bandwidth, you’ll probably have some network traffic that’s more important than the rest. This includes real-time communication traffic like:
Video conferencing (e.g. Zoom and Skype)
Voice over IP (VoIP)
Streaming video through a browser
With QoS, you can prioritize these activities on your network. Not only can you prioritize network traffic by application, but you can prioritize certain devices or traffic from specific users as well. QoS will ensure your video calls run smoothly at all times, while other activity like transferring files or internet browsing will have a lower priority if the network is congested.
This is a level of configuration that unmanaged switches don’t provide.
As a side note, most newer routers come with QoS capabilities. You won’t have to buy a managed switch to get this benefit on your home network.
Virtual Local Area Networks (VLANs)
If you have devices on your network that you want to isolate from each other, you can use a VLAN to accomplish this. Rather than separate these devices on different switches, managed switches allow you to isolate devices on the same switch. This is a much faster (and simpler) way to separate your network.
For example, if the human resources department has a system that contained the banking information of all its employees, you can use a VLAN to make sure the system isn’t accessible by any other departments other than the human resources department.
To provide this example visually, if the company used unmanaged switches their network would look like this:
However, using a managed switch the company’s network would look like this:
Hopefully you can see how a network with many segments would get very complicated if unmanaged switches were used.
VLANs are a great benefit to larger offices with many employees because they:
Are simpler than setting up physical LANs
Are easy to manage
Improve security of the network
Give more control over network traffic
In terms of your home network, you can create VLANs without having to buy a managed switch. As I mentioned earlier, most routers come with switch capabilities and allow you to create VLANs.
Remote Configuration
Another benefit of managed switches is the ability to configure them remotely.
You can make changes to managed switches remotely as long as you’re connected to the network the switch is on. In other words, you can change QoS or VLAN settings on the switch without having physical access to it.
Once again, this is very helpful for companies in large buildings with many floors and multiple server rooms. Rather than traveling to the switch to change its configuration, you can do it all from a distance. Better still, if you have a change you’d like to make to multiple switches, you can make changes to groups of switches at a time.
These benefits allow network engineers to respond to network issues very quickly.
Remote Monitoring
Managed switches provide a level of network monitoring that unmanaged switches do not.
With a managed switch, you can gain insights into:
The devices that are connected to the switch
What a top-level view of your network looks like
Statistics about the flow of traffic on your network
Root causes of network issues
Remote monitoring makes it easier for network engineers to manage large, complex networks.
Being able to see what the network looks like and the flow of traffic through it is a huge benefit when troubleshooting network issues. Network engineers can quickly drill down to the root cause of network bottlenecks with managed switches.
On top of that, they can resolve any issues they find from a remote location. This makes the lives of the network users and engineers much easier.
Having a view into the systems connected to the network is useful as well. It makes it much faster and easier to identify if someone is on the network that shouldn’t be. This improves the security of the network.
This level of insight can be overkill on home networks because they’re usually simple networks that don’t contain many wired devices.
Downtime Resilience
Managed switches provide network redundancy that’s not offered by unmanaged switches.
They use several protocol like rapid spanning tree protocol (RSTP) to prevent network downtime events from occurring. Essentially RSTP identifies an efficient path for network traffic to follow. If this path of network traffic is disrupted, it would normally halt traffic and result in network downtime. However, when these events occur RSTP can reroute traffic around the network to avoid the area that experienced the failure.
Pretty cool huh?
This is a big advantage in complex networks with multiple paths or connections between different devices.
Another advantage of RSTP is that it prevents looping. Looping is a situation that occurs if both ends of an ethernet cable are plugged into the same switch. In short, this causes the network to become flooded with traffic until the issue is corrected. Although this is prevented in managed switches, looping can happen on unmanaged switches. For your own sanity, please don’t plug two ends of an ethernet cable into the same switch.
Due to the fact that home networks are pretty simple, there are not usually multiple paths that network traffic can take. In this sense, a managed switch wouldn’t provide the same benefit for a home network as it would for a large, corporate one.
The ability to prevent looping is nice to have, but unless your head is screwed on the wrong way you shouldn’t be plugging both ends of an ethernet cable into an unmanaged switch. This is more likely to happen in large datacenters where there are many devices and wires all over the place. You shouldn’t buy a managed switch for your home network just to prevent looping.
Port Security
On managed switches, you have the ability to turn off individual ethernet ports. This is yet another security benefit of managed switches. By turning off any ports on the switch that aren’t in use, you know that unwanted people are not plugging devices into your network.
Corporate networks are usually so large that it would be difficult to detect a hacker who snuck into the building and plugged a malicious device into a port on one of the switches. By turning on ethernet ports only when they will be used, this can be prevented.
For example, let’s say I was using two ethernet ports on a switch.
Rather than leave the remaining three ports open, I could disable them. That would mean if anyone plugged an ethernet cable into ports 3, 4, or 5 of the above switch it wouldn’t work. I would first need to turn on the port before it could be used to connect to the network.
On home networks port security is usually not a concern, because not many people are interested in sneaking into your house to plug devices into your switch. In addition, you’ll most likely only have one or two switches on your network. It’s very easy to monitor a few switches by physically checking them once in a while.
When to Use a Network Switch
Now that you know all about managed and unmanaged ethernet switches, let’s discuss when you would want to use a switch in a home network.
First off, you’d consider doing this if you have devices that would benefit from a wired connection (e.g. gaming devices or computers). As a reminder, wired connections provide some advantages over WiFi when it comes to internet connections.
Let’s take a look at a few use cases.
Switch Use Case 1
Let’s say you live in a home with multiple floors. On the first floor is your living room where you have your router. Your living room is where most of your wireless devices are located. On the second floor you have an entertainment room with multiple devices you’d like to provide with a wired network connection.
Without a switch you’d have to connect multiple ethernet cables from the first floor to the second floor. However with a switch, you could wire one ethernet cable from the first floor and have it run to a switch on the second floor.
Your first floor would look like this:
And your second floor would look like this:
In this case, a switch makes a lot of sense. You can provide all your devices on the second floor with a wired connection. All you would have to do is wire one ethernet cable from the first floor.
Switch Use Case 2
For this next use case, let’s say you have a large one floor house. Your router is located in your living room. In the surrounding area, you have many devices that you want to give a wired connection. If your switch only has four ethernet ports available, what do you do?
You can wire three of the devices directly to your router, and you can use the fourth ethernet cable to connect to a switch. That switch then allows additional devices to have a wired connection.
This scenario would look something like this:
By using a switch to multiply the number of available ethernet connections, you can provide a wired connection to as many devices as you want.
What Type of Switch Do I Need for My Home Network?
In most cases, you should get an unmanaged switch for your home network. I imagine your reasons for getting a switch in the first place are so you can provide more devices with wired connections to your network. This is what unmanaged switches are designed to do.
As mentioned above, the added capabilities that managed switches support are likely overkill for what you need.
With that said, you can now find smaller, managed switches at a similar price to unmanaged switches (like this one). As a result, you should weigh the benefits that managed switches provide and decide if they would benefit your network. Keep in mind that many routers provide the ability to:
Set up VLANs
Configure quality of service (QoS)
Provide limited network monitoring
If you have any questions or are undecided about what type of switch to buy, feel free to reach out to me in the comments section or the Contact Me page.
What Should I Look for When Buying an Ethernet Switch?
Once you’ve decided that your home network would benefit from an ethernet switch, there are a few things you should consider.
The Number of Ports on the Switch
You’ll want to determine the number of devices you’ll want to have a wired connection.
Ethernet switches come with different numbers of ports. Common configurations include five, eight, ten, and sixteen ports.
It’s important to remember that one of the ports will be needed as the uplink port to connect to your router, or another switch if you have a large network. So essentially a five switch port will provide four devices with wired connections.
The most commonly used switches have five ports, but if you have a lot of devices that need wired connections you will want to buy a switch with more ports (like this eight port switch). Also keep the future in mind here. If you’re going to be adding devices in the future that require a wired connection, air on the side of caution and get a switch with some extra ports.
If You Want a Managed or Unmanaged Switch
You will want to have a good idea of the features you want your switch to provide. Some common questions you will want to ask yourself are:
Do you want your switch to offer port security?
Do you want to be able to remotely configure your switch?
How much visibility do you want into your network traffic?
Are there devices on your network (e.g. security cameras) that would benefit from network redundancy?
Your answers to these questions will help you decide if you want a managed switch or not. If you want to have more control over your switches, you should go with a managed switch. Keep in mind that these will be more difficult to configure than unmanaged switches.
If you’re a non-technical person who just wants to provide a few devices with network connectivity, you can’t go wrong with an unmanaged switch.
The Speed Supported by the Ethernet Ports on the Switch
Most new switches today will offer ethernet ports that support 10/100/1000 Megabits per second (Mbps). This means that the switch will support speeds up to 1000 Mbps. If this is the case, you don’t have to worry about your switch limiting the speed of your network.
On the slip side, if the switch has ethernet ports that support 10/100 Mbps the ethernet ports will only support speeds up to 100 Mbps. The trouble with this is that many people have internet plans that offer more than 100 Mbps. If this is the case you’ll want to make sure your switch supports 10/100/1000 ethernet ports.
In a case where you have a 600 Mbps internet plan and your switch only supports 100 Mbps, the devices connected to your switch will get a maximum of 100 Mbps. If you’re paying the extra money for a fast ethernet plan over 100 Mbps, do yourself a favor and make sure your switch supports speeds up to 1000 Mbps.
As a side note, just because your switch supports 1000 Mbps does not mean your network will function at 1000 Mbps. You’ll want your ethernet cables to support the internet plan you are paying for as well. Check out our previous post on ethernet cables to learn more: Can an Ethernet Cable Slow Your Internet Speed?
The Price of the Ethernet Switch
You’ll be able to find five port unmanaged or managed switches for around $25-$30. If you’re looking for an unmanaged switch, I would recommend this one. Here’s a good five port managed switch if that’s what you want. If you need more than five ports on your switch, expect to pay a little more.
With that being said, the price for some managed switches can be much higher (more than $1,000). These higher-priced switches are made for large, complex corporate networks. They’ll be overkill for your home network.
Wrap Up
There you have it.
You should now be able to make an educated decision regarding:
If a switch would help optimize your home network
What type of switch is the best fit for your home network (managed or unmanaged)
The network speed you want your switch to support
The number of ports you need on your switch
Approximately how much you should be spending for your ethernet switch
Are you using a switch in your home network? If so, I would love to hear about your experience or any questions your might have. Drop a comment below to share your story.
If you found this article interesting, here are some relevant posts you might enjoy:
Your router is a very important piece of your home internet connection. It’s a complex device that offers a great deal of configuration options.
Sometimes, making changes to your router can have negative affects on your home internet’s performance. Other times, you forget your router’s username and password and can’t even log in to change its settings.
The good news is there’s a safe way to restore your router to good health.
I’m taking about the factory reset option.
But how exactly is this accomplished?
A factory reset is performed on a router by manually pressing the reset button on the device. This can also be accomplished by accessing the router’s settings page with a device like a laptop or mobile phone and navigating to the advanced settings page.
In this post I’ll provide a detailed approach to performing a factory reset on your router, including when you should do it and the steps you should take immediately after a reset.
When Should I Factory Reset My Router?
There are several cases where a factory reset makes sense. Let’s take a look at each situation.
When You Can’t Log in to Your Router
Have you ever created a password for an account, only to forget it at a later date?
I’m sure we’ve all been there before.
This is probably the most common reason for performing a factory reboot on your router. If you can’t get into your router to change any of its settings, you’re only option is to restore it to its default settings.
By performing a factory reset on your router, your username and password will become the default values that they were when you first got the router. Unfortunately this also makes your router much less secure, but we’ll get into that later on.
As a note, before you factory reset your router, you should first try to log in to it with the router’s default username and password. Your default username and password can be found on a sticker on the device or in the router’s user manual. Most of the time, people never change their router’s password in the first place.
If the default username and password don’t work and you want to access your router, you should give it a factory reset.
When Your Router Is Performing Poorly
If your home internet starts acting funky, it may have something to do with your router.
Your router is an important piece of your home internet. If your internet connections slow to a crawl or you have trouble connecting to the internet on a regular basis, there may be a configuration setting holding it back.
In this case, there are a few things you can try before restoring your router to its default settings. The first step is to perform a reboot of your router (you can even set it to automatically reboot on a schedule if you have consistent issues). If that doesn’t solve your issues you may want to try rebooting your modem as well.
If both of those options don’t solve your problems, a factory reset might be the next thing to try. Its possible that starting over with your router might clear up whatever was slowing it down.
Keep in mind that there may be times when even a factory reset won’t help your situation. For example, if you have an old router its performance will slowly degrade over time and you will eventually have to replace it.
When You’re Not Sure What Setting Is Causing Poor Router Performance
As I previously mentioned, your router is highly customizable.
You can configure it as much or as little as you like. The problem with this is, if you make too many changes to your settings, it’s hard to keep track of them all.
If making changes to your router causes poor internet performance, how do you know what setting is causing it?
Unless you’re a highly technical person, it can be very hard to tell.
Sometimes it’s just easier to start with a clean slate.
A factory reset allows you to do just that.
To avoid making too many changes at once that may slow your internet performance, I recommend making a few settings changes to your router at a time. After making a few changes to your settings, test your internet’s performance. If it’s working properly, move on and make additional changes.
If you want to play it safe, you can even save your settings after you’ve confirmed that your internet is performing well with them. This will allow you to return your router to a working configuration at a later time if you’re experiencing problems.
What Happens if I Factory Reset My Router?
Before we dive into how to perform a factory reset on your router, let’s talk about what a factory reset does first.
A factory reset will cause drastic changes to your home network. It’s important to understand what these changes are so you’re not surprised when you perform a reset.
A Factory Reset Changes the Router Login Information
When you restore your router to its factory settings, your router’s login password will be restored to its default value. This is the password that’s used to access and change the routers settings.
As you’ll see later, you may have the option to reset your router’s settings while keeping the password you set for it, but depending upon your router you may not have this option.
A Factory Reset Changes WiFi Network Names and Passwords
Do you remember the first time you set up your router?
If you do, you probably remember how your WiFi network names were very generic. On top of that, the passwords for these networks were random and hard to remember.
After resetting your router to its factory settings, your wireless network names and passwords will revert back to what they were when you first set up your router.
Many people don’t think of this when they factory reset their router.
When you think about how many devices you have connected to your wireless network, you realize how much work you’ll have to do after a factory reset.
You’ll have to reconnect all your devices to your WiFi, unless you rename your wireless networks to exactly what they were before. You’ll also have to change the passwords for these networks to the same as they were before if you want your devices to automatically reconnect.
This is not an argument against performing a factory reset on your router. I just want you to be aware of the actions you’ll need to take after you perform the factory reset.
A Factory Reset Changes All Your Security and Configuration Settings to Their Default Values
This is what most people think of when they perform a factory reset.
All of your router’s settings will revert back to their original state, which is their default values.
There are tons of different settings changes you can make on your router, but some of the settings that will be reset include:
Security settings such as the type of encryption used
Any automatic reboot schedule that’s in place
The wireless channels the router uses, if you set it to use specific channels
Access restrictions or parental controls on the router
The list goes on and on. It’s important to take a minute and think about all the customization you’ve made on your router before you reset it. Make a list of the settings changes you’ll have to go in and change again after the factory reset is completed.
The more prepared you are for the factory reset, the easier it’ll be to get your internet up and running as you want it.
How to Reset Your Router to Factory Settings
There are two ways to reset your router to its factory settings. You can either manually perform a factory reset by pressing a button on your router, or you can reset your router through its settings console.
Performing a Factory Reset by Pressing the Factory Reset Button on the Device
Using the reset button on your router to perform a factory reset it is a fairly simple process.
You’ll first need to get an object with a point like a push pin or a paper clip that has been straightened out.
Next, you’ll want to locate the reset button on your router. It should be clearly labeled and located somewhere on the back of the router.
For example, here’s the back of my TP-Link Archer A7 router:
As you can see, the reset button is located in a little hole. This is to prevent the button from accidentally being pressed.
To factory reset your router, press and hold the reset button for 7 seconds, or until the power LED light on the front of the router blinks.
Once the router powers back on and connects to the internet, it will have its default settings in place.
Performing a Factory Reset by Accessing Your Router’s Settings Console
You can also reset your modem to its factory settings with your computer.
To do this, you’ll need to log in to your router to access its settings.
The first step is to enter your router’s IP address or default access location into your browser. If you’re unsure of your router’s IP address, look for a sticker on the device.
On my TP-Link Archer A7 router, the sticker is on the bottom of the router.
I also know that my router’s IP address is 192.168.0.1 (which is the case for a lot of routers), so I can just type that into my browser.
This will bring you to the login page of your router. Enter your username and password to gain access to your router’s settings.
If you don’t remember your router’s username and password, you’ll have to factory reset your router with the manual method above.
Once you’re logged in to your router, you’ll need to access the advanced settings page. This is where you’ll most likely find the factory reset option.
The advanced settings page will provide you with tons of options for customizing your router. As is the case with my router, the advanced settings are broken into categories.
For my router, I need to access the System Tools category to get to the factory reset option.
After clicking the System Tools category, a list of subcategories is displayed. From this list I can select Backup and Restore, which brings me to the settings page I want.
On the Backup and Restore subcategory page, I can access the option to perform a factory reset of my router.
As you can see, there are multiple options for resetting your router to its default settings.
Resetting Your Router’s Settings to Their Default Values and Keeping Your Login Information
Since you know the username and password of your router (you need this information to log in to your router’s settings in the first place), you may just want to return all your router’s settings to their default values and keep your login and cloud information.
Keeping your login information will be useful for you if you made a settings change that is causing poor internet performance, but you’re not sure what setting is causing it.
This will probably be the best choice for most people who want to perform a factory reset on their router.
Resetting All Configuration Settings to Default Values
Resetting all of your router’s settings to their default values will return your router to a completely new condition.
In other words, every setting on the router will be returned to what it was when you first got it.
This is a good option if you want to start over with a clean slate and create new login information for your router.
It’s also a smart choice if you want to sell your router or return it to the store. You’ll want to wipe it clean before you hand it over to someone else.
Next Steps After Performing a Factory Reset on Your Router
If you perform a factory reset where all your configuration settings are reset to their default values, there are a few next steps you should take.
Log in to Your Router
The first step is to log in to your router’s settings console. You’ll need to do this with your router’s default username and password. You can follow the steps detailed above to log in to your router.
See? Your router’s login information is more available than you might think.
What does this mean?
It means if a hacker was to get access to your home network, he or she would be able to log in to your router and make any changes to it that they want.
Yikes. That’s scary.
The good news is, changing your router’s password to something you know will go a long way toward making it more secure.
Change Your Wireless Network Names and Passwords
While you’re changing your other settings, you should change the names of your wireless networks as well.
If you don’t, every time you want to connect a new device to your home internet, you’ll have to look up what the names of your networks are.
It’s much easier to just change your networks to names that you’ll easily remember.
Along these same lines, you should change the passwords to these newly named networks as well.
Trust me. You’ll thank me later when your friends and family come over and want to use your WiFi.
Make Any Desired Security Settings Changes
The last (and definitely not the least) important changes you should make to your router after a factory reset are to make sure your security settings are in good shape.
Two of the most important are to disable WPS on your router, and to make sure you’re using the best encryption for your wireless connections (AES with WPA2).
These changes, along with changing the default password for your router, will zip up your router and home internet pretty tightly.
Of course, there are additional security measures you can take, but these are the heavy hitters that you can take care of easily while setting up your router after a factory reset.
Wrap Up
There you have it folks. That’s the most important information you should consider when you’re thinking about performing a factory reset on your router.
Make sure you understand exactly how a factory reset will impact your home network so you’re ready to get back up and running after your router turns back on.
As always, if you have any questions or want to share your experiences, please feel free to drop a comment below.
If you found this post interesting, here are some related posts I’ve written for your viewing pleasure:
Did you know that you can log in to your modem to change its password and reboot it? Did you also know that when you buy a modem it comes with a default username and password?
Many people never log in to their modem, much less change its password. This is a big mistake.
Changing your modem’s password makes it much more secure from hackers.
What happens if you can’t log in to your modem or forget the password you set for it? How can you reset your password?
If a password for a modem’s settings is forgotten, the password can be reset to the factory default value that came with the modem. Pressing and holding the Reset button on the back of the modem for seven seconds will return the modem to its default settings and restore its default username and password.
In this post I’ll give you all the information you need to reset your modem’s password.
Why Should You Reset Your Modem Password?
If you want to log in to your modem, you’ll need to know your username and password.
If you aren’t sure what your username and password are, the only way you’ll be able to log in to your modem is to reset it to its factory settings. Resetting your modem will reset its username and password to their default settings. These default credentials will give you access to the modem.
Once you can access your modem, you really shouldn’t need to reset your password again for any reason. That is, unless you forget your password again.
Before you run off and reset your modem to its factory settings, however, you should try logging in with your default username and password.
How Do I Find My Modem’s Default Password?
If you’ve never logged in to your modem before, you’ll be able to do so with the default username and password that come with the modem.
Where can you find this information?
There are a few different places to look.
Finding the Default Password on the Modem’s Sticker
A good place to start is by looking at the sticker on your modem. This sticker will provide a lot of useful information like:
The default username and password to log in to the modem
Your modem’s make and model
The IP address of your modem, which you can use to access the device’s management console
On my Netgear CM600 modem, the sticker is on the bottom of the device.
As you can see, the default username of my device is “admin” and the default password is “password”.
If for some reason the sticker on your device doesn’t have this information, all hope is not lost.
Finding the Default Password in the Modem’s User Manual
Another place where you can find the default username and password of your modem is in the user’s manual for the device.
Even if you don’t have the hard copy of your manual, you’ll probably be able to find a digital copy online. For example, the owner’s manual of my Netgear CM600 can be found on Netgear’s website.
Within the digital user manual, there’s a section that details how to change the device’s password.
In this section the default username and password are provided. As you can see, this is the same information that is displayed on my modem’s sticker.
Finding the Default Password in Online Forums
If for some reason you still can’t find the default username and password for your modem, there’s one final place you can check.
Many online forums list the default usernames and passwords for a lot of common modems and routers. For example, check out this list of usernames and passwords for Netgear routers.
The username and password for my CM600 modem is not on this list, but take a step back and look at what most of the default login credentials are. The vast majority of them have the same default username (“admin”) and password (“password”).
Based upon this information alone, it would make sense for me to try “admin” and “password” to log into my modem. In my case, this would be the correct information if I have never changed my modem’s password before.
Although this is convenient for those who are looking to log in to their modems, it’s also a serious security risk for the owners of these devices. We will get into this in more depth later.
How to Reset Your Modem’s Password
As mentioned above, resetting your modem’s password is done by resetting your modem to its factory settings.
The first step in doing this is to locate the reset button on your modem. In many cases it will be located on the back of your modem. It should also be clearly marked.
You’ll notice that the reset button is a small hole in the modem. It’s designed this way so that you don’t accidentally press it when you don’t mean to.
In order to press the reset button on your modem you’ll need something with a point, like a paper clip.
Once you have a paperclip in hand, complete the following steps:
Unfold the paperclip so that part of it is straight.
Put the tip of the paperclip into the reset button hole in your modem until the button clicks.
Hold the reset button down for 7 seconds.
Release the reset button.
Upon releasing the reset button, your modem will reboot. Wait a few minutes for it to complete its initial setup.
Once the modem has completed its initial setup, it will have all the initial settings it came with.
This means the username and password will be their default settings as well.
How to Change Your Modem’s Password From the Default Setting
Now that you’ve set your modem username and password to their default settings, you’ll want to make sure you change your password.
I know what you’re thinking. Why do I need to change my password? I just changed it by resetting it.
The reason for this is that the default password of your modem isn’t a secret. If you can remember, we previously described how there are forums online that list the default passwords of commonly used modems and routers.
If your modem has a default password, it makes it very easy for hackers to log in to it. All they have to do is find a way to connect to your home network and the rest is easy from there.
There’s no limit to what hackers can do to your network and devices if they get access to your modem, so it’s best to make it as secure as possible.
Try to think of a long passphrase that you won’t forget, or use a password manager to generate a password for you. This simple step of changing your password away from the default password goes a long way toward securing your home network.
How Can I Change My Modem’s Password Without Resetting It to the Factory Default Setting?
Now that you can log in to your modem with its default username and password, you can change your password pretty easily.
The first thing you have to do is log into the modem’s management page.
To do this, identify what the IP address of your modem is. As mentioned before, this can be found on the sticker of your modem.
Now type the modem’s IP address into an internet browser search bar, like Google Chrome. For my modem I have to enter http://192.168.100.1.
Next, you will be prompted to enter your modem’s username and password to log in. Now that you have reset your modem, this will be the default username and password for the device.
Once you are signed into your modem, you’ll be able to access the password settings. In order to change my password, I need to go to the Advanced tab.
Within the Advanced tab, I can select the Administration header. The Administration header dropdown will then let me select Set Password.
On the Set Password screen, you can change your password to whatever you want. Enter the strong password you want to change it to and select Apply.
Congratulations, you’ve made your modem (and home network) more secure.
Do I Need to Regularly Change My Modem Password?
If you choose a strong password to protect your modem, you shouldn’t have to change it very often.
The longer your password is, the harder it is to crack. For example, if your password is 16 characters or longer, you shouldn’t worry too much about changing it.
If you want to be extra safe, I would recommend changing your password on a yearly basis if you’re using strong passwords.
The fact of the matter is, as long as it’s not the default password you should be in good shape. Most hackers will reach for the low hanging fruit, in this case the people that don’t change their default password.
Wrap Up
The reset button on your modem is a very useful tool if you ever forget its password. The downside is that whenever you factory reset your modem, all other changes you’ve made to it will be erased.
After a factory reset, make sure you go through each modem setting so that it’s set up properly for your home network.
If you run into any problems or have any questions about the information provided in this post, drop a comment below.
If you found this post useful, check out some related content that I’ve published:
If you’ve spent any amount of time on the internet, you’ve probably heard of the “dark web”.
But did you know that the dark web is accessed using something called the Tor browser? Did you also know that Tor is readily downloadable and free to use by anyone?
I know what you might be thinking.
Believe it or not, Tor is not just for hackers and criminals. It provides benefits to regular, law-abiding citizens as well.
So what is the Tor network and how does it work, exactly?
The Tor network allows you to use the internet anonymously without having to worry about your activity being tracked. This is achieved by encrypting your traffic and bouncing it around three nodes on the Tor network before sending your internet request to the website you want to access. This in effect hides the IP address of your device. Without the true IP address of the source device that sent the internet request, websites (and other watchful eyes) will not be able to determine the origin of your request.
This complete guide will take an in-depth look at how Tor works, as well as the benefits (and shortcomings) of using the browser. The information provided will allow you to decide if you want to consider Tor when using the internet.
Let’s get into it.
What does Tor stand for?
Tor stands for The Onion Router. It’s an internet browser just like the one you’re using now.
It allows you to search the internet and access websites just like your Google Chrome or Mozilla Firefox browsers do. But there’s more.
Tor isn’t your ordinary browser.
What is Tor used for?
Anonymous internet browser
When using Tor, your online activity is anonymous.
This means you can’t be tracked by your internet service provider (ISP), Google, or any other third parties that keep a record of your online activity.
This is a problem that many people don’t even realize the extent of. Google and other third-party companies are taking note of every search you perform and website you visit online. They sell this information about you to marketing companies. The marketing companies then serve you targeted ads in an effort to get you to buy the products of their clients, whether you really need them or not.
To put it simply, Tor provides the privacy that many internet users want, but very few have.
Portal to the dark web
As mentioned at the beginning of this article, Tor also provides you with access to the dark web.
What exactly is the dark web?
The dark web consists of all the websites that can only be accessed by Tor. These websites are not indexed by the other popular web browsers like Google Chrome or Mozilla Firefox. This basically means that there are sites on Tor that are “invisible” to the rest of the internet. That’s why it’s called the dark web.
Tor gives you the keys to the dark web, but you must enter at your own risk. We will explain this in further detail later on.
How does Tor work?
Tor allows you to browse the internet anonymously, but how does it do this?
The answer here involves hiding your actual IP address from the rest of the internet.
For those of you not familiar, an IP address is basically an identifier that is assigned to all devices that are connected to the internet. That’s how websites are able to send your browser the websites you want to see. They answer your internet requests by listing your IP address as the destination of their responses.
Normally when you go to a website on your internet browser, your ISP, Google, other third parties, and the websites you visit are all able to see that your internet requests are coming from your IP address. If you mask your true IP address when you submit your internet requests, they won’t be able to determine that the internet activity came from you. Thus, you have achieved internet anonymity.
Easy enough right?
Let’s dive into the components involved with Tor.
Tor nodes
The Tor network is made up of many servers and computers that are used to make requests on behalf of the user (you). These systems are called nodes or relays, and without them Tor wouldn’t be able to function.
In fact, any Tor user can set up their device as a Tor relay if they so desire. The more relays that make up the Tor network, the faster and more efficient the experience will be for those who use it.
Tor node hosting considerations
If you’re thinking about hosting a Tor node, it’s important to know that all nodes in the Tor network are visible in a public directory. In other words, if someone knows your IP address, they’d be able to tell if you’re running a Tor node.
If you’re the host of a Tor relay, the government may be suspicious of you because of the illegal activities that occur using Tor. This may attract unwanted attention from the government if they know you’re an active contributor to Tor. That said, if you’re not doing anything illegal this is nothing to worry about.
Another important consideration is if you run a relay on Tor, you may become a target of hackers. If a Tor node becomes compromised by a hacker, the hacker will be able to see the IP addresses that are using the node. If multiple nodes become compromised by the same hacker, they may be able to piece enough information together to identify a Tor user.
This has happened in the past where criminal users on Tor have been identified (detailed later).
Tor proxies
When a request is made in Tor, it goes through three Tor proxies before reaching the intended website. The purpose of the three proxies is to hide your IP address from the website you’re visiting. The connections between the proxies is also encrypted to prevent others from listening in on your requests.
Each proxy adds another layer of encryption on top of the previous proxy, like layers of an onion (hence the name The Onion Router). When a request is sent to a website, a layer of encryption is peeled off at each proxy until it gets to the site. This ensures that the Tor traffic is all encrypted from the user to the exit node.
The three proxies used in a Tor request are:
Guard node
The guard node (or entry node) is the first proxy that your Tor requests will go to.
When you log into the Tor browser for the first time, a small random set of guard nodes is assigned to your device. These nodes have been identified as extremely secure and unlikely to be compromised. If the guard node isn’t compromised, you can be confident that you won’t be identified when using Tor.
Each time the Tor browser is used, the guard node is assigned from the small set that was randomly assigned to your device.
Middle node
The middle node is the second proxy that your request will go to.
Once a guard node is chosen for a connection (also known as a circuit), the middle node is randomly chosen from the list of public tor nodes.
Exit node
The exit node is the last proxy your request will go through. It communicates directly with the destination website that was entered into the Tor search bar.
Much like the middle node, the exit node is randomly assigned from the list of public Tor nodes.
Node assignment
One item of note is that the exit node for one Tor user could be the middle node for another user. Every user will use different nodes for each of the three proxies. This unpredictability adds another layer of security to the Tor network. The more nodes in the Tor network, the more difficult and confusing it is to determine the real IP address of a Tor user.
Tor process
Now that you understand the Tor network and the proxies it uses, let’s go through the process of sending an internet request through Tor.
Request
The process begins when you’ve opened the Tor browser and enter a website you want to navigate to. In this case let’s use the Tor version of Facebook (with a .onion domain).
At this point, the public directory of all Tor nodes is accessed and a node is chosen at random to serve as the first Tor proxy, or the guard node. The connection between the user’s device and guard node includes three layers of encryption to ensure confidentiality of the request. There’s one layer of encryption for each of the three Tor proxies that will be used. Each of the three layers of encryption is peeled off at each Tor proxy in the process.
From the guard node, the request is sent to a second proxy. The second proxy is the middle node. Much like the guard node, the middle node is also selected at random from the Tor node directory.
Once the middle node receives the request, a second layer of encryption is removed. At this point only one layer of encryption exists on the traffic. At this time, an encrypted connection to the last proxy is established. This is the exit node.
Once again, another layer of encryption is removed, but this time between the middle node and exit node.
From the exit node, the request is sent to the website that the user searched for.
Due to the fact that the requested website is not part of the Tor network, there is no encryption built into the final leg of the process. However, if the website that was entered into the search bar uses https (as most do) or has a .onion domain name, the connection between the exit node and website will be encrypted as well.
The entire request process using Tor looks like this:
Response
When the website receives a request for its webpage, it treats it like any other internet request. The website will see that the request came from the Tor exit node, as that is the IP address that requested the website. It will reply to the Tor exit node with the webpage that was requested.
At this point the Tor exit node receives the webpage from the website. In reverse fashion, the exit node adds a layer of encryption to the connection between the exit node and middle node. Over this encrypted connection, it sends the requested webpage to the middle node.
The middle node receives the webpage from the exit node. It follows suit and adds a second layer of encryption between it and the guard node. The requested webpage is then sent to the guard node over the encrypted connection.
The last leg of the response is between the user’s device and the guard node. The guard node will receive the requested webpage from the middle node and add the final layer of encryption to it. After adding the final layer of encryption, the webpage is sent to the Tor user’s device.
The Tor user’s device receives the requested webpage from the guard node. It then strips the three layers of Tor encryption from the message so the webpage can be viewed in the browser. This completes the process of a request using the Tor browser.
The complete response process looks like this:
Could I still be identified on Tor?
Using Tor to browse the internet anonymously isn’t foolproof.
There have been cases where Tor users have been identified and arrested for illegal activity.
How does something like this happen? Let’s take a closer look.
Compromised Tor nodes
As mentioned earlier, if all three of the Tor nodes that your connection uses are compromised, you can be identified.
Granted, this is extremely difficult because there are many Tor nodes that make up the network.
Tor also takes extra precaution when assigning the guard node. If a node doesn’t meet the strict security requirements established by Tor, it can’t be used as a guard node. On top of this, the middle and exit nodes are selected at random when you start a Tor session.
Despite all these precautions, Tor users have been identified in the past.
There are even suspicions that the federal government hosts nodes on Tor. If you host a Tor node, you can see all the traffic coming into and out of that host. This can provide valuable hints when trying to piece together a Tor user’s identify.
To be clear, if you’re acting lawfully while using Tor you have nothing to worry about. Just know that you may not be as anonymous as you think if you’re doing things you shouldn’t be doing.
Signing into accounts
Just because you’re using Tor doesn’t mean you’re invincible.
This may seem obvious, but logging into your social media or Gmail accounts while using Tor will give away your identity.
If you want to stay anonymous, don’t do this. If you’re going to be logging into one of your personal accounts, you might as well use a regular browser.
Using JavaScript
Another way you can be identified when using Tor is if you have JavaScript enabled. JavaScript can be used to initiate a direct connection to a Tor user, giving away their IP address. Once your IP address is uncovered, you’re no longer anonymous.
So you just need to disable JavaScript in Tor and you’re all set?
Unfortunately there’s a catch here.
Many websites require JavaScript and Flash Player to work properly. If you were to disable these applications, many of the sites you want to go to won’t work as they should.
Once again, if you have nothing to hide you may want to use Tor with JavaScript enabled. Chances are, you’ll only be identified on Tor through JavaScript if the authorities are suspicious of you. On top of that, you’ll have a much better experience using Tor with JavaScript enabled.
Websites that use http
If you access a website that uses http, your activity on Tor could be tracked. This is because the last connection between the exit node and web server is not encrypted unless the website being accessed uses https or is on the .onion domain.
What’s so risky about this?
For one, you don’t know who is controlling that exit node. The host of the exit node can monitor or even alter your traffic if he or she wants to.
For example, if the federal government is hosting the exit node, when you send your internet request through Tor they can send you a website with viruses on it. If you download the virus it may identify your true IP address and expose you.
This may sound far-fetched but it has happened before. You need to be aware of this if you’re going to use Tor.
Tor pros and cons
Now that you have an idea of how Tor functions, let’s spell out the benefits of Tor, as well as its downsides.
What is Tor good for?
Free to use
One major benefit about Tor is that it’s free to download. If you’re curious about it, you can download it and try it out to see if you like it. Other alternatives (like Virtual Private Networks) cost money, so this could be a nice cost-free alternative for you.
Privacy on the internet
With Tor you can feel good about using the internet privately. If you’re using it correctly and not doing any illegal, you can be comfortable that your activity is most likely anonymous (see downsides section).
Access to censored sites and content
Tor masks your true location by hiding your IP address. This allows you to sidestep any restrictions that your government or organization might put on certain websites and content. In this sense, Tor provides you with more freedom on the internet.
Who can argue with that?
Dark web access
By using Tor, you’ll have access to sites and resources that other browsers don’t provide. On the dark web, you’ll be able to speak freely and make unregulated transactions with other users.
Of course, not all these transactions are legal, so you need to be careful about how you’re using Tor.
Downsides to Tor
Poor browsing experience
Browsing on Tor is much slower than using a regular browser due to the fact that each request bounces to three Tor nodes before reaching its destination. This will take longer than accessing the site directly like on a normal browser. Tor may take some getting used to and may result in some frustration when you’re starting out.
If you want to ensure anonymity when using Tor, you have to make some sacrifices. As mentioned earlier, you’ll have to disable JavaScript, which will negatively impact your experience. Many websites won’t even work without JavaScript. This is something you have to live with if you’re committed to using Tor.
Not all sites accessible
Another factor to consider is that not all websites work with Tor browser. This is something to consider if some of your favorite sites won’t work with it.
Anonymity not guaranteed
Just because Tor advertises that it provides anonymity on the internet doesn’t mean it’s foolproof. As mentioned earlier in this article, there are still ways to identify Tor users. You need to be aware of this if you’re planning to perform illegal activities on Tor.
Potential unwanted attention from authorities
Tor can have a negative reputation because it provides access to the dark web. Many people assume that Tor users access the dark web for illegal purposes as a result. Unfortunately the same is true for law enforcement. It’s impossible to say for certain, but they may pay closer attention to you if you decide to use Tor.
This isn’t meant to scare you away from using it. As mentioned several times in this article, if you aren’t doing anything illegal you have nothing to worry about.
Should I use Tor?
Tor is a great, free way to maintain your privacy on the internet. With that being said, if you decide to use Tor you’ll most likely have to make some sacrifices. It boils down to the question of how much your privacy is worth to you.
If you’re looking to remain anonymous on the internet and are willing to pay a few dollars for it, a Virtual Private Network (VPN) might be a better option for you.
VPNs are faster than Tor, and you can access all the websites that your normal browser can access. You can’t access the dark web with a VPN, but all normal internet functionality will be available to you.
You can also use Tor while connected to a VPN if you still wanted to access the dark web and remain anonymous.
VPNs hide your IP address, but they do it a little differently than Tor does. Many people are willing to pay a few dollars for anonymity and full access to the regular internet.
If you want to try Tor, you can download it from the Tor Project website. Make sure you download Tor only from this site, as other sites might include malicious software with the download.
Wrap up
Now you should have a good idea of what the Tor network is and how it works.
If you would like to learn more about other products and services that provide privacy when using the internet, check out the following posts: